How to Use a Rowing Machine at Gym
Learning how to use a rowing machine at gym is one of the best decisions you can make for your fitness journey. This guide walks you through proper setup, the correct rowing stroke, common mistakes, and a sample workout plan. Whether you are a total beginner or returning to the gym, you will find practical tips to get the most from every rowing session.
Walking into a gym and seeing a rowing machine can feel intimidating. The seat slides back and forth, the handles pull toward you, and the monitor shows numbers you do not quite understand yet. But here is the good news. Learning how to use a rowing machine at gym is easier than most people think. In just a few minutes, you can master the basics and start getting an incredible full-body workout. This guide breaks everything down into simple, actionable steps. You will learn proper setup, the correct rowing stroke, common mistakes, and a workout plan you can follow right away.
Rowing machines are some of the most underrated pieces of gym fitness equipment. Unlike treadmills or bikes that mostly target your lower body, a rower works your entire body. It builds muscle, improves cardiovascular health, and burns a ton of calories. Yet many gym-goers skip the rower because they do not know where to start. That ends today. By the time you finish reading this article, you will feel confident enough to hop on a rowing machine and crush your workout.
Key Takeaways
- Proper form matters: Using the correct rowing technique prevents injury and maximizes results.
- Setup is simple: Adjusting foot straps, damper settings, and monitor takes only a few minutes.
- Full-body benefits: Rowing engages legs, core, arms, and back in one smooth movement.
- Avoid common errors: Overloading the arms and rounding the back are the most frequent mistakes.
- Follow a plan: A structured workout routine helps beginners and advanced users alike.
- Consistency wins: Regular rowing sessions at the gym build endurance, strength, and burn calories fast.
📑 Table of Contents
Why Rowing Machines Are Great at the Gym
Before diving into technique, it helps to understand why the rowing machine deserves a regular spot in your routine. Rowing is a low-impact cardio exercise that puts very little stress on your joints. This makes it perfect for people of all fitness levels. Whether you are recovering from an injury or just starting out, the rower welcomes you.
Here are some of the top rowing machine benefits:
- Full-body engagement: A single rowing stroke works your legs, core, back, shoulders, and arms all at once.
- High calorie burn: Rowing torchs calories faster than many traditional cardio machines.
- Heart health: Regular indoor rowing strengthens your heart and improves circulation.
- Muscle building: The resistance from the flywheel helps tone and build lean muscle.
- Mental health boost: The rhythmic motion of rowing can reduce stress and improve focus.
Another big advantage is versatility. You can adjust the rowing resistance levels to make your workout easier or harder. This means the same machine works for a complete beginner and an experienced athlete. If you want to learn more about rowing at the gym specifically, check out this guide on how to use a rowing machine at the gym for additional gym-specific tips.
How to Set Up the Rowing Machine Properly
Before you start rowing, you need to set the machine up correctly. A proper setup makes a huge difference in comfort and performance. Most gyms have standard Concept2 or similar models. The setup process is quick and straightforward.
Step 1: Adjust the Foot Straps
Sit on the seat and slide forward. Place your feet into the foot plates. The strap should go across the ball of your foot, right over the toe area. Pull the strap tight enough so your foot does not slide around, but not so tight that it cuts off circulation. When you push off with your legs, your feet should stay secure in the plates.
Step 2: Set the Damper Level
The damper is the little lever on the side of the flywheel. It controls how much air flows into the rower. Think of it like the gears on a bicycle. A lower setting (1 to 3) feels lighter and faster. A higher setting (5 to 10) feels heavier and slower. For most people, a damper setting of 4 to 6 works best. This gives you a smooth, manageable resistance without burning out too fast.
Step 3: Check the Monitor
The monitor displays your stroke rate, distance, time, and calories burned. Most gym rowers come pre-set with a few workout programs. If you are new, start with the manual or interval mode. You can always explore fancier programs once you are comfortable with the basics. For a detailed walkthrough of the entire process, you can also read this rowing machine step by step guide.
Step 4: Sit in the Correct Starting Position
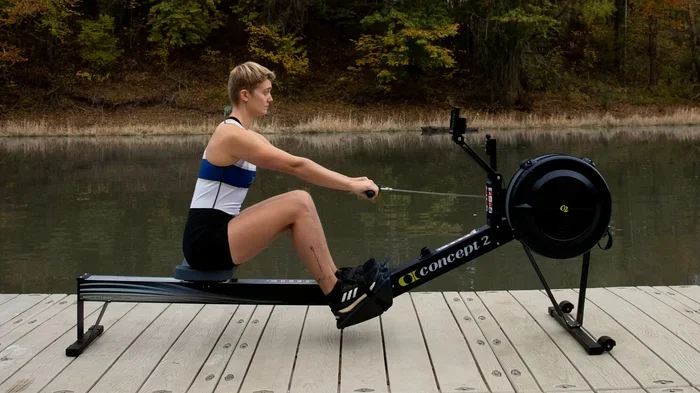
Sit on the seat with your knees bent and feet strapped in. Grab the handle with both hands. Your arms should be extended straight out, shoulders relaxed, and your back straight. This is your starting position. From here, you will push with your legs and pull with your arms. Keep your core engaged throughout the entire movement.
Quick tip: Before every session, do a few gentle stretches. Focus on your hamstrings, calves, and upper back. This prepares your body for the rowing exercise and reduces the chance of strain.
Mastering the Rowing Stroke Technique
The rowing stroke has four distinct phases. Learning to move smoothly through each phase is the key to an effective and safe workout. Many beginners make the mistake of rushing through the stroke. Take your time. Quality always beats speed.
The Catch
The catch is the starting position. Your knees are bent, shins are vertical, and your arms are extended forward. Your shoulders are relaxed and leaning slightly forward over your knees. This is where the power begins. Think of it as loading a spring. Your body is coiled and ready to push.
The Drive
The drive is where the power happens. It follows a specific sequence:
- Push with your legs first. Extend your legs fully while keeping your arms relaxed and extended.
- Open your hips as your legs reach full extension. Your torso leans back slightly from the hips.
- Pull the handle toward your lower chest with your arms. The handle should land just below your ribcage.
Remember the sequence: legs, hips, arms. This order is crucial. If you pull with your arms too early, you waste power and put unnecessary strain on your shoulders.
The Recovery
The recovery is the return phase. It should be slow and controlled. The sequence reverses:
- Extend your arms forward first.
- Lean your torso forward from the hips.
- Bend your knees and slide the seat forward.
The recovery is where you rest and prepare for the next stroke. Do not rush it. A smooth recovery sets up a powerful drive. If you want to learn more about proper technique from scratch, this guide on how to properly use a rowing machine for beginners covers the fundamentals in detail.
The Finish
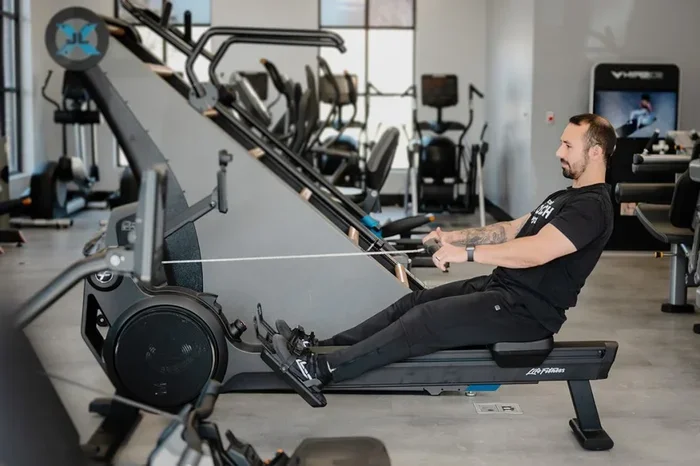
The finish is the end of the drive phase. Your legs are fully extended, the handle is pulled into your lower chest, and your torso is leaning back slightly. Your shoulders are relaxed and down, not hunched up. From here, you transition smoothly into the recovery phase.
Quick tip: Film yourself rowing from the side. This helps you see if your form matches the correct sequence. Most people do not realize they are rushing the recovery or pulling with their back instead of their legs until they see the video.
Common Mistakes to Avoid
Even experienced gym-goers make mistakes on the rowing machine. Knowing what to avoid saves you from injury and helps you get better results faster.
Mistake 1: Using Only Your Arms
This is the most common error. The rowing stroke is about 60 percent legs, 20 percent core, and 20 percent arms. If you pull with just your arms, you will tire out quickly and miss the real power of the exercise. Focus on driving through your legs first.
Mistake 2: Rounding Your Back
Rounding your back during the drive puts dangerous pressure on your spine. Keep your back straight and core engaged throughout the stroke. If you feel any lower back pain, stop and check your form. You may be leaning too far back or hunching forward during the recovery.
Mistake 3: Sliding Too Fast
Many beginners shoot the seat forward during the recovery. This throws off your rhythm and wastes energy. The recovery should be about twice as long as the drive. Slow and steady wins the race here.
Mistake 4: Setting the Damper Too High
A damper setting of 10 does not mean you are getting a harder workout. It just means the flywheel is heavier and harder to spin. Most people should stay between 3 and 6. Higher settings lead to poor form and early fatigue.
Mistake 5: Ignoring the Monitor
The monitor is your best friend. Pay attention to your stroke rate (strokes per minute) and split time. A good target for beginners is 20 to 26 strokes per minute. As you get fitter, you can increase this. Tracking your numbers helps you see real progress over time.
Sample Rowing Machine Workout Plan
Now that you know the setup and technique, it is time to put it all together. Here is a simple rowing machine workout plan you can try on your next gym visit.
Beginner Workout (20 Minutes)
- Warm-up (3 minutes): Row at a comfortable pace with low resistance. Focus on smooth strokes and proper form.
- Steady State (10 minutes): Row at a moderate pace. Aim for 22 to 24 strokes per minute. Keep your split time consistent.
- Intervals (5 minutes): Row hard for 30 seconds, then rest for 30 seconds. Repeat for 5 rounds.
- Cool-down (2 minutes): Row slowly and focus on deep breathing.
Intermediate Workout (30 Minutes)
- Warm-up (5 minutes): Easy rowing with light resistance.
- Pyramid Intervals (15 minutes): Row 1 minute hard, 1 minute easy. Then 2 minutes hard, 2 minutes easy. Then 3 minutes hard, 3 minutes easy. Work back down the pyramid.
- Endurance Row (8 minutes): Row at a steady, challenging pace. Maintain 24 to 26 strokes per minute.
- Cool-down (2 minutes): Slow rowing with stretching.
Advanced Workout (35 Minutes)
- Warm-up (5 minutes): Moderate rowing with dynamic stretches.
- Sprint Intervals (15 minutes): Row all-out for 250 meters, rest for 1 minute. Repeat for 10 rounds.
- Power Endurance (10 minutes): Row at a high stroke rate (28 to 32 spm) with moderate resistance.
- Cool-down (5 minutes): Easy rowing followed by full-body stretching.
For more ideas on building muscle with rowing, check out this rowing machine muscle building guide. It complements this article perfectly and gives you advanced strategies for using the rower.
Tips for Getting the Most Out of Your Gym Rowing Sessions
Once you have the basics down, these tips will help you level up your gym rowing sessions and see better results faster.
Stay consistent. Aim for 3 to 4 rowing sessions per week. Consistency beats intensity every time. Even 20-minute sessions add up to big results over weeks and months.
Focus on your breathing. Exhale during the drive and inhale during the recovery. Proper breathing fuels your muscles and keeps your rhythm steady. Many beginners hold their breath without realizing it.
Mix it up. Do not do the same workout every time. Alternate between steady-state rows, intervals, and sprints. Variety keeps your body challenged and your mind engaged.
Track your progress. Use the monitor to record your distance, time, and calories. Write them down or use a fitness app. Seeing your numbers improve is incredibly motivating.
Don’t forget to cool down. After every session, spend 3 to 5 minutes rowing slowly. Then stretch your legs, back, and shoulders. This reduces soreness and helps your body recover faster.
Ask for help. Gym staff and experienced rowers are usually happy to give tips. Do not be shy about asking someone to check your form. A quick adjustment can transform your workout.
For more information on how long you should row to see results, check out this article on how long on a rowing machine to lose weight. It covers timing and frequency in great detail.
Conclusion
Learning how to use a rowing machine at gym is a skill that pays off for years. You now know how to set up the machine, execute the rowing stroke correctly, avoid common mistakes, and follow a structured workout plan. The rowing machine is one of the most effective pieces of gym equipment you will find. It works your entire body, burns serious calories, and builds both strength and endurance.
Start with the beginner workout and build from there. Focus on form over speed. Be patient with yourself. Every expert was once a beginner who showed up and kept going. The rower is waiting for you. Hop on, follow these steps, and enjoy the ride. Your body will thank you.
Frequently Asked Questions
Is rowing good for weight loss?
Yes, rowing is excellent for weight loss. It burns a high number of calories in a short amount of time. A 30-minute session can burn 200 to 400 calories depending on your intensity and body weight. Combined with a healthy diet, regular rowing sessions can help you shed fat effectively.
How long should a beginner row at the gym?
Beginners should start with 15 to 20 minutes per session. Focus on learning proper form rather than going for distance or speed. As your fitness improves, gradually increase your time to 30 minutes or more. Consistency matters more than duration in the early stages.
Can I use the rowing machine every day?
You can use the rowing machine daily if you keep the intensity moderate. However, rest days are important for muscle recovery. Most people benefit from 3 to 5 sessions per week with at least one rest day between intense workouts. Listen to your body and adjust accordingly.
What muscles does a rowing machine work?
A rowing machine works almost every major muscle group. The legs (quads, hamstrings, calves) do the most work during the drive. The core stabilizes your body throughout the stroke. The back, shoulders, and arms pull the handle toward you. It is truly a full-body exercise.
Should I use a high or low damper setting?
Most people should use a damper setting between 3 and 6. Higher settings do not mean a better workout. They just make the rower harder to pull, which can lead to poor form. A moderate setting gives you a smooth, effective workout that builds endurance without burning you out too quickly.
How do I know if I am rowing with the correct form?
You are rowing with correct form when the movement feels smooth and sequential. Your legs push first, then your hips open, and finally your arms pull. If you feel pain in your lower back or shoulders, your form likely needs adjustment. Film yourself from the side or ask a gym trainer for feedback.