Ready to row like a pro? This guide walks you through every detail of using a rowing machine, from set‑up and posture to interval workouts and safety tips. Follow the step‑by‑step instructions and start seeing results fast.
Key Takeaways
- Proper setup matters: Adjust the foot straps, seat, and damper before you even start rowing.
- Master the four‑phase stroke: Catch, drive, finish, and recovery are the building blocks of an efficient row.
- Start with a warm‑up: A 5‑minute light row prepares muscles and reduces injury risk.
- Use interval training: Mixing high‑intensity bursts with recovery periods maximizes calorie burn.
- Track progress: Monitor distance, stroke rate, and split time to measure improvement.
- Stay safe: Keep your core engaged, avoid over‑reaching, and listen to your body.
- Consistency wins: Row 3‑4 times a week and watch strength, endurance, and posture improve.
📑 Table of Contents
- Introduction: Why Rowing Is a Game‑Changer
- 1. Setting Up Your Rowing Machine
- 2. Understanding the Rowing Stroke
- 3. Step‑By‑Step Guide to Your First Row
- 4. Designing Effective Rowing Workouts
- 5. Common Mistakes and How to Fix Them
- 6. Safety Tips and Maintenance
- Conclusion: Row Your Way to Better Fitness
Introduction: Why Rowing Is a Game‑Changer
Imagine a single piece of equipment that gives you a full‑body cardio workout, builds muscular endurance, and is easy on the joints. That’s the rowing machine, also called an indoor rower. Whether you’re a beginner looking for a low‑impact cardio option or an athlete wanting to fine‑tune performance, rowing offers a unique blend of strength and stamina.
But like any tool, a rowing machine only works for you if you know how to use it correctly. Bad form can turn a great workout into a sore‑muscle nightmare. That’s why we’ve created this step‑by‑step guide. We’ll cover everything from setting up the machine to designing a weekly routine, all in a friendly, conversational tone. Let’s dive in and make your rowing sessions efficient, safe, and fun.
1. Setting Up Your Rowing Machine
1.1 Choose the Right Spot
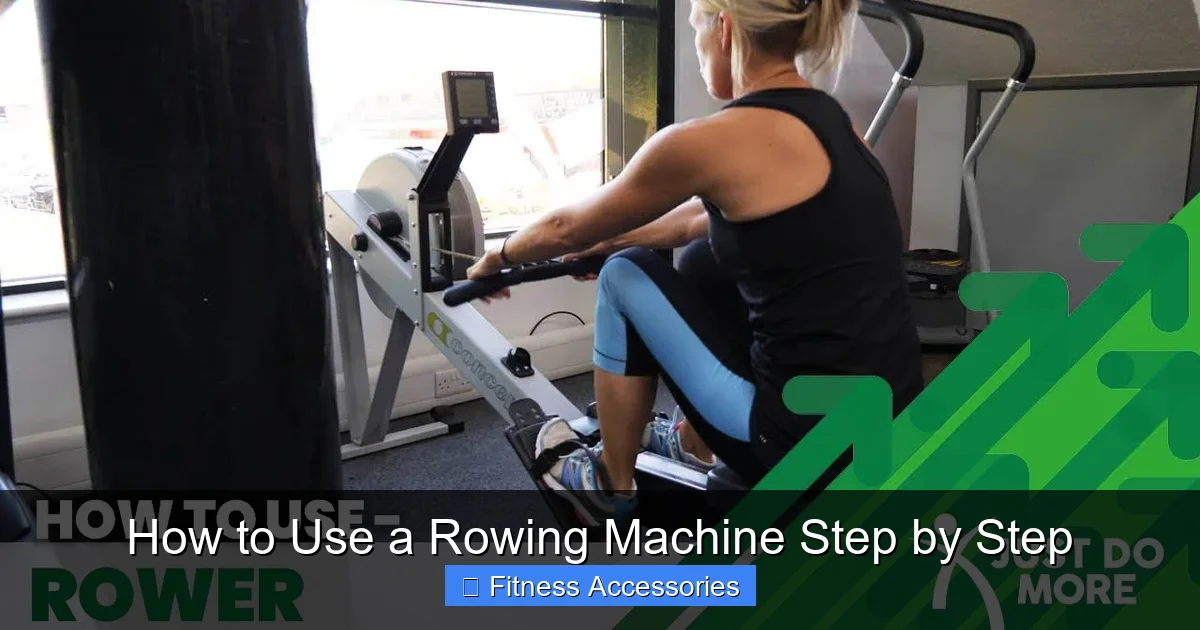
Pick a flat, stable surface with enough clearance around the machine—ideally 2‑3 feet on each side. This gives you room to stretch your arms fully and prevents the rower from wobbling.
Visual guide about How to Use a Rowing Machine Step by Step
Image source: i.ytimg.com
1.2 Adjust the Foot Straps
Slide your feet onto the footplates, align the heel with the strap’s center, then tighten until you feel a snug but comfortable hold. Your toes should still be able to move slightly; a too‑tight strap can cut off circulation.
1.3 Set the Seat Position
Most rowers have a sliding seat. Move it forward so that when you’re in the “catch” position (knees bent, shins vertical), your shins are almost vertical and your hips are slightly behind the knees. This ensures a full range of motion.
1.4 Choose the Damper or Resistance
On air rowers (like the Concept2), the damper knob ranges from 1‑10. Beginners should start at 3‑4; athletes may go up to 6‑7. Water rowers have a paddle that you can add weight to. The key is to feel a smooth, controllable pull, not a jerky yank.
1.5 Test the Monitor Settings
Enter your weight, age, and gender into the performance monitor. This helps the machine calculate accurate calories burned and split times. Most monitors also let you switch between distance, time, and calorie modes—pick the one that matches your goal.
2. Understanding the Rowing Stroke
2.1 The Four Phases at a Glance
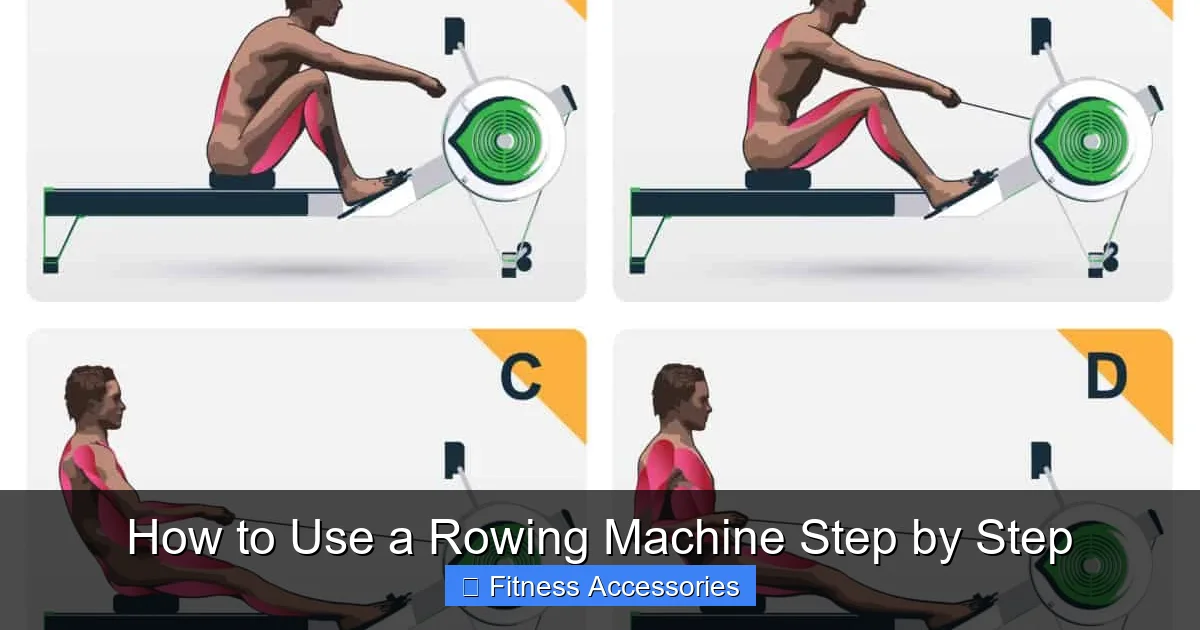
Think of the stroke as a cycle: catch → drive → finish → recovery. Mastering each phase creates power and efficiency.
Visual guide about How to Use a Rowing Machine Step by Step
Image source: startrowing.com
2.2 Catch – The Starting Position
- Body: Knees bent, shins vertical, torso leaning slightly forward from the hips.
- Arms: Straight, gripping the handle just outside the knuckles.
- Core: Engaged, preparing to transmit force.
Imagine you’re about to pull a heavy sled. Your body is primed, ready to unleash power.
2.3 Drive – The Power Phase
Push through your legs first. As your legs extend, lean back slightly (about 10‑15 degrees) and finally pull the handle to your lower ribs. The sequence is legs → hips → arms. Keep the motion fluid; avoid jerking the handle.
2.4 Finish – The End of the Pull
At the end of the drive, your legs are straight, torso slightly leaned back, and elbows drawn past your sides. The handle should rest just below your ribs. Your shoulders stay relaxed, and you maintain a strong core.
2.5 Recovery – Returning to the Catch
Reverse the drive: arms extend first, then torso leans forward, and finally knees bend to slide the seat forward. This phase should be about twice as long as the drive, creating a smooth rhythm.
3. Step‑By‑Step Guide to Your First Row
3.1 Warm‑Up (5‑7 Minutes)
Start with a light row at a low stroke rate (20‑22 strokes per minute). Focus on smoothness, not speed. This raises your heart rate and loosens the muscles.
3.2 Set Your Target
Decide on a simple goal: 5 minutes, 1000 meters, or a specific calorie burn. Beginners often start with time‑based rows to build endurance.
3.3 Begin the Stroke Cycle
- Catch: Sit tall, shins vertical, arms straight, grip relaxed.
- Drive: Push with legs, lean back, pull handle to ribs.
- Finish: Legs straight, handle near ribs, shoulders down.
- Recovery: Extend arms, lean forward, bend knees, slide seat forward.
3.4 Monitor Your Stroke Rate
Aim for 22‑26 strokes per minute (spm) when you’re learning. Use the monitor’s “spm” readout or a metronome app. A steady rhythm keeps you from over‑exerting early.
3.5 Cool‑Down (3‑5 Minutes)
Gradually lower your pace and return to a gentle rowing speed. Finish with a few deep breaths and light stretching for the hamstrings, calves, and lower back.
4. Designing Effective Rowing Workouts
4.1 Beginner Routine (3 Days/Week)
- Day 1: 10‑minute steady row at 20‑22 spm.
- Day 2: 5 × 1‑minute intervals (30 s hard, 30 s easy) with 2‑minute rest.
- Day 3: 15‑minute mixed pace (alternating 2 min fast, 2 min easy).
4.2 Intermediate Routine (4 Days/Week)
- Day 1: 20‑minute tempo row (23‑25 spm).
- Day 2: Pyramid intervals – 1‑2‑3‑2‑1 minutes hard (90‑95% effort) with equal rest.
- Day 3: 30‑minute endurance row, focus on consistent split time.
- Day 4: 10‑minute power row (high damper, 24‑26 spm) + core circuit.
4.3 Advanced Routine (5‑6 Days/Week)
- Day 1: 5 × 1000 m pieces, 2‑minute rest, aim for sub‑4 min splits.
- Day 2: 45‑minute steady state at low damper, focus on technique.
- Day 3: HIIT – 10 × 30 s sprint, 30 s recovery.
- Day 4: 20‑minute “split” row – alternate 4 min fast (90% effort) / 4 min easy.
- Day 5: Cross‑training (bike or run) + light 10‑minute row.
- Day 6: Long row 60 min at conversational pace.
4.4 Tracking Progress
Use the monitor’s log function or a fitness app. Record distance, average split (time per 500 m), and calories. Review weekly to notice trends and adjust resistance or interval length.
5. Common Mistakes and How to Fix Them
5.1 Over‑Reaching at the Catch
If your arms stretch too far forward, you’ll lose power and strain your shoulders. Keep the handle just past your shins and maintain a slight bend in the elbows.
5.2 Rounding the Back
A rounded spine during the drive puts stress on the lower back. Engage your core, keep chest up, and hinge from the hips—not the waist.
5.3 Pulling With the Arms First
Beginners often yank the handle before the legs. Remember the sequence: legs → hips → arms. Practice the “leg‑only” drive by pushing with legs while keeping arms straight, then add the hip lean.
5.4 Ignoring the Recovery Timing
Rushing the recovery leads to a choppy rhythm and fatigue. Count “1‑2‑3” for the recovery (arms, torso, legs) to keep it twice as long as the drive.
5.5 Setting the Damper Too High
A high damper feels like “rowing a heavy boat” and can cause early exhaustion. Start low, focus on technique, then increase gradually as strength improves.
6. Safety Tips and Maintenance
6.1 Listen to Your Body
If you feel sharp pain in the lower back, knees, or wrists, stop immediately. Adjust form or lower the intensity before continuing.
6.2 Stay Hydrated
Rowing can be intense. Keep a water bottle within reach and sip every 10‑15 minutes.
6.3 Proper Footwear
Wear snug, low‑profile shoes with a firm sole. Flip‑flops or loose sandals reduce stability and increase slip risk.
6.4 Regular Machine Care
- Wipe down the seat and rail after each use.
- Check the chain or belt tension monthly (air rowers have a chain, water rowers use a smooth rail).
- Lubricate the flywheel or water tank as per manufacturer’s guidelines.
- Inspect foot straps and bolts for wear.
6.5 Safe Environment
Ensure the area is well‑ventilated and has a non‑slippery floor. If you have a TV or music setup, keep cords out of the rower’s path.
Conclusion: Row Your Way to Better Fitness
Learning how to use a rowing machine step by step transforms a simple piece of equipment into a powerhouse for full‑body fitness. By setting up correctly, mastering the four‑phase stroke, following a structured workout plan, and avoiding common pitfalls, you’ll see improvements in cardiovascular health, muscular endurance, and posture—all while keeping joint impact low.
Remember, consistency beats intensity. Start with short, focused sessions, track your progress, and gradually increase duration or resistance. Before long, you’ll be gliding through rows with confidence, enjoying the rhythmic flow that makes rowing such a rewarding workout. Grab your shoes, adjust those foot straps, and let the water‑like motion propel you toward your fitness goals.
Frequently Asked Questions
Do I need a specific type of rowing machine for beginners?
No. Air, magnetic, and water rowers all work for beginners. Choose one that feels smooth, fits your budget, and offers easy resistance adjustments.
How many calories can I burn in a 30‑minute rowing session?
Calorie burn varies by weight and intensity, but most people burn between 250‑350 calories in a steady 30‑minute row at moderate effort.
Is rowing better than running for weight loss?
Rowing provides a full‑body workout, engaging both upper and lower muscles, which can lead to higher overall calorie expenditure. It’s also low‑impact, making it gentler on joints than running.
Can I use a rowing machine if I have back problems?
Yes, as long as you maintain a neutral spine and avoid rounding the back. Start with low resistance and focus on proper form; consult a healthcare professional if you have severe issues.
How often should I change the damper setting?
Keep the damper consistent for a given workout to develop rhythm. Change it only when you feel you’ve mastered the current setting or want to target a different intensity.
What’s the ideal stroke rate for a cardio workout?
For most cardio sessions, aim for 22‑26 strokes per minute. Higher rates (28‑30 spm) are used in sprint intervals, while lower rates (18‑20 spm) suit endurance rows.