How to Make Your Own Yoga Mat Spray
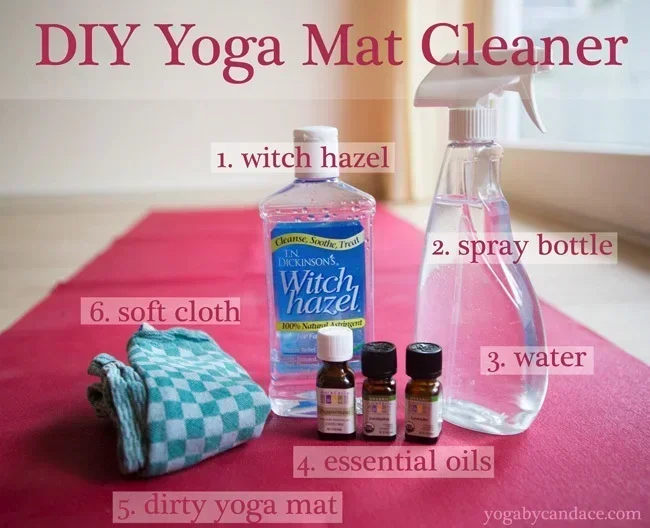
Making your own yoga mat spray is simple, affordable, and keeps your mat fresh between washes. You only need a few household ingredients like water, witch hazel, and essential oils to create a natural yoga mat cleaner that smells amazing. This guide walks you through easy recipes, application tips, and mat maintenance secrets to extend the life of your gear.
There is something really satisfying about keeping your yoga gear fresh and clean. Your yoga mat picks up sweat, dirt, and bacteria every time you practice on it. Over time, this buildup leads to odors and a slippery surface that throws off your balance.
The good news is that you do not need expensive store-bought sprays to keep your mat in great shape. How to make your own yoga mat spray is simpler than you think. With just a few natural ingredients from around your home, you can create a homemade yoga mat spray that cleans, refreshes, and protects your mat.
In this guide, you will learn why DIY sprays work so well, get step-by-step recipes, and discover tips to make your mat last longer. Whether you are a beginner or a seasoned practitioner, this guide has something for you.
Key Takeaways
- DIY yoga mat sprays are cheap and easy: You can make one in under five minutes with items already in your kitchen.
- Natural ingredients are safer: Essential oils and witch hazel replace harsh chemical cleaners that can damage your mat.
- Regular spraying keeps your mat hygienic: A quick spritz after each session removes sweat, bacteria, and odors.
- Multiple recipes work for different needs: Whether you want a refreshing spray or a deep-cleaning solution, there is a recipe for you.
- Proper storage matters: Store your spray correctly to keep it effective for weeks.
- Pair your spray with good mat habits: Cleaning your mat regularly and storing it properly makes your spray even more effective.
📑 Table of Contents
Why Make Your Own Yoga Mat Spray?
Store-bought yoga mat sprays can cost a lot over time. Many of them contain synthetic fragrances and chemicals that break down yoga mat material. When you make your own yoga mat cleaner, you control exactly what goes into it.
Here are the biggest reasons to try a DIY approach:
- Cost savings: A single bottle of store-bought spray can cost $10 to $20. A DIY version costs less than $2 per bottle.
- Natural ingredients: You avoid harsh chemicals like parabens, sulfates, and artificial fragrances.
- Custom scents: Choose the essential oils you love most. Lavender, tea tree, and peppermint are all popular choices.
- Eco-friendly: You reduce plastic waste by reusing the same spray bottle again and again.
- Quick and easy: Most recipes take less than five minutes to prepare.
Making your own yoga mat refresh spray also means you can adjust the strength based on your needs. Lightly scented for daily use or stronger for a deep refresh after hot yoga sessions.
What Makes a Good Yoga Mat Spray?
A great DIY yoga mat spray needs three key components. First, a liquid base that carries the cleaning agents. Second, a natural disinfectant that kills bacteria. Third, an essential oil for scent and extra antibacterial power.
The base is usually water or a mix of water and witch hazel. Witch hazel is a natural astringent that cuts through sweat and grime without damaging your mat. It also helps the spray dry faster, which is important for preventing mold and mildew.
For disinfecting, tea tree oil and lavender oil are top choices. Both have natural antimicrobial properties that keep your mat hygienic. If you want a detailed breakdown of essential oil options, check out our guide on making yoga mat spray with essential oils.
Easy Yoga Mat Spray Recipes
Here are three simple recipes you can try right now. Each one targets a different need, so pick the one that fits your routine best.
Recipe 1: The Daily Refresh Spray
This is your go-to spray for everyday use after practice. It is light, refreshing, and takes seconds to make.
- 1 cup distilled water
- 1 tablespoon witch hazel
- 5 drops lavender essential oil
- 3 drops tea tree essential oil
Mix all ingredients in a clean spray bottle. Shake gently before each use. Spray a light mist over your mat after every session and wipe down with a soft cloth. This keeps sweat and bacteria from building up between deeper cleanings.
Recipe 2: The Deep Clean Spray
Use this one once a week or after especially intense sessions. It has a stronger cleaning power to cut through grime and stubborn odors.
- 1 cup distilled water
- 2 tablespoons witch hazel
- 1 teaspoon castile soap
- 8 drops eucalyptus essential oil
- 5 drops peppermint essential oil
Combine the water, witch hazel, and castile soap in your spray bottle first. Add the essential oils last. Shake well before using. Spray generously over the mat, let it sit for two minutes, then wipe clean with a damp cloth.
For a thorough cleaning that goes deeper than surface spray, you can also learn how to clean your yoga mat in the bathtub once a month. This removes buildup that a daily spray alone cannot handle.
Recipe 3: The Extra Strength Odor Eliminator
If your mat has a persistent smell, this recipe tackles it head-on.
- 1 cup distilled water
- 2 tablespoons white vinegar
- 1 tablespoon baking soda
- 10 drops lemon essential oil
- 5 drops rosemary essential oil
Add the baking soda to the water first and stir until fully dissolved. Then add the vinegar (it will fizz, and that is normal). Once the fizzing stops, add the witch hazel and essential oils. Shake the bottle well. Spray on your mat, let it sit for five minutes, then wipe clean and air dry.
Note: Vinegar has a strong smell at first, but it completely dissipates as it dries. The lemon and rosemary oils leave a fresh, clean scent behind.
How to Use Your Yoga Mat Spray Properly
Making the spray is only half the battle. Using it the right way makes a big difference in how well it works and how long your mat lasts.
Step-by-Step Application
- Shake the bottle gently before each use to mix the ingredients.
- Spray from 6 to 8 inches away from the mat surface. This creates a fine mist that covers evenly.
- Use 2 to 3 sprays per session for a standard-sized mat. Do not soak the mat.
- Wipe down with a soft, damp cloth in long, sweeping motions.
- Let the mat air dry completely before rolling it up or storing it.
When to Spray Your Mat
The best time to use your yoga mat refresh spray is right after your practice. Sweat and bacteria are still fresh on the surface, so the spray can do its job more effectively. Here is a simple routine to follow:
- After every practice: Light spritz and wipe down.
- Once a week: Use the deep clean recipe for a more thorough refresh.
- After hot yoga or intense sessions: Apply the odor eliminator if needed.
- Before storing for travel: A quick spray prevents mildew during storage.
Regular spraying also helps with how to stop your yoga mat from being slippery. Sweat residue creates a slick layer on the mat surface. A quick spray and wipe removes that layer and restores your grip.
Tips for Storing and Maintaining Your Spray
Your DIY yoga mat spray can last for weeks or even months if you store it properly. Follow these simple tips to get the most out of every batch.
Storage Best Practices
- Keep the bottle in a cool, dark place. Heat and sunlight break down essential oils and reduce their effectiveness.
- Label your bottle with the date you made it. Most sprays stay fresh for 4 to 6 weeks.
- Use dark glass spray bottles. They protect the ingredients from UV light and extend shelf life.
- Shake before every use. Natural ingredients can separate over time, and shaking mixes them back together.
How Often to Make a Fresh Batch
A good rule of thumb is to make a new batch every four to six weeks. If you notice the scent fading or the liquid looking cloudy, it is time to refresh. Using expired spray will not harm your mat, but it loses its cleaning and deodorizing power.
Matching Your Spray to Your Mat Type
Different yoga mats respond differently to sprays. Here is a quick guide:
- TPE mats: Avoid oil-based sprays. Stick to water and witch hazel recipes.
- Natural rubber mats: Essential oils work great, but avoid citrus oils that can degrade rubber over time.
- Cotton/jute mats: These absorb more liquid. Use lighter sprays and let them dry fully before rolling.
- Closed-cell PVC mats: These are the most durable and can handle any of the recipes above.
For more information on keeping your mat in top condition, learn how to make yoga mat cleaner with essential oils for additional cleaning methods tailored to different mat materials.
Common Mistakes to Avoid
Even with the best recipe, some mistakes can reduce the effectiveness of your yoga mat spray. Here is what to watch out for:
- Using too much spray: Over-saturating your mat can cause moisture to get trapped underneath. This leads to mold and mildew. A light mist is all you need.
- Skipping the shake: Ingredients settle at the bottom. If you do not shake, you get uneven application.
- Using tap water: Tap water contains minerals and chlorine that can leave residue on your mat. Always use distilled water.
- Storing the mat wet: Never roll up your mat right after spraying. Always let it air dry completely first.
- Using synthetic fragrances: They may smell nice but can contain chemicals that degrade mat material and irritate your skin.
Avoiding these simple mistakes ensures your DIY yoga mat spray works as intended and your mat stays in great shape for years.
Bonus: Pair Your Spray with Good Mat Habits
A yoga mat spray works best when it is part of a broader mat care routine. Here are a few habits that complement your spray and keep your mat in excellent condition.
- Wash your mat monthly: A deep wash removes buildup that surface spraying cannot reach. You can wash your yoga mat in the washer if it is made of durable materials.
- Roll your mat with the top side out: This prevents creasing and keeps the surface even.
- Store your mat flat or loosely rolled: Tight rolling can cause cracks and uneven wear over time.
- Keep your mat away from direct sunlight: UV rays break down mat material and cause it to dry out and crack.
- Use a yoga mat bag: A breathable bag protects your mat during transport and prevents moisture buildup.
When you combine regular spraying with proper storage and cleaning, your mat stays fresh, grippy, and hygienic for a long time. A well-maintained mat also feels better under your feet and makes every practice more enjoyable.
Final Thoughts
Learning how to make your own yoga mat spray is one of the easiest ways to improve your yoga routine. It saves money, keeps your mat clean, and lets you avoid the harsh chemicals found in many commercial products. With just a few simple ingredients, you can have a fresh, effective spray ready in minutes.
Start with the daily refresh recipe and experiment from there. Soon, making your own yoga mat cleaner will be as natural as rolling out your mat in the first place. Your nose, your skin, and your mat will all thank you.
Take a few minutes today to put together your first batch. You will wonder why you ever spent money on expensive store-bought sprays. Happy practicing.
Frequently Asked Questions
Can I use tap water instead of distilled water?
Distilled water is the best choice because it does not contain minerals or chlorine that can leave residue on your mat. Tap water may work in a pinch, but it can build up over time and affect your mat’s texture and grip.
How often should I spray my yoga mat?
You should spray your mat after every practice session. A light mist and wipe-down after each use prevents sweat and bacteria from building up. For a deeper clean, use the deep clean recipe once a week.
Are essential oils safe for all yoga mat types?
Most essential oils are safe, but some can degrade certain materials over time. Citrus oils like lemon and orange can break down natural rubber. If you have a TPE or rubber mat, stick to lavender, tea tree, or eucalyptus oils.
Can I use rubbing alcohol in my yoga mat spray?
It is best to avoid rubbing alcohol. It can dry out and crack yoga mat material over time. Stick to natural alternatives like witch hazel, which disinfects effectively without damaging your mat.
How long does homemade yoga mat spray last?
Most DIY sprays stay fresh for four to six weeks when stored in a cool, dark place. Using dark glass bottles helps extend the shelf life. If the scent fades or the liquid looks cloudy, make a fresh batch.
Will my yoga mat spray prevent slipping during practice?
A yoga mat spray helps remove sweat residue that causes slipping. However, if you still experience slippage, you may need to treat your mat for slipperiness with additional grip-enhancing methods like a yoga towel or grip spray.
=== META DATA ===
SEO Title: How to Make Your Own Yoga Mat Spray
Meta Title: How to Make Your Own Yoga Mat Spray | Easy DIY Guide
Meta Description: Learn how to make your own yoga mat spray with simple, natural ingredients. This easy DIY guide keeps your mat fresh, clean, and ready for every practice session.
URL Slug: how-to-make-your-own-yoga-mat-spray