How to Set Up for a Barbell Hip Thrust

Ready to power up your glutes? This guide walks you through every detail of setting up for a barbell hip thrust—from equipment selection to perfect foot placement—so you can lift confidently and avoid injury. Follow the simple steps and start seeing stronger, rounder results fast.
Key Takeaways
- Proper equipment matters: Choose a sturdy bench, quality barbell, and comfortable padding.
- Foot placement is crucial: Align feet to target glutes while keeping knees safe.
- Core engagement prevents strain: Brace your core before each rep.
- Progressive loading builds strength: Add weight gradually to avoid plateaus.
- Consistent warm‑up reduces injury risk: Activate glutes and hips before heavy sets.
- Form checks improve results: Use mirrors or video to fine‑tune technique.
- Recovery matters: Stretch and foam roll after the workout for optimal growth.
📑 Table of Contents
- Introduction: Why the Barbell Hip Thrust Deserves a Spot in Your Routine
- 1. Gather the Right Gear
- 2. Prepare the Bench and Bar Position
- 3. Master Your Foot Placement
- 4. Perfect Your Starting Position
- 5. Execute the Hip Thrust with Proper Form
- 6. Programming, Progression, and Recovery
- Conclusion: Your Path to Stronger Glutes Starts with a Solid Setup
Introduction: Why the Barbell Hip Thrust Deserves a Spot in Your Routine
If you’ve ever wondered why elite athletes and fitness influencers swear by the hip thrust, the answer is simple: it builds some of the strongest, most defined glutes on the planet. Unlike squats or deadlifts, the barbell hip thrust isolates the hips, allowing you to lift heavier loads with less stress on the lower back. The result? Bigger, rounder glutes, a stronger posterior chain, and better performance in sports that demand power from the hips.
But great results start with great setup. A shaky bench, an improperly positioned bar, or a misaligned foot stance can turn a promising exercise into a painful one. In this article, we’ll break down every step of the setup process, from choosing the right gear to mastering the final squeeze at the top of the movement. By the end, you’ll feel confident loading the bar, lifting safely, and getting the most out of each rep.
1. Gather the Right Gear
Bench or Platform
The bench is the foundation of the hip thrust. Look for a sturdy, flat surface that can support at least 500 lb. A standard weight‑training bench works well, but many lifters prefer a low, wide platform that keeps the hips close to the floor. If you’re training at home, a sturdy couch or a sturdy plyometric box can serve as a substitute—just make sure it won’t wobble.

Visual guide about How to Set Up for a Barbell Hip Thrust
Image source: liftmanual.com
Barbell and Weight Plates
Choose a standard Olympic barbell (20 kg/45 lb) for most lifters. Beginners might start with a lighter, 15 kg bar to practice form. Load plates evenly on each side, and use collars to keep them from sliding. For added comfort, invest in a barbell pad or a thick yoga mat to cushion the hips.
Footwear and Socks
Your shoes should provide a stable base. Flat‑soled shoes (like Converse or weight‑lifting shoes) keep your feet from rolling, which helps maintain proper hip alignment. Some lifters prefer barefoot training for a better ground feel, but make sure the surface isn’t slippery.
Optional Accessories
- Resistance bands: Looped around the knees, they cue proper knee tracking.
- Foam roller: Use before the workout to release tight hip flexors.
- Mirror or phone tripod: Record yourself to check form.
2. Prepare the Bench and Bar Position
Bench Height and Placement
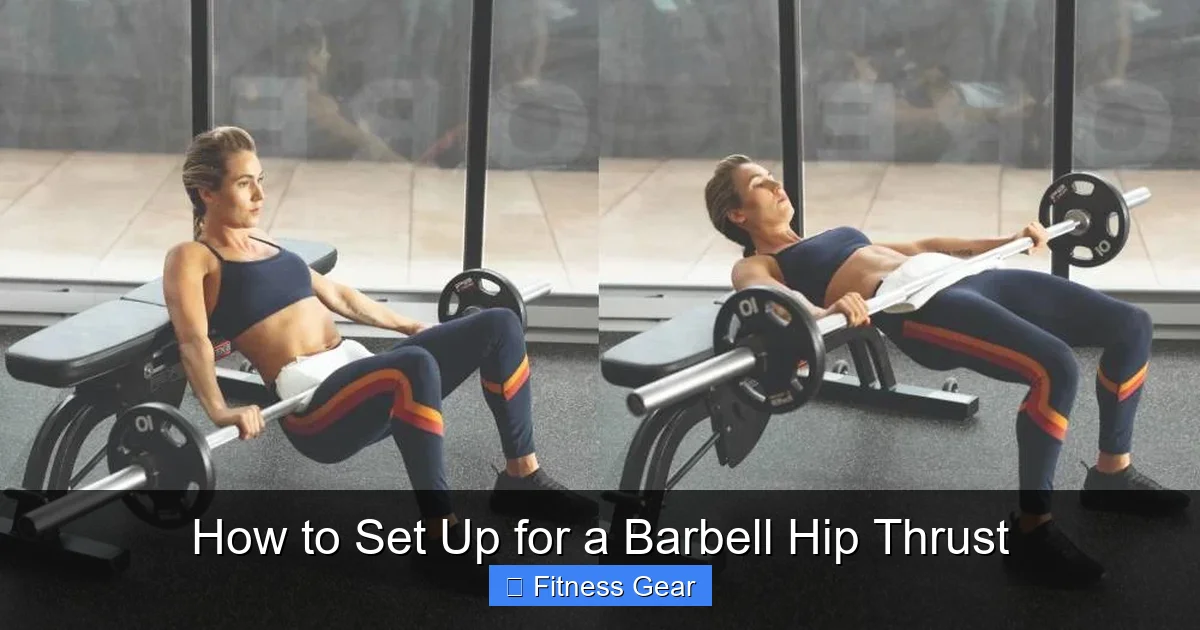
Set the bench so that when you sit on the floor with your back against it, your shoulder blades rest comfortably on the edge. Most lifters find a bench height of 16‑18 inches works best. If the bench is too high, the range of motion shortens; too low and you’ll lose the “bench support” feel.
Visual guide about How to Set Up for a Barbell Hip Thrust
Image source: thebarbellbeauties.com
Bar Placement on the Hips
Slide the bar over your hips while seated. The bar should sit just below the pelvic bones—think “just above the crease of your hips.” Use a bar pad or a thick towel to cushion the pressure. Position the bar so it’s centered across the hips; an off‑center bar can cause uneven loading and shoulder strain.
Finding the Sweet Spot
Do a quick “hip roll” test: With the bar in place, gently rock your hips side‑to‑side. If the bar stays centered and you feel balanced, you’ve found the sweet spot. If the bar slides, adjust your foot placement or add a small towel under the bar for extra friction.
3. Master Your Foot Placement
Distance from the Hips
Place your feet about hip‑width apart, with the toes pointing slightly outward (10‑15 degrees). The exact distance will vary based on leg length, but a good rule of thumb is: when you look down, your shins should be vertical at the bottom of the movement.

Visual guide about How to Set Up for a Barbell Hip Thrust
Image source: liftmanual.com
Knee Angle and Glute Activation
When you thrust upward, aim for a 90‑degree knee angle at the top of the lift. This angle maximizes glute recruitment while keeping the knees safe. If your knees flare out or cave in, adjust your foot angle or place a resistance band around the knees to cue proper tracking.
Testing the Position
Do a bodyweight “glute bridge” first. Lie on the floor, feet flat, and lift your hips. If you can achieve a straight line from shoulders to knees without arching the lower back, your foot placement is likely correct. Transfer that feeling to the barbell version.
4. Perfect Your Starting Position
Seated Setup
Sit on the floor with your back against the bench, bar over hips, and feet planted. Your shoulders should be resting on the bench, and your head relaxed. Keep your hands gripping the bar just outside your hips—this helps stabilize the load.
Brace Your Core
Before you lift, take a deep breath, fill your belly with air, and brace as if you’re about to be punched in the stomach. This intra‑abdominal pressure protects the spine and gives you a solid base for the thrust.
Hip Alignment
Ensure your hips are directly under the bar, not too far forward (which turns the movement into a squat) or too far back (which reduces glute activation). A quick visual cue: your hips, shoulders, and knees should form a straight line at the top of the lift.
5. Execute the Hip Thrust with Proper Form
Step‑by‑Step Breakdown
- Start the drive: Push through your heels, squeeze the glutes, and lift the hips toward the ceiling.
- Full extension: At the top, your body should form a straight line from shoulders to knees. Hold the peak for 1‑2 seconds, fully contracting the glutes.
- Controlled descent: Lower the hips back down until your glutes hover just above the floor—don’t rest on the ground.
- Repeat: Perform the desired number of reps, maintaining the same tempo.
Common Mistakes to Avoid
- Over‑arching the lower back: Keep the core braced; the lower back should stay neutral.
- Using the arms to lift the bar: Your hands are only for stability, not pulling.
- Rushing the reps: A controlled tempo (2‑0‑2) maximizes muscle tension.
- Letting the knees collapse inward: Keep them tracking over the toes.
6. Programming, Progression, and Recovery
How Much Weight to Start With
Beginners should begin with a weight that allows 12‑15 reps with good form—usually the bar alone or the bar plus 10‑20 lb plates. As you become comfortable, add 5‑10 lb plates each week, focusing on form over load.
Sets, Reps, and Frequency
For glute hypertrophy, aim for 3‑5 sets of 8‑12 reps, 2‑3 times per week. More advanced lifters can incorporate heavy low‑rep days (4‑6 reps) and lighter high‑rep days (15‑20 reps) to hit different muscle fibers.
Recovery Essentials
- Stretching: After the workout, perform a seated forward fold and a pigeon pose to release the hip flexors.
- Foam rolling: Spend 2‑3 minutes on the glutes, hamstrings, and lower back.
- Nutrition: Consume protein (0.8‑1 g per lb bodyweight) within 45 minutes post‑workout to support muscle repair.
Conclusion: Your Path to Stronger Glutes Starts with a Solid Setup
Setting up for a barbell hip thrust may feel like a lot of moving parts, but once you master the basics—right bench, proper bar placement, balanced foot stance, and a tight core—you’ll unlock massive glute gains without risking injury. Treat each component as a habit: check your equipment, cue your foot placement, brace your core, and then thrust with confidence. Consistency, progressive loading, and proper recovery will keep your glutes growing stronger, rounder, and more functional for everyday life and athletic performance.
Now that you have the full roadmap, grab that bar, set up your bench, and give your glutes the workout they’ve been begging for. Happy thrusting!
Frequently Asked Questions
What height should my bench be for a barbell hip thrust?
The bench should be around 16‑18 inches tall, allowing your shoulder blades to rest comfortably on the edge while keeping the hips close to the floor.
Do I need a barbell pad?
A pad isn’t mandatory, but it greatly reduces pressure on the hips, making heavy sets more comfortable and helping you focus on the lift.
How far apart should my feet be?
Place your feet hip‑width apart with toes pointed slightly outward (10‑15°). Adjust until your shins are vertical at the bottom of the movement.
Can I do hip thrusts without a bench?
Yes—use a sturdy low platform, a strong couch, or a plyometric box. Just ensure it’s stable and won’t tip over under the bar.
How many reps and sets are best for glute growth?
For hypertrophy, aim for 3‑5 sets of 8‑12 reps, performed 2‑3 times per week. Mix in occasional heavy low‑rep and light high‑rep days for variety.
What should I do if my lower back arches during the thrust?
Focus on bracing your core before each rep and keep the movement controlled. If the arch persists, reduce the weight and practice the bridge without a bar until you master a neutral spine.