How to Use a Rowing Machine with Handles
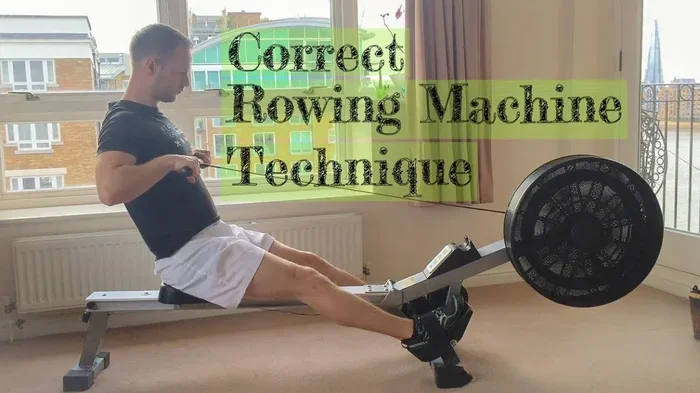
Using a rowing machine with handles the right way can transform your workouts and protect your body from injury. This guide walks you through proper grip, stroke technique, and common mistakes so you get the most out of every session. Whether you are a complete beginner or looking to refine your form, you will find clear, actionable tips here.
Rowing machines are one of the best pieces of workout equipment you can use at home or in the gym. They give you a full-body workout that burns calories and builds muscle. But many people skip over one simple detail — how they hold the handles. Your grip and handle technique can make or break your rowing session.
In this guide, we break down everything you need to know about using a rowing machine with handles. From the correct grip to the full stroke cycle, you will learn practical steps you can use right away. We also cover common mistakes and expert tips so you get the most out of every pull.
Whether you are brand new to indoor rowing or you have been using a machine for a while, this article has something for you. Let us dive in and make sure your handle technique is spot on.
Key Takeaways
- Correct handle grip is the foundation of every effective rowing stroke and prevents wrist strain.
- The rowing stroke has four phases — catch, drive, finish, and recovery — and each matters.
- Avoid common mistakes like yanking the handles too fast or rounding your back.
- Handle rowing builds full-body strength targeting legs, back, arms, and core.
- Adjust resistance and settings to match your fitness level and goals.
- Consistent practice with proper form leads to better results and fewer injuries.
📑 Table of Contents
Understanding the Rowing Machine Handles
The handles on a rowing machine might look simple, but they play a big role in your workout. Most rowing machines come with a long bar connected to a resistance mechanism. You hold this bar and pull it toward your torso during each stroke. The way you hold and move the handles directly affects your rowing machine form and results.
Here are a few things to know about the handles before you start:
- Handle material: Most handles are made of padded plastic or rubber-coated metal. This keeps your hands comfortable during long sessions.
- Handle width: Handles are usually shoulder-width apart. This natural width helps you maintain good rowing machine posture.
- Resistance type: Air, magnetic, water, and hydraulic rowers all use handles differently. Air rowers like the Concept2 feel heavier as you pull faster.
- Handle movement: The handles move in a straight line back and forth. They do not rotate or twist much during use.
Understanding your handles is step one. Once you feel comfortable with them, the rest of the stroke becomes much easier to learn.
How to Grip the Handles Properly
Your grip is the connection between your body and the machine. A bad grip leads to wrist pain, poor form, and wasted energy. A good grip sets you up for a powerful and safe rowing machine exercise.
Follow these steps to get your grip right:
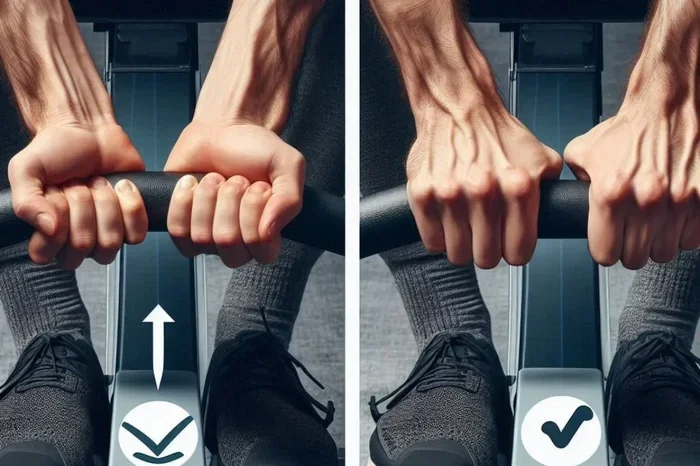
- Hold the handle with an overhand grip. Wrap your fingers around the bar and rest your thumbs on top. Do not wrap your thumbs around the bar — this can cause strain.
- Keep your wrists straight. Your wrists should be flat, not bent up or down. Think of your arms as ropes that connect your hands to your shoulders.
- Use a light but secure hold. You do not need to squeeze the handle tightly. A firm but relaxed grip reduces tension in your forearms.
- Keep your hands shoulder-width apart. This aligns your arms with your shoulders and helps you maintain proper rowing machine posture.
Quick Tip: Check Your Grip Mid-Workout
It is easy to forget about your grip once you start rowing. Every few minutes, take a quick mental check. Are your wrists still straight? Are you squeezing too hard? Small adjustments make a big difference over time.
For beginners who want more guidance on getting started, check out our article on how to properly use a rowing machine for beginners. It covers grip, foot placement, and more in detail.
The Correct Rowing Stroke with Handles
The rowing stroke is a smooth, four-part movement. Each phase uses the handles differently. When you put all four phases together, you get a fluid rowing machine workout that works your entire body.
1. The Catch
This is the starting position. You lean forward slightly, your knees are bent, and your arms are extended. The handles are at the front of the machine, close to your shins. Keep your back straight and your shoulders relaxed.
2. The Drive
This is the pulling phase where most of the power happens. Start by pushing off with your legs, then lean back slightly, and finally pull the handles toward your lower chest. The sequence is legs, then back, then arms. This order is crucial for proper rowing machine technique.
3. The Finish
At the end of the drive, your legs are extended, your back is slightly leaned back, and the handles are pulled into your lower ribcage. Your elbows should be behind your body. Keep your shoulders down and relaxed — do not shrug up.
4. The Recovery
This is the return phase. Reverse the drive sequence: arms extend first, then lean forward, then bend your knees. The handles move smoothly back to the catch position. The recovery should be slower than the drive. This is your rest moment between strokes.
Visualizing the Stroke
Think of the stroke as a clock. The catch is at 11 o’clock, the drive moves to 1 o’clock, and the recovery brings you back. Smooth and continuous. If you want to see the full step-by-step process with handle positioning, our article on how to use a rowing machine step by step has detailed visuals and explanations.
Common Mistakes People Make with Rowing Machine Handles
Even experienced rowers make handle mistakes sometimes. Knowing what to avoid helps you stay on track and prevents injury. Here are the most common errors:
- Pulling the handles too fast: Speed is not the goal. Control is. Fast, jerky pulls waste energy and strain your shoulders.
- Rounding your back: Keep your back straight throughout the stroke. A rounded back during the catch or drive puts pressure on your spine.
- Yanking with your arms only: Your arms should not do all the work. The power comes from your legs first, then your back, then your arms.
- Gripping too tightly: A death grip on the handles causes forearm fatigue and reduces blood flow to your hands.
- Bending your wrists: Keep those wrists flat. Bending them up or down leads to pain and poor rowing machine form.
Fixing these mistakes early will save you from pain and frustration. If you are dealing with specific physical concerns, our article on can you use a rowing machine with bad knees offers helpful advice for modifying your technique.
Tips for a Better Handle Rowing Workout
Once you have the basics down, you can level up your rowing machine with handles sessions. These tips help you get more from every workout.
1. Start with Low Resistance
If you are new to rowing, begin with a low damper setting (around 3 to 5 on air rowers). This lets you focus on form without exhausting your muscles too quickly. You can always increase resistance as you build strength and confidence.
2. Focus on Timing and Rhythm
A good rowing stroke has a steady rhythm. The drive should be powerful but smooth, and the recovery should be relaxed. Try counting “one, two, three, four” for each stroke cycle. This helps you maintain a consistent pace.
3. Use Your Legs — They Are Your Biggest Muscles
Many beginners forget that the legs do about 60 percent of the work. Push through your feet on the foot straps during the drive phase. Your legs are the engine of every stroke.
4. Keep Your Core Engaged
Your core muscles — your abs and lower back — help stabilize your body throughout the stroke. Tighten your core slightly during the drive and keep it engaged during the recovery. This protects your lower back and improves power transfer.
5. Try Interval Training
Interval training is one of the best ways to boost your rowing machine calories burned and improve endurance. Try alternating between 30 seconds of hard pulling and 60 seconds of easy recovery. Repeat for 15 to 20 minutes.
For a deeper dive into effective workouts, check out our guide on how to get a good workout on a rowing machine. It has workout plans and intensity tips for all fitness levels.
Who Can Benefit from Handle Rowing
One of the best things about the rowing machine with handles is that almost anyone can use it. Here is a quick look at who benefits most:
| Group | Benefit |
|---|---|
| Beginners | Easy to learn, low impact, builds confidence |
| Weight loss seekers | High calorie burn, full-body engagement |
| Athletes | Improves endurance, power, and coordination |
| Seniors | Low joint impact, strengthens back and core |
| Office workers | Reverses posture issues from sitting all day |
No matter your age or fitness level, handle rowing can be adapted to fit your needs. Start slow, focus on form, and gradually increase intensity. For guidance on how long to row each session, see our article on how long should a beginner use a rowing machine.
Handle rowing is also a great way to train for outdoor rowing. The indoor rowing handle technique builds the same muscles and coordination you need on the water. If you want to learn more about training for rowing without a machine, our article on how to train for rowing without a rowing machine has useful dryland exercises.
Key Takeaways
- Grip the handle lightly with an overhand grip and keep your wrists straight to avoid strain.
- Follow the four-phase stroke — catch, drive, finish, recovery — in the correct sequence for maximum power.
- Avoid common mistakes like pulling too fast, rounding your back, or using only your arms.
- Start with low resistance and focus on form before increasing intensity.
- Use interval training to boost calorie burn and improve your cardiovascular fitness.
- Handle rowing is for everyone — beginners, athletes, seniors, and office workers alike.
- Practice consistently with proper form to see real improvements in strength and endurance.
Using a rowing machine with handles is one of the smartest choices you can make for your fitness. It works your entire body, burns serious calories, and is gentle on your joints. But all of that depends on one thing — using the handles correctly.
Start with the basics: a light grip, straight wrists, and the proper four-phase stroke. Avoid the common mistakes that derail so many beginners. And most importantly, be patient with yourself. Good technique takes time, but the results are worth it.
Now that you have all the tools and tips, it is time to get on the machine and put them into practice. Your body will thank you. Happy rowing!
Frequently Asked Questions
Can I use a rowing machine with handles every day?
Yes, you can row daily, but listen to your body. Start with shorter sessions of 10 to 15 minutes and gradually increase. Rest days help your muscles recover, especially when you are just beginning.
What is the correct way to hold rowing machine handles?
Use an overhand grip with your wrists straight and hands shoulder-width apart. Do not wrap your thumbs around the bar, and keep your grip light but secure throughout the stroke.
Does rowing with handles build muscle?
Yes, handle rowing engages your legs, back, arms, and core. It is an excellent full-body workout that builds endurance and strength, especially when you use proper form and appropriate resistance.
Why do my wrists hurt when I row?
Wrist pain usually comes from bending your wrists or gripping the handles too tightly. Keep your wrists flat and your grip relaxed. If pain continues, check your form or reduce resistance.
How long should I row to see results?
Consistency matters more than duration. Aim for 15 to 30 minutes per session, three to five times a week. Over time, you will notice improved endurance, strength, and better rowing machine form.
Can handle rowing help with weight loss?
Absolutely. Rowing burns a high number of calories and engages multiple muscle groups, making it effective for weight loss. Combine it with a balanced diet and regular routine for the best results.