
How Hard Is It to Assemble Nordictrack Treadmill
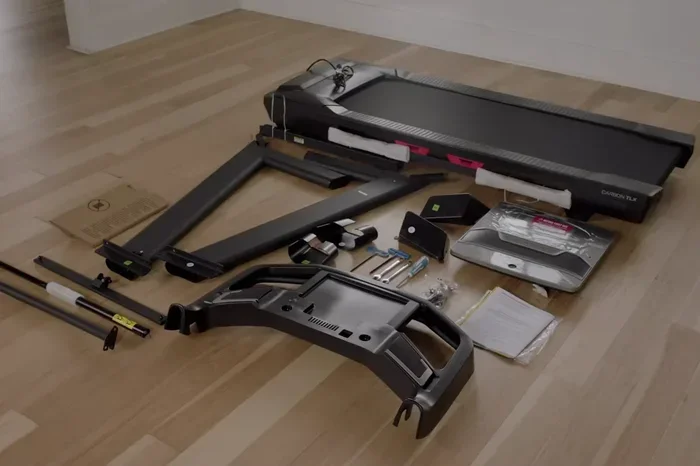
Assembling a NordicTrack treadmill is a manageable task for most people, typically taking 1 to 3 hours depending on the model. You will need basic tools, a helper for heavy parts, and patience to follow the instruction manual carefully. With the right approach, your NordicTrack treadmill setup goes smoothly and gets you running fast.
So, you just bought a new NordicTrack treadmill. Exciting, right? But now there is this big box sitting in your garage, and you are staring at a pile of parts, screws, and a manual that looks like it was translated by a robot. The big question is simple: how hard is it to assemble a NordicTrack treadmill?
The honest answer is that it is not as scary as it looks. Most people can put a NordicTrack treadmill together in one to three hours. You do not need to be a mechanic or a carpenter. You just need the right tools, a little bit of space, and the willingness to follow instructions step by step.
In this guide, we will walk you through everything you need to know about NordicTrack treadmill assembly. We will cover what tools you need, how long it takes, what challenges to expect, and how to avoid the mistakes that trip up most people. By the end, you will feel confident enough to tackle the build yourself.
Key Takeaways
- Assembly time ranges from 1 to 3 hours for most NordicTrack models, with some larger units taking longer.
- You need basic tools like an Allen wrench, screwdriver, and adjustable wrench, all usually included in the box.
- A second person is highly recommended for lifting and holding heavy frame sections during assembly.
- Reading the manual first saves time and prevents mistakes that can cause delays or damage.
- Common challenges include belt alignment and console wiring, but these are fixable with patience.
- Warranty coverage may apply if you register your treadmill and follow assembly instructions correctly.
- Post-assembly checks are essential to ensure safety, proper leveling, and optimal performance.
📑 Table of Contents
- Understanding What Comes in the Box
- Tools You Will Need for the Job
- Step-by-Step Assembly Process
- Common Challenges During Assembly
- How Long Does Assembly Really Take?
- Tips to Make Assembly Easier
- When to Call for Professional Help
- Post-Assembly Care and Maintenance
- Is It Worth Assembling Yourself?
- Final Thoughts
Understanding What Comes in the Box
Before you start, it helps to know what you are working with. Every NordicTrack treadmill comes in a large shipping box. Inside, you will find the main frame, the running belt, the motor cover, the console, handrails, legs or a folding mechanism, and a bag of hardware.
Typical Parts You Will Find
- Main deck and frame — the backbone of your treadmill.
- Motor housing — houses the motor and attaches to the frame.
- Running belt and deck — the surface where you walk or run.
- Console unit — the display screen and control panel.
- Handrails — usually two side rails or a front bar.
- Legs or folding mechanism — supports the treadmill and allows storage.
- Hardware bag — screws, bolts, Allen keys, and small parts.
- Power cord and safety key — essential for operation.
Knowing what each piece looks like before you start makes a huge difference. Lay everything out on a clean floor and match parts to the manual diagram. This simple step alone can save you 30 minutes of confusion later.
Tools You Will Need for the Job
One of the best things about NordicTrack treadmills is that they come with most of the tools you need. The Allen wrench and screwdriver are usually included in the hardware bag. However, having a few extra tools on hand makes the process much smoother.
Essential Tools Checklist
- Allen wrench set — included with the treadmill, but a larger set helps with tight bolts.
- Phillips and flathead screwdrivers — for securing panels and the console.
- Adjustable wrench — useful for tightening nuts on the frame and legs.
- Rubber mallet — helps tap parts into place without damaging them.
- Socket wrench set — some models use socket bolts that need this tool.
- Level — to ensure your treadmill sits flat on the floor after assembly.
You do not need a full workshop. A small corner of your garage or a clear section of your living room works fine. Just make sure you have enough space to lay out parts and move around comfortably.
Step-by-Step Assembly Process
Every NordicTrack treadmill follows a similar assembly pattern. While the exact steps vary by model, the general process stays the same. Here is a breakdown of what to expect.
Step 1: Prepare Your Workspace
Clear a large area before you start. You need at least 8 feet by 4 feet of open floor space. Make sure the surface is clean and flat. Working on carpet is fine, but a hard floor makes it easier to slide parts around. If you are working on carpet, check our guide on is it okay to have a treadmill on carpet for helpful tips.
Step 2: Attach the Legs or Folding Frame
Start by attaching the legs to the main deck. This is usually the first major assembly step. You will need to insert bolts and hand-tighten them before fully tightening. A second person is very helpful here because the frame can be awkward to hold in place while you work on the bolts.
Step 3: Install the Motor and Belt
Next, you will attach the motor housing and install the running belt. This is one of the trickier parts. The belt needs to sit centered on the deck, and the motor pulley must align correctly. Take your time with this step. Rushing it can lead to a misaligned belt, which causes problems later.
Once the belt is in place, you may need to move the belt on a NordicTrack treadmill to center it properly. This is a normal part of the setup process and does not mean you did anything wrong.
Step 4: Attach the Handrails and Console
With the frame and belt in place, you can now attach the handrails. These usually bolt onto the frame at the front or sides. After that, it is time to connect the console. This involves wiring the display unit to the motor and power supply. The wires are clearly labeled, so follow the color codes in your manual.
Step 5: Final Assembly and Safety Checks
Finish by tightening all bolts, checking that every panel is secure, and plugging in the power cord. Insert the safety key and power on the console. Walk the belt slowly by hand to make sure it moves smoothly. Check for any unusual noises or resistance.
If everything looks good, you are done. If something feels off, double-check your connections and belt alignment before using the treadmill at full speed.
Common Challenges During Assembly
Even with a clear manual, assembly can throw some curveballs. Here are the most common challenges people face when building their NordicTrack treadmill.
Belt Alignment Issues
The running belt sometimes shifts to one side during assembly. This is very common and usually easy to fix. You can adjust the belt by turning the adjustment bolts on the back of the treadmill. If you are unsure how to do this, you can refer to our guide on how to adjust the belt on a NordicTrack treadmill for a detailed walkthrough.
Console Wiring Confusion
The console has multiple wires that connect to the motor, sensors, and power supply. It can look overwhelming at first. The key is to follow the manual diagram exactly and connect one wire at a time. Never force a connector — if it does not fit easily, check that you have the right port.
Heavy Frame Sections
The main frame and motor housing are heavy. Trying to hold them in place alone can be frustrating and even risky. Always ask a friend or family member to help with the heavier parts. This is not a sign of weakness — it is just smart assembly practice.
Missing or Confusing Parts
Sometimes a small part is missing, or two parts look similar but serve different purposes. Before you start, count all the hardware pieces against the manual list. If something is missing, contact NordicTrack customer support right away. They usually ship replacements quickly.
How Long Does Assembly Really Take?
Assembly time depends on several factors. Your experience with furniture or equipment builds matters a lot. If you have put together a lot of workout equipment before, you will be faster.
Here is a general breakdown of what to expect:
| Experience Level | Estimated Time | Notes |
|---|---|---|
| First-timer | 2 to 3 hours | Read the manual carefully and take breaks |
| Some experience | 1.5 to 2 hours | Follow the steps in order without skipping |
| Experienced builder | 1 to 1.5 hours | May still need help with heavy parts |
Do not rush the process. Taking shortcuts often leads to mistakes that cost more time to fix. Play some music, keep water nearby, and enjoy the build.
Tips to Make Assembly Easier
A few simple tips can make your NordicTrack treadmill setup much less stressful. Here are the best ones we have gathered from experienced builders.
- Watch a video tutorial first. Seeing the process before you start gives you a mental map of what to expect.
- Organize screws by type. Use small bowls or a muffin tin to sort hardware. It saves a lot of searching time.
- Do not fully tighten bolts until the end. Hand-tighten everything first, then go back and snug each one. This lets you adjust parts that need repositioning.
- Keep the manual accessible. Refer to it often. Even if you think you remember, double-checking prevents errors.
- Enlist a helper for steps 2 through 4. Having someone hold the frame or hand you parts makes a big difference.
- Test the treadmill at low speed first. After assembly, walk on it at 2 mph before running. Listen for unusual sounds and check the belt tracking.
These tips might seem small, but they add up to a much smoother experience. People who follow them consistently report finishing assembly faster and with fewer headaches.
When to Call for Professional Help
There is no shame in asking for help. If you feel stuck at any point, or if a part does not seem to fit correctly, stop and reassess. Forcing something can damage the treadmill and void your warranty.
Some people prefer to hire a professional for NordicTrack treadmill assembly. Many local appliance or furniture assembly services can handle the job. This usually costs between $100 and $200, depending on your location and the model complexity.
If you are buying a best NordicTrack treadmill and want peace of mind, consider this option. It is especially worth it for larger models like the NordicTrack Commercial or X22i series, which have more parts and a more complex build.
Post-Assembly Care and Maintenance
Once your treadmill is assembled, a few maintenance steps will keep it running smoothly for years. First, lubricate the running belt according to the manual instructions. Most NordicTrack models need a 100% silicone-based lubricant applied every 3 to 6 months.
Check the belt alignment periodically. Over time, the belt can shift, especially with heavy use. If you notice the belt drifting to one side, a quick adjustment fixes it. You can learn more about maintaining your belt in our guide on what to do if treadmill belt is slipping.
Also, make sure your treadmill stays level. Use a level on the deck and adjust the leveling feet as needed. An unlevel treadmill can cause uneven belt wear and affect your workout quality.
Finally, keep the area around your treadmill clean and free of dust. Dust buildup in the motor area can cause overheating over time. A quick wipe-down after each workout goes a long way.
Is It Worth Assembling Yourself?
The short answer is yes. Assembling your NordicTrack treadmill yourself saves money and gives you a sense of accomplishment. You also learn how every part works, which helps you troubleshoot minor issues later on.
That said, if the idea of building a machine from a pile of parts fills you with dread, professional assembly is a perfectly valid choice. The important thing is that your treadmill gets set up correctly so you can get to your workouts without any safety concerns.
Remember, the assembly process is temporary. Once it is done, you get to enjoy all the benefits of having a premium treadmill right in your home. No more gym commutes, no more waiting for machines, and no more weather excuses.
Final Thoughts
So, how hard is it to assemble a NordicTrack treadmill? The answer is: moderately challenging but very doable. With the right tools, a helper, and a bit of patience, most people complete the build in under three hours. The key is to follow the instructions, take your time, and not be afraid to ask for help when you need it.
Your new treadmill is an investment in your health and fitness. Taking the time to assemble it properly ensures you get years of reliable use from your workout equipment. Now go build it, plug it in, and get moving. Your fitness journey starts right at home.
Frequently Asked Questions
Can I assemble a NordicTrack treadmill by myself?
Yes, you can assemble a NordicTrack treadmill by yourself, but having a helper is strongly recommended. The frame and motor housing are heavy, and a second pair of hands makes the process safer and faster. If you are physically able and comfortable following detailed instructions, solo assembly is absolutely possible.
What should I do if a part is missing from my NordicTrack treadmill?
First, double-check the hardware bag and compare the parts list in your manual. Sometimes small pieces are tucked inside foam packaging. If a part is truly missing, contact NordicTrack customer support immediately. They will typically ship the missing part free of charge, especially if your treadmill is still under warranty.
Do I need any special tools to assemble a NordicTrack treadmill?
No special tools are required. NordicTrack includes an Allen wrench and screwdriver in the hardware bag. However, having an adjustable wrench, a socket wrench set, and a rubber mallet on hand makes the process smoother. A level is also helpful for ensuring your treadmill sits flat after assembly.
How long does the NordicTrack treadmill assembly warranty last?
NordicTrack typically covers defects in materials and workmanship for a specified period after purchase. The exact warranty length depends on the model and where you purchased it. Register your treadmill on the NordicTrack website as soon as possible to activate your warranty and ensure you are covered for any assembly-related issues.
Can I assemble my NordicTrack treadmill on carpet?
Yes, you can assemble your treadmill on carpet, but a hard floor is easier. Carpet can make it harder to slide parts and keep the workspace clean. If you do assemble on carpet, make sure the area is clear and the carpet is flat. For more tips on treadmill placement, check our guide on is it okay to have a treadmill on carpet.
What is the weight limit on a NordicTrack treadmill?
The weight limit varies by model, but most NordicTrack treadmills support between 250 and 350 pounds. Check your specific model’s specifications before purchasing to ensure it meets your needs. Exceeding the weight limit can damage the motor and void your warranty, so always verify this detail before assembly.