How to Put Air in Rear Bike Shock
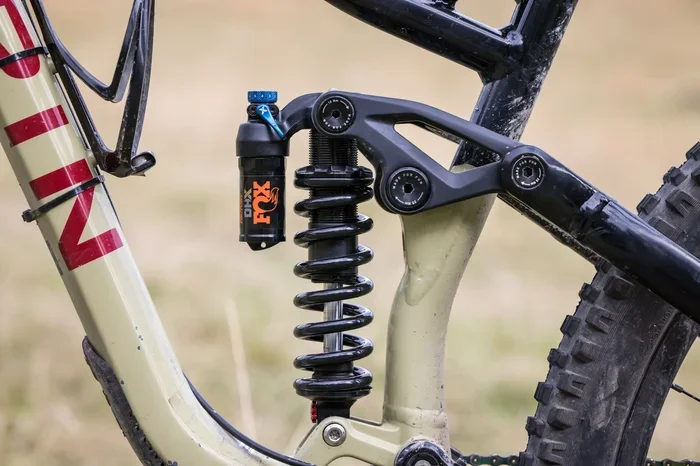
Putting air in your rear bike shock is one of the simplest ways to improve your ride quality and suspension performance. Whether you ride a mountain bike or a gravel rig, getting the right air pressure makes a huge difference in comfort and control. This guide walks you through everything from choosing a shock pump to setting the correct PSI for your weight and riding style. You will also learn common mistakes to avoid and expert tips to keep your rear suspension running smoothly for miles to come.
Riding a bike with a poorly set rear shock is like driving a car with flat tires. You feel every bump, lose traction, and tire out faster than you should. Putting air in your rear bike shock might seem intimidating at first, but it is actually a straightforward process once you know the basics. Whether you are a trail rider, an enduro enthusiast, or a casual mountain biker, getting your rear suspension dialed in will transform your rides.
The rear shock is the heart of your bike’s suspension system. It absorbs impacts from rocks, roots, and rough terrain, keeping your wheels planted on the ground. When the air pressure is too low, the shock bottoms out constantly. When it is too high, the ride becomes harsh and unforgiving. Finding the sweet spot takes a little trial and error, but this guide will give you all the tools and knowledge you need to get it right.
Key Takeaways
- Right PSI matters: Setting the correct air pressure in your rear shock improves comfort, traction, and overall ride quality.
- Use a shock pump: A dedicated shock pump gives you the precision needed for low-volume rear shocks.
- Sag is your guide: Measuring sag helps you dial in the perfect air pressure for your body weight and riding style.
- Check for leaks: Regularly inspect your shock for air leaks to maintain consistent performance.
- Follow manufacturer specs: Always refer to your shock manufacturer’s recommended pressure range as a starting point.
- Adjust for conditions: Fine-tune your air pressure based on terrain, rider weight, and temperature changes.
📑 Table of Contents
Why Air Pressure Matters in Your Rear Bike Shock
Air pressure controls how stiff or soft your rear shock feels. A well-inflated shock responds to bumps in a predictable way. It soaks up impacts without collapsing completely. This is called suspension travel, and it is what keeps you comfortable on rough descents.
Understanding Air Springs
Most modern mountain bike shocks use an air spring system. Air fills the inside of the shock’s air canister and acts like a coil spring. You can adjust the pressure to match your weight. Lighter riders need less air, while heavier riders need more. This is why how much air pressure in mountain bike rear shock is such a common question among riders of all levels.
The air spring works alongside your shock’s damping controls. The damping manages how fast the shock compresses and rebounds. But without the right air pressure, even the best damping settings will not feel right. Think of air pressure as the foundation. Everything else builds on top of it.
What Happens When Pressure Is Wrong
Too much air and your shock feels stiff. You will skip over small bumps and feel every rock. Too little air and the shock bottoms out on every big hit. Neither situation is fun. Here is a quick breakdown of what wrong pressure feels like:
- Too low: The shock bottoms out easily. You hear loud clunks on every drop. The rear end feels unstable and bouncy.
- Too high: The ride feels harsh. Small bumps are not absorbed. You lose traction on rough sections.
- Just right: The shock uses most of its travel without bottoming out. The ride feels smooth and controlled.
What You Need to Get Started
Before you start adding air, make sure you have the right tools. You do not need much, but having the correct equipment makes the process faster and more accurate.
A Shock Pump
A shock pump is the most important tool for this job. Unlike a regular bike tire pump, a shock pump has a small volume chamber that lets you add tiny amounts of air. This precision matters because rear shocks operate at low volumes. Even a few extra pumps can change the pressure significantly.
You can also use a shock pump with an air compressor if you prefer faster inflation. Some riders who already own an air compressor for tasks like how to air up bike tire with air compressor find it convenient for shocks too. Just be careful not to over-inflate. A shock pump with a built-in gauge is the safest option.
Your Bike and Shock Information
Before you add any air, check a few things on your bike:
- Find the shock model number and manufacturer.
- Look for the recommended pressure range printed on the shock or in the manual.
- Note your rider weight, including any gear you typically carry.
- Check if your shock uses a Presta valve or a standard shock valve.
This information will save you time and help you set the right pressure from the start. If you are unsure about your shock model, check the manufacturer’s website or the sticker on the shock itself.
Step-by-Step: How to Put Air in Rear Bike Shock
Now that you have your tools ready, let us walk through the process step by step. This method works for most air-sprung rear shocks found on modern mountain bikes.
Step 1: Find the Schrader or Shock Valve
Look at the top of your rear shock. You will see a valve, similar to a bike tire valve. Some shocks use a Schrader valve, which looks like the valve on a car tire. Others use a proprietary shock valve. If you have a Schrader valve, you can sometimes use a standard bike pump with an adapter, but a dedicated shock pump is always better.
Step 2: Attach the Shock Pump
Press the shock pump firmly onto the valve. Make sure it is seated properly so no air escapes while you pump. A loose fit will give you inaccurate readings and waste air. Give the pump a gentle tug to confirm it is locked in place.
Step 3: Check the Current Pressure
Look at the gauge on your shock pump. This tells you the current air pressure PSI inside the shock. Write this number down so you can compare it later. If the shock has never been set up, the pressure might be zero.
Step 4: Add Air Gradually
Start adding air in small amounts. One or two pumps at a time is plenty. After each addition, check the gauge again. You want to avoid overshooting your target pressure. It is much easier to add a little more air than to let some out.
Step 5: Check the Sag
Once you reach your target pressure, step on the pedals and sit on the bike in your normal riding position. Have a friend measure how much the shock compresses. This measurement is called sag. For most mountain bike shocks, you want about 25 to 30 percent sag. This means the shock should use roughly a quarter of its total travel when you are sitting on the bike.
If you are new to setting sag, check out our detailed guide on how to adjust rear air suspension on mountain bike for more tips on fine-tuning your setup.
Step 6: Test Ride and Fine-Tune
Go for a short ride and pay attention to how the shock feels. Does it bottom out on big hits? Add a little more air. Does it feel too stiff and skip over small bumps? Let out a small amount. Making small adjustments and testing them is the best way to find your perfect setting.
Common Mistakes When Adding Air to a Rear Shock
Even experienced riders sometimes make mistakes when setting up their rear shock. Here are the most common errors and how to avoid them.
Using a Regular Tire Pump
A standard bike tire pump does not work well for rear shocks. The volume is too large, and you cannot add small enough amounts of air. You will likely overshoot the pressure and end up with a harsh ride. Invest in a proper shock pump for accurate results.
Ignoring the Manufacturer’s Recommended Range
Every shock has a recommended pressure range. This range is based on the shock’s design and the air canister size. Going outside this range can damage the shock or lead to poor performance. Always start within the recommended range and adjust from there based on your personal preference and riding style.
Not Accounting for Temperature Changes
Air pressure changes with temperature. On a hot day, the air inside your shock expands, which increases pressure. On a cold day, the pressure drops. If you notice your shock feels different after a temperature change, check the pressure and adjust accordingly. This is something many riders overlook, but it matters for consistent performance.
Forgetting to Bleed the Shock
Sometimes air gets trapped in the damping oil inside the shock. This is called air spring fade, and it makes the shock feel inconsistent. If you notice your shock feels different after the first few hits and then settles down, you may need to bleed the shock. This is a more advanced task, so consider taking your bike to a professional if you are not comfortable doing it yourself.
How Often Should You Check Your Rear Shock Air Pressure?
Air slowly leaks from shocks over time. Most riders lose a few PSI per week, even with a good seal. This is normal. To keep your ride feeling its best, check your rear shock pressure at least once a month. If you ride frequently or in rough conditions, check it before every ride.
Also check the pressure after any major service or if you notice changes in how the shock feels. A sudden loss of air could indicate a damaged seal or a valve issue. Catching these problems early saves you from more expensive repairs later.
Quick Tips for Maintaining Rear Shock Air Pressure
- Keep your shock pump in your bike bag so it is always available.
- Write down your preferred pressure setting so you can quickly return to it.
- Clean the valve area before attaching the pump to prevent dirt from entering the shock.
- Store your bike in a cool, dry place to minimize pressure fluctuations.
- Have your shock professionally serviced every 50 to 100 hours of riding.
Expert Tips for Getting the Most Out of Your Rear Shock
Setting the air pressure is just the beginning. Here are some expert-level tips that will help you get the most out of your rear suspension.
Match Pressure to Your Riding Style
If you mostly ride smooth trails, you can run slightly higher pressure for a more efficient pedaling feel. If you tackle aggressive, technical terrain, lower pressure gives you more bump absorption and keeps your rear wheel tracking over rough sections. There is no single perfect pressure for every rider. It all depends on how and where you ride.
Consider Rider Weight and Gear
Your total weight matters more than just your body weight. If you carry a heavy backpack, hydration pack, or tools, factor that into your pressure calculation. A heavier setup needs more air to achieve the same sag percentage. This is why many shock manufacturers provide pressure charts based on rider weight ranges.
Pair Air Pressure with Damping Adjustments
Once you have the right air pressure, take some time to adjust the compression and rebound damping. These controls work together with the air spring to shape your ride feel. A well-set damping adjustment combined with the correct air pressure makes the biggest difference in how your bike handles. If you want to learn more about rear suspension setup and tuning, our guide on how much air pressure in mountain bike rear shock covers this topic in greater detail.
Keep Your Shock Clean
Dirt and grime around the shock shaft can damage the seals over time. Wipe down your shock after every muddy or dusty ride. A clean shock not only lasts longer but also maintains a better air seal, which helps pressure stay consistent between rides.
Conclusion
Putting air in your rear bike shock is a simple task that pays big rewards. With the right tools, a little patience, and the steps outlined in this guide, you can set up your rear suspension to match your weight, your riding style, and the terrain you tackle. Start by gathering your shock pump and checking your manufacturer’s recommended pressure range. Add air gradually, measure your sag, and fine-tune with test rides.
Remember to check your pressure regularly and avoid the common mistakes that trip up many riders. A well-maintained rear shock keeps you comfortable, in control, and confident on every ride. Take the time to dial it in, and your bike will feel like a completely different machine. Happy riding!
Frequently Asked Questions
How do I know what PSI to put in my rear bike shock?
Start by checking your shock manufacturer’s recommended pressure range. Then use your rider weight to narrow it down. Most manufacturers provide a chart that matches rider weight to air pressure. Set the pressure based on this chart, then measure your sag to fine-tune the setting.
Can I use a regular bike pump to put air in my rear shock?
You can, but only if your shock has a Schrader valve and you have an adapter. A regular bike pump lacks the precision needed for low-volume shocks. A dedicated shock pump with a gauge is the best tool for accurate and safe inflation.
What is sag and why does it matter?
Sag is the amount your rear shock compresses when you sit on the bike in your normal riding position. It matters because it tells you whether your air pressure is too high or too low. Most riders aim for 25 to 30 percent sag for the best balance of comfort and control.
How often should I add air to my rear bike shock?
Check your shock pressure at least once a month. Air naturally leaks over time, so you may need to add air regularly. If you ride often or in rough conditions, check the pressure before every ride to ensure consistent performance.
What happens if I put too much air in my rear shock?
Too much air makes the shock stiff and harsh. It will bottom out less, but it will skip over small bumps and feel unforgiving on rough terrain. You will also lose traction and comfort. If you over-inflate, let out a small amount of air and test again.
Do I need to bleed my rear shock if it feels inconsistent?
Not necessarily. Sometimes inconsistent feel comes from incorrect air pressure rather than internal issues. Check your PSI first and adjust if needed. If the problem persists, the shock may need bleeding or servicing. In that case, consider visiting a professional bike mechanic.