Car Seat Belt Cleaning Instructions
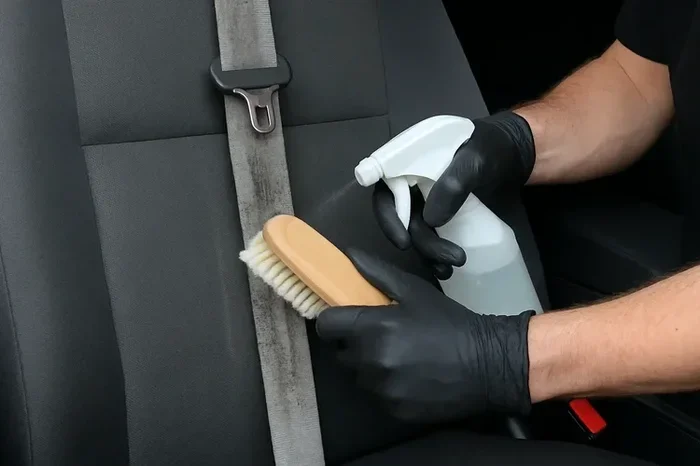
Car seat belt cleaning instructions are essential for maintaining both hygiene and safety in your vehicle. Regular cleaning removes dirt, stains, and odors that build up over time. This guide covers everything from basic wiping to deep cleaning techniques for all seat belt types. You will learn how to clean the webbing, the buckle, and the retractor mechanism safely. Follow these simple steps to keep your car seat belts looking and functioning like new.
Your car seat belt is one of the most important safety features in your vehicle. But here is something most people overlook: seat belts get dirty. They collect dust, food crumbs, sweat, and all kinds of grime every single day. Over time, this buildup can lead to stains, bad smells, and even bacteria growth. That is why knowing the right car seat belt cleaning instructions matters so much.
Cleaning your seat belts is not just about appearance. It is about hygiene and safety too. A dirty seat belt can harbor germs, and in some cases, grime can weaken the fabric over time. The good news is that cleaning them is surprisingly easy. You do not need expensive products or special tools. With a few household items and some basic know-how, you can have your seat belts looking fresh in under an hour.
In this guide, we will walk you through every step of the process. You will learn how to clean different parts of the seat belt, which products to use, and what mistakes to avoid. Whether you are dealing with a stubborn stain or just want to do routine maintenance, this guide has you covered. Let us get started.
Key Takeaways
- Regular cleaning prevents buildup: Dirt and grime accumulate on seat belts and can affect their integrity over time.
- Use the right cleaning solution: Mild soap and water work best for most seat belt materials.
- Never machine wash seat belts: This can damage the webbing and compromise safety.
- Clean the buckle and retractor too: These areas often harbor bacteria and debris.
- Dry seat belts completely: Moisture left behind can cause mold and unpleasant odors.
- Inspect for wear during cleaning: Cleaning is the perfect time to check for fraying or damage.
- Replace seat belts when needed: No amount of cleaning fixes a worn or damaged belt.
📑 Table of Contents
- Why You Should Clean Your Car Seat Belts Regularly
- What You Need Before You Start
- Step-by-Step Car Seat Belt Cleaning Instructions
- Common Mistakes to Avoid When Cleaning Seat Belts
- How Often Should You Clean Your Seat Belts?
- When to Replace Your Seat Belt Instead of Cleaning
- Quick Tips for Keeping Seat Belts Clean Between Deep Cleanings
- Final Thoughts on Car Seat Belt Cleaning
Why You Should Clean Your Car Seat Belts Regularly
Most people clean the inside of their car but forget about the seat belts. This is a mistake. Seat belts are in constant contact with your skin, and they absorb sweat, oils, and dead skin cells. Over weeks and months, this creates a perfect environment for bacteria and odor. Here is why regular cleaning matters.
Hygiene and Health Benefits
Your seat belt touches your skin every time you drive. This means it collects body oils, sweat, and dead skin. In warm weather, this buildup can cause skin irritation or even minor infections. Regular cleaning removes these contaminants and keeps your seat belt hygienic. This is especially important if you have kids or pets who ride in the back seat.
Extending the Life of Your Seat Belts
Dirt and grime are abrasive. They slowly wear down the fabric and weaken the stitching. By cleaning your seat belts regularly, you remove these harmful particles. This helps the seat belt material stay strong and flexible. A well-maintained seat belt lasts longer and performs better in a crash.
Maintaining Your Car’s Value
If you ever plan to sell or trade in your car, the interior condition matters a lot. Stained or smelly seat belts can lower the perceived value of your vehicle. Clean seat belts give the impression that the car has been well cared for. This small effort can make a big difference when it is time to sell.
What You Need Before You Start
Before you dive into cleaning, gather your supplies. You do not need anything fancy. Most of these items are already in your home. Having everything ready will make the process smooth and efficient.
Essential Cleaning Supplies
- Mild dish soap or car interior cleaner: Avoid harsh chemicals that can damage the fabric.
- Warm water: Not too hot, as heat can shrink or damage the webbing.
- Soft-bristle brush or old toothbrush: This helps you scrub away stubborn stains gently.
- Microfiber cloths: These are gentle and do not leave lint behind.
- A spray bottle: For mixing and applying your cleaning solution.
- Baking soda: Great for absorbing odors and lifting stains.
- White vinegar: A natural disinfectant that works well on seat belt fabric.
Optional but Helpful Tools
- A small vacuum with a narrow nozzle: Perfect for sucking out loose dirt from the buckle area.
- Cotton swabs: Great for reaching into the buckle crevices.
- A flat-head screwdriver: Useful for gently prying off the seat belt buckle cover if needed.
Step-by-Step Car Seat Belt Cleaning Instructions
Now that you have your supplies ready, it is time to start cleaning. Follow these steps carefully for the best results. Each step addresses a different part of the seat belt system.
Step 1: Prep the Seat Belt
Start by pulling the seat belt out fully. This gives you access to the entire length of the webbing. Look for any visible dirt, stains, or debris. Use the vacuum with a narrow nozzle to remove loose dust and crumbs. This step makes the actual cleaning much more effective because you are not just pushing dirt around.
Step 2: Mix Your Cleaning Solution
In your spray bottle, mix a few drops of mild dish soap with warm water. Shake it gently to create a light, soapy solution. Do not use too much soap, as residue can be hard to rinse out. If you prefer a natural option, mix equal parts water and white vinegar. Both solutions work great for cleaning seat belt fabric.
Step 3: Scrub the Webbing
Spray the cleaning solution onto a microfiber cloth, not directly onto the seat belt. This gives you more control and prevents oversaturation. Use the soft-bristle brush or toothbrush to gently scrub the webbing in a back-and-forth motion. Focus on any stained or discolored areas. Work in small sections to make sure you clean each part thoroughly.
For stubborn stains, make a paste using baking soda and a small amount of water. Apply the paste to the stain and let it sit for about 10 minutes. Then scrub gently with your brush. The baking soda acts as a mild abrasive that lifts the stain without damaging the fabric.
Step 4: Wipe and Rinse
After scrubbing, use a clean damp cloth to wipe away the soap and loosened dirt. Go over the webbing a few times to remove all residue. If possible, use a separate cloth dampened with plain water for the final wipe. This ensures no soap is left behind, which could attract more dirt later.
Step 5: Clean the Buckle and Retractor
The buckle and retractor are often neglected, but they need attention too. Use cotton swabs dipped in your cleaning solution to reach into the buckle’s tight spaces. Wipe away any grime or corrosion on the metal parts. For the retractor mechanism, a quick wipe with a damp cloth is usually enough. Do not use excessive water near the retractor, as moisture can cause rust.
Step 6: Dry Completely
This is a step many people skip, but it is crucial. Let the seat belt air dry completely before retracting it. You can speed up the process by opening a window or using a fan. Never retract a damp seat belt, as trapped moisture can lead to mold and mildew. It can also cause a musty smell that is very hard to get rid of.
Common Mistakes to Avoid When Cleaning Seat Belts
Even with the best intentions, it is easy to make mistakes when cleaning car seat belts. Here are some common errors you should avoid to protect your seat belts and your safety.
Using Harsh Chemicals
Avoid bleach, ammonia, or heavy-duty industrial cleaners. These products can weaken the seat belt webbing and degrade the material over time. Stick to mild soap, vinegar, or a dedicated car interior cleaner. Your seat belt fabric is designed to withstand normal wear, not harsh chemicals.
Soaking the Seat Belt
Never soak or saturate the seat belt with water or cleaning solution. Excessive moisture can reach the retractor mechanism and cause rust or malfunction. It can also weaken the stitching that holds the webbing together. Always apply cleaning solution with a cloth, not by pouring it directly onto the belt.
Skipping the Drying Step
As mentioned earlier, drying is critical. A damp seat belt is a breeding ground for mold and bacteria. It also smells terrible. Take the time to let the seat belt dry fully before using the car again. Patience here pays off in the long run.
Forgetting to Check for Damage
Cleaning is the perfect time to inspect your seat belts. Look for fraying, cuts, or stretched webbing. Check the buckle for any cracks or malfunction. If you notice any damage, address it immediately. A compromised seat belt cannot protect you in a crash.
How Often Should You Clean Your Seat Belts?
The frequency of cleaning depends on how you use your car. If you eat in the car regularly or have pets, you will need to clean more often. As a general rule, aim to clean your seat belts at least once a month. A quick wipe-down with a damp cloth every week can also help prevent buildup between deeper cleanings.
If you notice stains or odors, do not wait. Address them as soon as possible. The longer a stain sits, the harder it becomes to remove. The same goes for odors. Treating them early prevents them from setting into the fabric permanently.
When to Replace Your Seat Belt Instead of Cleaning
Cleaning can do wonders, but it cannot fix everything. There are times when a seat belt needs to be replaced rather than cleaned. Here are the signs that your seat belt has reached the end of its life.
- Frayed or torn webbing: If the fabric is visibly worn or has holes, it needs replacement.
- Stretched or loose belt: A seat belt that does not retract properly or feels loose may have a internal mechanism problem.
- Damaged buckle: If the buckle does not latch or release smoothly, it is a safety concern.
- Persistent odor after cleaning: If a bad smell remains even after thorough cleaning, mold may be deep inside the retractor.
- Visible rust on the retractor: Rust can compromise the mechanism and should be inspected by a professional.
If you are unsure whether your seat belt needs replacement, consult a certified mechanic or auto body specialist. They can assess the condition and advise you on the best course of action. Remember, seat belts are a critical safety feature. Never compromise on their condition.
Quick Tips for Keeping Seat Belts Clean Between Deep Cleanings
Deep cleaning is great, but maintenance between sessions keeps your seat belts in top shape. Here are some quick tips to make this easier.
- Wipe down seat belts after eating in the car: A quick wipe prevents crumbs and spills from setting in.
- Use a seat belt cover: If you have pets, a cover can protect the webbing from fur and dirt.
- Keep a small cleaning kit in your trunk: Include a microfiber cloth, a small spray bottle, and a travel-sized cleaner.
- Air out your car regularly: Opening the windows for a few minutes helps reduce moisture and odor buildup.
- Wash your hands before driving: This reduces the oils and dirt transferred to the seat belt.
Final Thoughts on Car Seat Belt Cleaning
Cleaning your car seat belts is a simple task that delivers big benefits. It improves hygiene, extends the life of your seat belts, and keeps your car interior looking its best. With the right supplies and a little time, you can follow these car seat belt cleaning instructions easily at home. No special skills or expensive equipment are needed.
Make seat belt cleaning a regular part of your car maintenance routine. Just like oil changes and tire rotations, it keeps your vehicle in great shape. Your seat belts protect you every time you drive, so give them the care they deserve. Start today, and you will notice the difference immediately.
Remember, a clean seat belt is a safe seat belt. Take a few minutes each month to wipe them down and do a deeper clean whenever needed. Your car, your passengers, and your peace of mind will all thank you for it.
Frequently Asked Questions
Can I machine wash my car seat belts?
No, you should never machine wash car seat belts. The agitation and water exposure can damage the webbing and the retractor mechanism. Always clean seat belts by hand using a mild soap solution and a soft cloth or brush.
What is the best cleaning solution for seat belts?
A mild dish soap mixed with warm water works best for most seat belt materials. You can also use a solution of equal parts water and white vinegar for a natural alternative. Avoid harsh chemicals like bleach or ammonia.
How long does it take to clean car seat belts?
A thorough cleaning of all seat belts typically takes about 30 to 45 minutes. This includes scrubbing, wiping, and allowing time for drying. Regular quick wipes take only a few minutes.
Can I use a steam cleaner on seat belts?
Yes, a steam cleaner can be effective for cleaning seat belts. It helps lift dirt and sanitize the fabric without chemicals. Just be careful not to use too much steam, as excessive moisture can damage the retractor mechanism.
How do I remove stubborn stains from seat belts?
Make a paste of baking soda and water, apply it to the stain, and let it sit for 10 minutes. Then gently scrub with a soft brush and wipe clean with a damp cloth. Repeat if necessary for tough stains.
Is it safe to use WD-40 on seat belt buckles?
WD-40 can be used sparingly on metal buckle parts to reduce sticking or corrosion. However, avoid getting it on the fabric webbing, as it can leave an oily residue. Wipe off any excess immediately and do not use it near the retractor.
=== CONCLUSION ===
Car seat belt cleaning instructions are simple to follow and make a real difference in your vehicle’s hygiene and safety. By cleaning your seat belts regularly and avoiding common mistakes, you keep them in excellent condition for years to come. Use the right supplies, follow each step carefully, and never skip the drying process. A little effort goes a long way when it comes to maintaining one of your car’s most important safety features. Start your cleaning routine today and enjoy a fresher, safer driving experience.