How to Get Under Barbell for Hip Thrusts
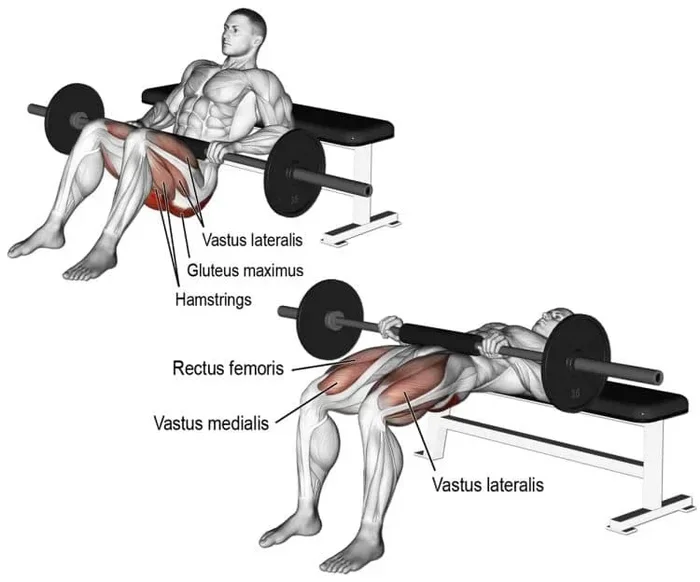
Learning how to get under the barbell for hip thrusts correctly is the single most important step toward building powerful glutes and avoiding injury. Proper barbell positioning ensures your hips drive through the full range of motion while keeping your spine neutral and your core engaged. This guide walks you through the exact setup, including bench height, foot placement, and barbell alignment, so you can maximize every rep and train with confidence.
Getting under the barbell for hip thrusts is one of those small details that makes a huge difference in your workout. If you have ever felt awkward, unstable, or unsure about your setup, you are not alone. Many lifters struggle with this step, especially when they are just starting out. The good news is that once you nail the positioning, everything else falls into place. This guide will walk you through exactly how to get under the barbell for hip thrusts the right way.
The barbell hip thrust is one of the best exercises for building strong glutes and powerful hips. But the exercise only works well when your setup is solid. Think of it like building a house. If the foundation is off, the whole thing suffers. Whether you train at home or at the gym, learning the proper hip thrust setup is essential. In this article, we will break down every step so you can feel confident and safe every time you load up the barbell.
We will cover the exact body positioning, common mistakes to avoid, the gear you need, and tips for both beginners and advanced lifters. By the end, you will have a clear picture of how to position yourself under the barbell like a pro. Let us dive in.
Key Takeaways
- Position the barbell low: Rest it across your hip crease for maximum comfort and power transfer.
- Choose the right bench height: Your thighs should be parallel to the floor when seated.
- Roll the barbell into position: Walk your hips forward to let the bar settle snugly against your hips.
- Use a protective pad: Cushion the barbell with a towel or hip thrust pad to prevent discomfort.
- Press your shoulder blades back: Pin them firmly to the bench for a stable, secure base.
- Set feet shoulder-width apart: A solid stance gives you the leverage needed to drive the barbell up.
- Drive through your heels: Focus on heel pressure to fully engage your glutes throughout each rep.
📑 Table of Contents
- Why Proper Barbell Positioning Matters for Hip Thrusts
- Step-by-Step Guide to Getting Under the Barbell
- Common Mistakes When Getting Under the Barbell
- Equipment You Need for a Safe Hip Thrust Setup
- Tips for Beginners Learning the Hip Thrust
- Advanced Techniques for Better Hip Thrust Performance
- Key Takeaways for a Perfect Hip Thrust Setup
Why Proper Barbell Positioning Matters for Hip Thrusts
You might wonder why so much attention goes into how you get under the barbell. The answer is simple. Your starting position determines how the entire movement feels and how effective it is. When the barbell sits in the wrong spot, you lose tension in your glutes. You might also put unnecessary strain on your lower back or neck.
Proper barbell positioning ensures that the weight is directly over your hips. This allows you to drive force through your heels and squeeze your glutes at the top of the movement. When the bar is too high or too low, your body compensates. That compensation leads to weaker results and a higher risk of injury.
Here is why getting this step right matters so much:
- It protects your spine and hips from unnecessary stress.
- It maximizes glute activation during every rep.
- It gives you a stable base to push from.
- It helps you lift heavier weights over time.
- It builds confidence in your movement pattern.
When you take the time to set up correctly, you are not just lifting weight. You are training your body to move properly. That is where real progress happens.
Step-by-Step Guide to Getting Under the Barbell
Now let us get into the practical part. Follow these steps each time you set up for a barbell hip thrust. Once you memorize the sequence, it will become second nature.
Step 1: Position the Bench Behind You
Start by placing a flat bench or stable surface behind your back. The bench should be sturdy and at the right height. When you sit on the floor with your upper back resting on the bench, your knees should bend at about 90 degrees. Your feet should be flat on the ground, roughly shoulder-width apart.
Take a moment to adjust the bench position. If it is too far forward or too far back, your hip extension range will be limited. You want your hips to be able to drop slightly below parallel at the bottom of the movement. This small detail makes a big difference in how effectively your glutes work.
Step 2: Sit Down and Roll the Barbell Over Your Hips
Sit on the floor with your back against the bench. Now comes the key moment. You need to carefully roll the barbell over your hips. Do not just drop onto it. The barbell hip thrust setup should be controlled and intentional.
Use your hands to guide the bar as it crosses your hip crease. Position the bar so it sits just above your hip bones. A barbell pad for hip thrusts can make this step much more comfortable. The pad distributes the pressure evenly and prevents the hard bar from digging into your hip flexors.
Step 3: Lean Back and Plant Your Feet
Once the bar is in place, gently lean back so your upper back rests firmly against the bench. Your head should be comfortable and neutral. Look straight up or slightly forward, not at your feet.
Now plant your feet. Press your heels into the ground. Your shins should stay roughly vertical at the start of the movement. This foot position gives you the best leverage to drive the barbell upward. If your feet are too far forward or too far back, you will lose power and stability.
Step 4: Grip the Bar and Unrack
Place your hands on the barbell with a shoulder-width grip. Your palms should face down. Take a deep breath and brace your core. When you are ready, push through your heels to lift the bar off the floor.
Unracking the barbell is a critical part of the hip thrust technique. The bar should feel balanced and secure on your hips. If it feels unstable, do not start the set. Adjust your position before you begin. Safety always comes first.
Step 5: Perform the Hip Thrust with Control
With the bar unracked, you are ready to begin the movement. Push your hips upward by squeezing your glutes. Keep your core tight throughout. At the top, your body should form a straight line from your shoulders to your knees.
Lower the bar back down in a controlled manner. Do not let the weight crash down. Control the eccentric portion of the movement. This is where a lot of the muscle-building benefit comes from. Slow and steady wins the game here.
Common Mistakes When Getting Under the Barbell
Even experienced lifters make mistakes with their hip thrust setup. Being aware of these errors helps you avoid them. Here are the most common ones.
Mistake 1: Skipping the Barbell Pad
This is probably the number one mistake people make. The barbell is hard. Your hip bones are hard. Putting them together without padding is a recipe for pain. A good barbell pad for hip thrusts protects your body and lets you focus on the exercise instead of discomfort.
If you are training at home and do not have a pad, a thick towel or yoga mat rolled up can work in a pinch. But a proper pad is a worthwhile investment. Your hips will thank you after every set.
Mistake 2: Setting the Bench Too Far Forward
When the bench is too far forward, you cannot fully extend your hips at the top of the movement. This limits your range of motion and reduces glute activation. You want to be able to push your hips all the way up until your body is in a straight line.
Take the time to find the right bench position before you start your working sets. Small adjustments can make a big difference in how the exercise feels.
Mistake 3: Letting the Head Lift Off the Bench
Some lifters tuck their chin too far or let their head pop off the bench during the movement. Both of these create unnecessary neck strain. Keep your head resting comfortably on the bench throughout the set.
Your neck should stay neutral. Think of it as a stable anchor point for your upper body. If your neck starts hurting, stop and check your position before continuing.
Mistake 4: Using the Wrong Foot Placement
Your feet do more than just stand there. They are the foundation of the entire movement. If your feet are too close together, you lose balance. If they are too wide, your hip mechanics change and your glutes do less work.
Keep your feet about hip-width apart. Point your toes slightly outward if that feels more natural. Experiment during your warm-up sets to find the sweet spot that lets you push the most weight with the best form.
Equipment You Need for a Safe Hip Thrust Setup
Having the right equipment makes a huge difference in how safe and effective your hip thrust exercise is. You do not need a lot of gear, but the right pieces matter.
Here is what you need:
- A sturdy bench: It should not wobble or slide. A flat bench works best for most people.
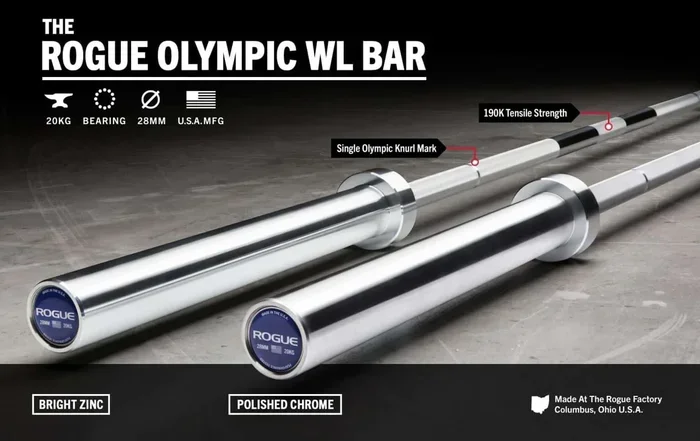
- A barbell: Standard Olympic bars work great. The length of the bar matters too. Make sure you have enough clearance to get under it comfortably.
- A barbell pad: This is non-negotiable for comfort. It protects your hips and makes the exercise feel much better.
- Weight plates: Choose plates that match your strength level. Start light and build up gradually.
- Non-slip flooring: Your feet need to stay planted. A rubber mat or gym flooring prevents slipping.
If you train at home, you might also want to consider a hip thrust without bench setup. There are alternatives that work well if you do not have access to a bench. These can be just as effective when done with proper form.
Quick Comparison: Bench vs. No-Bench Hip Thrust Setup
| Feature | With Bench | Without Bench |
|---|---|---|
| Stability | High | Moderate |
| Range of Motion | Full | Limited |
| Comfort | Very comfortable | Can be awkward |
| Best For | Gym and home use | Travel or limited space |
| Weight Capacity | High | Moderate |
As you can see, using a bench gives you the best overall setup. But a no-bench version still works when you need it. The key is to maintain proper form regardless of which option you choose.
Tips for Beginners Learning the Hip Thrust
If you are new to the barbell hip thrust, the learning curve can feel steep. That is completely normal. Every experienced lifter started exactly where you are now. Here are some tips that will help you progress faster and with fewer frustrations.
Start with Bodyweight or Light Weight
Do not jump straight to heavy weight. Your body needs time to learn the movement pattern. Start with just the bar or even bodyweight hip thrusts. Focus on feeling your glutes engage throughout the entire range of motion.
Once you can do 15 to 20 reps with perfect form, you can start adding weight in small increments. A good rule of thumb is to increase the load by no more than five to ten pounds per week. This gradual approach builds strength safely and reduces the risk of injury.
Practice the Setup Without Weight
Before you add any plates, practice getting under the barbell with no weight at all. Go through the full setup sequence. Feel where the bar sits on your hips. Check that your back is comfortable against the bench. Make sure your feet are in the right spot.
This practice round builds muscle memory. When it is time to load up the bar, your body will already know what to do. That familiarity makes the whole process smoother and safer.
Use a Mirror or Record Yourself
It is hard to see your own setup from the inside. If you have access to a mirror, use it. Better yet, record a short video of your set from the side. Watching it back helps you spot issues you cannot feel in the moment.
Look for these things in your video:
- Is your back flat against the bench?
- Are your feet planted firmly?
- Does the bar sit centered over your hips?
- Are your knees at the right angle?
Small adjustments based on what you see can lead to big improvements in your form and results.
Get Comfortable With the Unracking Process
Unracking the barbell can feel intimidating, especially when the weight is heavy. Practice the unracking motion separately. Get used to the feeling of the barbell on your hips before you start pressing it upward.
Take a deep breath, brace your core, and push the bar off the floor. Hold it at the top for a second to make sure you feel stable. Once you are comfortable, lower it back down with control. Repeat this a few times before you start your real working sets.
Advanced Techniques for Better Hip Thrust Performance
Once you have mastered the basic setup, you can start exploring more advanced approaches. These techniques help you break through plateaus and keep your training challenging.
Try a Hip Thrust Without a Bench
Doing the exercise without a bench changes the dynamics significantly. You will need more stability and balance. This can actually make your glutes work harder because your body has to stabilize itself throughout the movement.
If you want to try this, check out our guide on how to do barbell hip thrusts without a bench. It provides detailed instructions and safety tips for this alternative setup.
Experiment With Different Foot Positions
Small changes in foot placement can shift the emphasis to different muscle groups. A narrower stance targets the glutes more directly. A wider stance may involve more of the inner thigh muscles.
Try different foot positions during your warm-up sets. Pay attention to how each variation feels. You might find that a slight change unlocks a new level of glute activation for you.
Add Pause Reps for Extra Time Under Tension
Pause reps are a simple but powerful way to make the exercise harder. At the top of the movement, hold the position for two to three seconds before lowering back down. This keeps your glutes under tension for longer and builds more strength.
Start with just one or two pause reps per set. You will feel the difference immediately. Your glutes will be burning in the best way possible.
Focus on the Mind-Muscle Connection
One of the most underrated tips for improving any exercise is to focus on the muscle you are working. During hip thrusts, concentrate on squeezing your glutes at the top of the movement. Visualize the muscles contracting and releasing.
This mental focus might sound simple, but it has a real impact on how effectively you recruit muscle fibers. When you combine proper form with a strong mind-muscle connection, your results will improve faster than you expect.
Key Takeaways for a Perfect Hip Thrust Setup
Let us quickly recap what you have learned about getting under the barbell for hip thrusts:
- Position the bench correctly behind you before anything else.
- Roll the barbell over your hips with control and use a pad for comfort.
- Plant your feet firmly and keep your upper back against the bench.
- Avoid common mistakes like skipping the pad or using poor foot placement.
- Start light, practice the setup, and progress gradually.
- Explore advanced techniques once you have mastered the basics.
The hip thrust is one of the most effective exercises for building strong, powerful glutes. But all of that potential only comes through when your setup is right. Take the time to learn the process. Practice it every single time you train. The results will follow.
Remember, every expert was once a beginner. Do not get discouraged if the setup feels awkward at first. Keep practicing, stay patient, and trust the process. Your glutes will grow stronger with each session, and the barbell hip thrust will become one of your favorite exercises in the gym.
Frequently Asked Questions
How To Get Under Barbell For Hip Thrusts Safely?
Position yourself in a squat rack so the barbell sits at your mid-stomach height. Walk backward until the barbell rests across your hip crease, then grip the bar and unrack it. This setup keeps your spine neutral and your core engaged before you begin the movement.
What Is the Best Barbell Position for Hip Thrusts?
The barbell should sit directly across your hip bones, not your lower back or stomach. Use a padded barbell pad to distribute pressure evenly and prevent discomfort. Proper placement ensures maximum glute activation and reduces the risk of injury.
Can You Do Hip Thrusts Without a Squat Rack?
Yes, you can use a bench and have a partner hand you the barbell, or load the bar on a low rack and carefully roll it into position. The key is to maintain control and avoid jerky movements when getting the bar onto your hips. Always prioritize safety over convenience when setting up without a rack.
How Do You Position Your Body When Getting Under the Barbell?
Sit on the floor with your upper back resting against a bench, then walk your feet forward so the barbell settles over your hips. Keep your knees bent at roughly 90 degrees and your feet flat on the ground. This body position creates a stable base for a powerful hip thrust.
Why Does the Barbell Hurt My Hips During Hip Thrusts?
Discomfort usually happens when the barbell sits too low on the femurs or too high on the stomach. Adjust the pad thickness and bar placement until the pressure sits squarely on your hip crease. If pain persists, reduce the weight and check your alignment before adding more load.
What Are Quick Tips for Getting Under the Barbell for Hip Thrusts?
Always use a quality barbell pad, set the rack height correctly, and walk slowly into position. Engage your core and glutes before unracking the bar to protect your lower back. These small adjustments make a big difference in comfort and performance during every set.