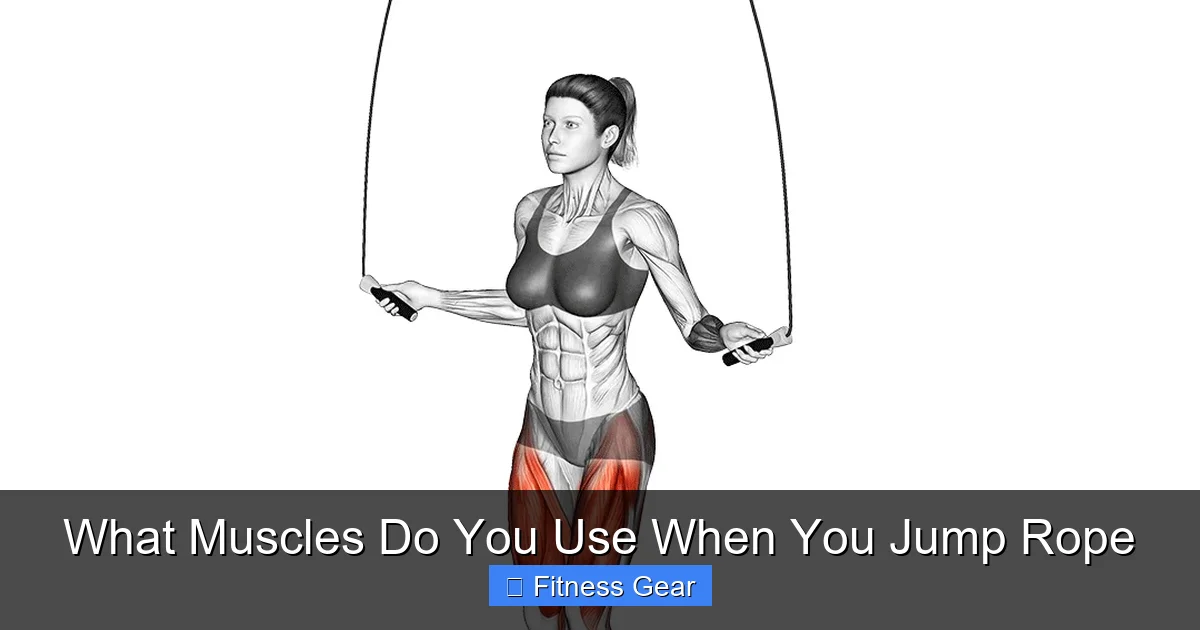
What Muscles Do You Use When You Jump Rope

Jump rope isn’t just cardio—it’s a total‑body strength builder. From calves and quads to your core and shoulders, every jump fires a chain of muscles that improve endurance, coordination, and power. Understanding which muscles work helps you train smarter and avoid injury.
Key Takeaways
- Lower‑body power: Calves, quads, hamstrings, and glutes do the heavy lifting for each hop.
- Core stability: Abs and lower back keep you upright and control the rope’s rhythm.
- Upper‑body coordination: Shoulders, forearms, and wrists guide the rope with precision.
- Joint health: Proper technique reduces stress on knees and ankles while strengthening supportive muscles.
- Calorie burn: Engaging multiple muscle groups makes rope jumping a high‑intensity calorie torcher.
- Injury prevention: Balanced training of all involved muscles protects against overuse strains.
- Progression tips: Targeted strength work for each muscle group speeds up jump‑rope skill gains.
📑 Table of Contents
- Introduction: Why Jump Rope Is a Full‑Body Exercise
- 1. The Lower Body: Power From the Ground Up
- 2. Core Muscles: The Unsung Heroes of Stability
- 3. Upper Body: Guiding the Rope With Precision
- 4. How the Muscles Work Together: The Kinetic Chain
- 5. Building Strength for Better Rope Performance
- 6. Common Mistakes & How to Fix Them
- Conclusion: Harness the Power of Every Muscle
Introduction: Why Jump Rope Is a Full‑Body Exercise
When you picture a simple piece of rope swinging under your feet, you might think the workout is only for your calves. In reality, every jump is a tiny orchestra of muscle action. The rope’s rhythm forces your legs, core, and arms to work together, creating a harmonious full‑body workout that burns calories, builds coordination, and boosts athletic performance.
Whether you’re a beginner learning the basic bounce or an advanced athlete mastering double‑unders, knowing which muscles fire during each movement helps you train smarter. It lets you target weak spots, avoid injury, and get the most out of every minute you spend on the rope.
1. The Lower Body: Power From the Ground Up
Calves (Gastrocnemius & Soleus)
The calf muscles are the first to fire when you push off the ground. They generate the quick, explosive extension needed for each hop. Because the rope’s contact time is short, the calves work in rapid, repeated bursts, improving both strength and endurance.

Visual guide about What Muscles Do You Use When You Jump Rope
Image source: cdn.britannica.com
Quadriceps (Front Thigh)
While the calves handle the push‑off, the quadriceps stabilize the knee joint and help straighten the leg during the landing phase. Strong quads reduce knee strain and keep the bounce light and springy.
Hamstrings (Back Thigh)
The hamstrings act as a brake, controlling the knee’s flexion as you land. They also assist in hip extension when you jump higher, especially during advanced moves like high‑knees or double‑unders.
Glutes (Buttocks)
Your gluteus maximus and medius add power to the upward motion and keep the pelvis stable. Engaging the glutes prevents excessive forward lean, which can cause lower back fatigue.
Hip Flexors (Iliopsoas)
When you incorporate high‑knees or alternate‑foot jumps, the hip flexors lift the thigh. This adds a cardio challenge and engages the core for balance.
Practical Tip:
Do a simple “calf‑raise + squat” combo three times a week. Perform 3 sets of 15 calf raises followed immediately by 12 bodyweight squats. This routine mirrors the push‑off and landing phases of rope jumping, strengthening the exact muscles you use.
2. Core Muscles: The Unsung Heroes of Stability
Rectus Abdominis (Front Abs)
The “six‑pack” muscles contract to keep your torso upright. They prevent excessive forward tilt, which can cause the rope to hit your feet.

Visual guide about What Muscles Do You Use When You Jump Rope
Image source: inspireusafoundation.org
Obliques (Side Abs)
Side‑bending and rotational stability come from the obliques. They help you keep the rope’s path straight, especially when you turn your shoulders slightly to speed up the swing.
Transverse Abdominis (Deep Core)
This deep muscle acts like a natural weight‑belt, stabilizing the spine during the rapid up‑and‑down motion. A strong transverse abdominis reduces lower back strain.
Erector Spinae (Lower Back)
The lower back muscles work opposite the abs to maintain a neutral spine. They help you stay tall and prevent the common “hunch‑over” posture that wastes energy.
Practical Tip:
Incorporate a “plank‑to‑push‑up” circuit after each rope session. Hold a plank for 30 seconds, then transition to a push‑up, repeat 5 times. This builds endurance in the entire core chain that supports rope jumping.
3. Upper Body: Guiding the Rope With Precision
Shoulders (Deltoids)
The anterior deltoid initiates the rope swing, while the posterior deltoid stabilizes the arm’s position. Strong shoulders keep the rope’s arc consistent, which is crucial for timing.
Visual guide about What Muscles Do You Use When You Jump Rope
Image source: inspireusafoundation.org
Forearms (Flexors & Extensors)
Every rotation of the rope is driven by the wrist and forearm muscles. Grip strength also matters; a firm yet relaxed grip prevents rope twist and reduces fatigue.
Triceps & Biceps
The triceps help extend the arm during the forward swing, while the biceps control the return motion. Balanced arm strength ensures smooth, energy‑efficient rope turns.
Practical Tip:
Perform “wrist curls” and “reverse wrist curls” with a light dumbbell (2–5 lb). Do 3 sets of 20 reps each, twice a week. Strong forearms translate directly into longer, cleaner rope swings.
4. How the Muscles Work Together: The Kinetic Chain
From Ground to Hand
Jump rope is a perfect example of a kinetic chain: the power starts at the ground (calves), travels up through the thighs, hips, core, and finally reaches the shoulders and wrists. If any link in this chain is weak, the whole movement suffers.
Timing and Coordination
Timing is the brain’s job, but the muscles execute the plan. Your brain sends a signal to the calves to jump, the core to stay rigid, and the arms to swing. Practicing at a slower speed helps cement the neural pathways, allowing the muscles to fire automatically at higher speeds.
Energy Efficiency
When all muscles are conditioned, each jump uses less energy. That’s why seasoned jumpers can keep a rapid pace for minutes without feeling exhausted, while beginners tire quickly.
Practical Tip:
Do a “slow‑motion” rope drill: jump at half speed while focusing on each muscle group’s role. Notice the calf push, core brace, and wrist turn. After a few minutes, increase the speed while maintaining the same muscle awareness.
5. Building Strength for Better Rope Performance
Leg Strength Routines
- Box jumps – 3 sets × 8 reps (explosive calf & quad power)
- Lunges – 3 sets × 12 each leg (hamstring & glute activation)
- Single‑leg calf raises – 4 sets × 15 each leg (balance & ankle stability)
Core Conditioning
- Dead bugs – 3 sets × 10 each side (deep core control)
- Russian twists – 3 sets × 20 (oblique endurance)
- Supermans – 3 sets × 15 (lower back resilience)
Upper‑Body Conditioning
- Band‑assisted rope swings – 2 sets × 30 seconds (shoulder endurance)
- Reverse curls – 3 sets × 12 (forearm extensors)
- Push‑ups – 3 sets × 15 (triceps & shoulder stability)
Integrating With Rope Sessions
Start each rope workout with a 5‑minute dynamic warm‑up (leg swings, arm circles, torso twists). After the rope interval, finish with the targeted strength moves above. This approach reinforces the exact muscles you just used, accelerating adaptation.
6. Common Mistakes & How to Fix Them
Landing Too Heavily
Heavy landings overwork the knees and weaken calf activation. Aim for a soft “quiet” bounce—think of landing on a pillow.
Hunching the Shoulders
Rounded shoulders tighten the upper back and reduce rope swing efficiency. Keep shoulders relaxed and slightly pulled down.
Neglecting the Core
Letting the hips sag or arch puts strain on the lower back. Engage the abs and keep a neutral spine throughout.
Improper Rope Length
If the rope is too long, you waste energy on extra rotations; too short, and you strain the shoulders. Stand on the rope’s middle; the handles should reach roughly to your armpits.
Fixing the Issues
- Practice “feet‑only” jumps on a mat to feel a light landing.
- Do shoulder rolls before each session to release tension.
- Perform a “plank hold” for 30 seconds before you start jumping to activate the core.
Conclusion: Harness the Power of Every Muscle
Jump rope is more than a cardio fad; it’s a sophisticated, whole‑body workout that recruits the calves, quads, hamstrings, glutes, core, shoulders, forearms, and even the small stabilizers around the spine and hips. By understanding the role each muscle plays, you can tailor your training, avoid common injuries, and jump higher, faster, and longer.
So the next time you hear that familiar “swish‑swish” of the rope, remember: you’re not just burning calories—you’re sculpting a powerful, coordinated machine from head to toe. Keep the rope moving, keep the muscles engaged, and enjoy the rhythm of a stronger, fitter you.
Frequently Asked Questions
Which muscle group burns the most calories while jumping rope?
The calves and quadriceps do the most work because they generate the explosive push‑off for each hop, making them the primary calorie‑burning muscles.
Do I need strong arms to jump rope effectively?
While you don’t need massive arms, the shoulders, forearms, and wrists must be conditioned for smooth rope rotation and endurance.
Can jumping rope help improve my running performance?
Yes. Strengthening the calves, quads, and core through rope jumping enhances stride efficiency and reduces injury risk for runners.
How often should I train the muscles used in jump rope?
Incorporate rope sessions 3–4 times a week and add complementary strength work 2–3 times a week for balanced development.
Is jumping rope hard on the knees?
When performed with a soft landing and proper alignment, rope jumping is low‑impact. Strengthening the surrounding muscles further protects the knees.
What is the best rope length for optimal muscle activation?
Stand on the rope’s center; the handles should reach close to your armpits. This length promotes efficient shoulder and wrist movement while allowing full leg extension.