The Best Homemade Playdough Recipe You Can Make at Home
Looking for a fun and easy playdough recipe you can whip up in minutes? This guide walks you through the best homemade playdough recipe that is safe, soft, and perfect for kids of all ages. You will learn the exact ingredients, step-by-step instructions, and pro tips to make homemade playdough that lasts for weeks. Whether you are a parent, teacher, or craft lover, this no-cook playdough method saves time and money while keeping kids entertained for hours.
Have you ever wanted to make your own playdough recipe at home? It is easier than you think, and the results are amazing. Store-bought playdough can be expensive, and you never really know what is in it. A homemade version gives you full control over the ingredients, the colors, and the texture.
In this guide, we share the best homemade playdough recipe that works every single time. It is a no-cook playdough method that takes less than ten minutes. Kids can even help mix and knead the dough. By the end of this article, you will have everything you need to create soft, squishy, and long-lasting DIY playdough right in your own kitchen.
Whether you are a parent looking for a fun weekend activity, a teacher planning classroom crafts, or just someone who loves kids craft ideas, this recipe is for you. Let us dive in and make some playdough!
Key Takeaways
- Simple Ingredients: You only need flour, salt, cream of tartar, oil, and water to make the best homemade playdough.
- No Cooking Required: This no-cook playdough recipe is fast, easy, and safe for young children to help with.
- Long-Lasting Results: With proper storage, your DIY playdough can last for months without drying out.
- Highly Customizable: You can easily change colors, add glitter, or mix in scents to create unique sensory play experiences.
- Budget-Friendly: Making playdough at home costs a fraction of buying store-bought versions.
- Great for Development: Homemade playdough supports fine motor skills, creativity, and hands-on learning for toddlers and preschoolers.
📑 Table of Contents
- Why Homemade Playdough Is Better Than Store-Bought
- What You Need for the Best Playdough Recipe
- Step-by-Step Playdough Recipe Instructions
- How to Make Different Colors and Varieties
- Tips for Storing and Keeping Playdough Fresh
- Fun Ways to Play and Learn with Homemade Playdough
- Common Mistakes to Avoid When Making Playdough
- Expert Tips for the Perfect Playdough Every Time
Why Homemade Playdough Is Better Than Store-Bought
You might wonder why bother making your own playdough recipe when you can just grab a tub from the store. There are actually many great reasons to go the homemade route.
You Control What Goes In
When you make homemade playdough, you know exactly what ingredients are used. Many store-bought brands contain artificial preservatives and strong chemical scents. With a DIY version, you can use natural, food-safe ingredients. This is especially important for younger children who tend to put everything in their mouths.
It Saves You Money
A single batch of budget-friendly crafts costs less than a dollar to make. Compare that to buying multiple cans of playdough at the store. One batch can make a large amount of dough, enough for several kids to play with at once.
Endless Customization Options
Store-bought playdough comes in limited colors and scents. But when you make your own, the possibilities are endless. You can mix in food coloring, add glitter, include essential oils for a pleasant scent, or even embed small toys and beads for added fun. This makes every batch of sensory play dough a unique experience.
It Is a Fun Activity in Itself
Making playdough is not just about the end product. The process of mixing, stirring, and kneading is a great hands-on learning activity for children. It builds fine motor skills, encourages teamwork, and sparks creativity even before the playdough is ready to use.
What You Need for the Best Playdough Recipe
Before you start, gather all your ingredients. Having everything ready makes the process smooth and stress-free. This easy playdough recipe uses common household items you probably already have in your pantry.
The Core Ingredients
Here is what you need for one batch of the best homemade playdough recipe:
- All-purpose flour — 1 cup. This is the base of your dough and gives it structure.
- Table salt — 1/2 cup. Salt helps preserve the dough and gives it firmness.
- Cream of tartar — 2 tablespoons. This ingredient keeps the playdough soft and smooth.
- Vegetable oil or baby oil — 1 tablespoon. Oil adds moisture and prevents cracking.
- Boiling water — 1 cup. Hot water activates the ingredients and binds everything together.
- Food coloring — A few drops. Use any color you like or mix colors for custom shades.
Optional Add-Ins for Extra Fun
Want to take your homemade playdough to the next level? Try adding these extras:
- Glitter — A sprinkle of glitter makes the dough sparkle and shine.
- Essential oils or vanilla extract — A few drops add a lovely scent to your DIY playdough.
- Kool-Aid powder — This adds both color and a fruity smell. Kids love it.
- Sand or glitter foam — For a textured sensory experience that feels unique in the hands.
- Small plastic toys or beads — Press them into the dough for imprinting and discovery games.
Tools You Will Need
You do not need any special equipment. Just grab a mixing bowl, a wooden spoon or spatula, a measuring cup, and a clean surface for kneading. A cutting board or silicone mat works perfectly as your kneading station. Keep a damp cloth nearby to wipe up any sticky residue.
Step-by-Step Playdough Recipe Instructions
Now comes the fun part — actually making the playdough recipe. Follow these simple steps and you will have a beautiful batch of soft, stretchy playdough in no time.
Step 1: Mix the Dry Ingredients
Start by combining the flour, salt, and cream of tartar in a large mixing bowl. Stir these three ingredients together with a spoon until they are evenly blended. Mixing the dry ingredients first ensures a smooth, lump-free result.
Step 2: Add the Wet Ingredients
Make a well in the center of the dry mixture. Pour in the boiling water, vegetable oil, and food coloring. Stir gently with a wooden spoon as you pour. The mixture will start to come together almost immediately. Keep stirring until it forms a shaggy, sticky dough.
Step 3: Let It Cool
Let the dough sit in the bowl for about five minutes. It will be hot at first, so be careful. Once it is cool enough to touch, it is time to move to the next step. This cooling period is important because it allows the flour to fully absorb the water.
Step 4: Knead the Dough
Turn the dough out onto a clean, lightly floured surface. Start kneading it with your hands. Push the dough away from you, fold it back, and rotate it. Keep kneading for about three to five minutes. The dough will transform from sticky and messy to smooth and soft. If it feels too sticky, add a little more flour, one teaspoon at a time.
Step 5: Store and Enjoy
Once your homemade playdough is smooth and pliable, it is ready to play with! Store it in an airtight container or a zip-lock bag. Proper storage keeps it fresh for weeks or even months. More on storage tips in the next section.
How to Make Different Colors and Varieties
One of the best things about a homemade playdough recipe is that you can make it in any color you want. You can also create different textures and scents for a truly custom experience.
Making Multiple Colors
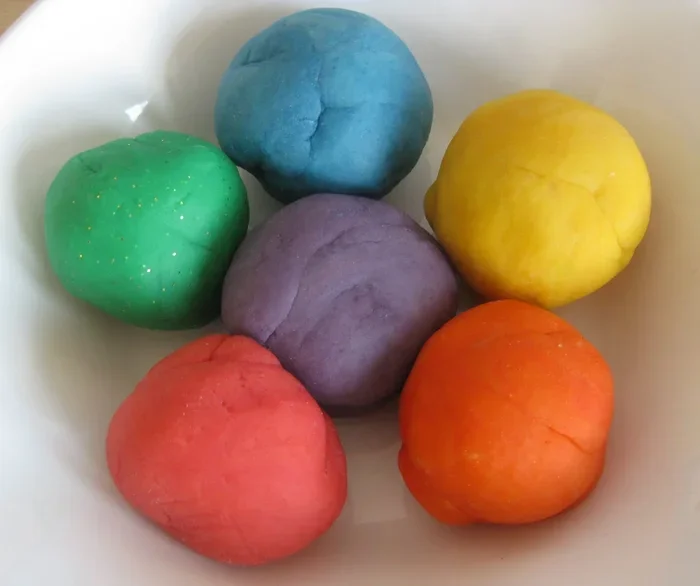
To make different colors, simply divide the base dough into portions before kneading in the food coloring. Place each portion in a separate bowl. Add different colors of food coloring to each one. Knead each piece separately until the color is fully blended. Your kids will love having a rainbow of DIY playdough to choose from.
Creating Scented Playdough
Scented playdough adds a whole new dimension to sensory play. Try these ideas:
- Lavender — Add a few drops of lavender essential oil for a calming scent.
- Citrus — Use orange or lemon essential oil for a fresh, zesty smell.
- Mint — A drop of peppermint extract makes the dough cool and refreshing.
- Chocolate — Add cocoa powder for a chocolate-scented dough that smells delicious.
- Apple — Mix in a little cinnamon for an apple-pie scent that kids adore.
Texture Variations
You can also change the texture of your homemade playdough for different tactile experiences:
- Cloud dough — Add extra oil for a softer, more crumbly texture.
- Sand playdough — Mix in fine sand for a gritty, beach-like feel.
- Glitter dough — Fold in fine glitter for a sparkly, magical texture.
- Herb-infused dough — Crush dried herbs like rosemary or thyme and knead them in.
Tips for Storing and Keeping Playdough Fresh
One of the biggest concerns with any playdough recipe is how long it lasts. The good news is that homemade playdough can stay fresh for a very long time if you store it properly.
Best Storage Methods
Always store your DIY playdough in an airtight container. A zip-lock bag, plastic container with a lid, or even a sealed jar all work well. The key is to keep air out, because air is what causes playdough to dry out and crack.
How Long Does Homemade Playdough Last?
When stored correctly, a batch of homemade playdough can last for two to three months. Some people report it lasting even longer. If the dough starts to feel a bit dry, you can add a tiny drop of oil and knead it back to softness. If it becomes sticky, just sprinkle a little flour and work it in.
Common Storage Mistakes to Avoid
- Leaving the lid off — This lets air dry out the dough quickly.
- Storing in direct sunlight — Heat and UV rays can cause colors to fade and the texture to change.
- Leaving it out overnight — Even a few hours uncovered can start to dry the surface.
- Mixing different colors — Store each color separately to avoid creating muddy brown dough.
Fun Ways to Play and Learn with Homemade Playdough
Making the dough is only half the fun. The real magic happens when you and your kids start playing and learning with it. Homemade playdough is a versatile tool for early childhood education and creative expression.
Educational Activities
Use your playdough recipe creations to teach a variety of skills:
- Letter and number formation — Roll small pieces into snakes and shape them into letters and numbers.
- Counting and sorting — Make small balls and sort them by color or count them in groups.
- Shape recognition — Use cookie cutters to press out different shapes and talk about their names.
- Science experiments — Explore what happens when you mix colors or stretch the dough thin.
Creative Play Ideas
Let imagination lead the way with these creative kids craft ideas:
- Make animals — Create a whole zoo of playdough animals with different textures.
- Build a city — Roll, flatten, and shape buildings, roads, and trees.
- Create food — Make pretend pizzas, cakes, and fruits for imaginative play kitchens.
- Nature imprints — Press leaves, flowers, and textured objects into the dough for beautiful prints.
- Storytelling props — Shape characters and scenes to act out stories together.
Why Sensory Play Matters
Sensory play is one of the most valuable activities for young children. When kids squish, roll, pinch, and stretch homemade playdough, they are developing important neural connections. This type of play strengthens hand muscles, improves hand-eye coordination, and builds the fine motor skills needed for writing later on. It also provides a calming, focused activity that can help children regulate their emotions.
Common Mistakes to Avoid When Making Playdough
Even with a simple playdough recipe, there are a few common mistakes that can ruin your batch. Here is what to watch out for.
Using Cold Water Instead of Hot Water
The hot water is essential in this no-cook playdough recipe. Cold water will not activate the flour properly, and your dough will end up sticky and crumbly. Always use boiling or very hot water for the best results.
Skipping the Cream of Tartar
Some people try to leave out the cream of tartar to simplify the recipe. But cream of tartar is what keeps the playdough soft and elastic. Without it, the dough dries out quickly and becomes hard. Do not skip this ingredient if you want your DIY playdough to last.
Not Kneading Enough
Kneading is the step where the magic happens. If you stop too early, the dough will feel sticky and uneven. Keep kneading until the dough is smooth, soft, and no longer sticks to your hands. It usually takes about three to five minutes of steady kneading.
Adding Too Much Food Coloring
A little food coloring goes a long way. Start with just a few drops and add more if needed. Too much coloring can make the dough feel slippery and stain hands and surfaces. If you accidentally add too much, knead in a small piece of plain dough to balance the color.
Expert Tips for the Perfect Playdough Every Time
Here are some extra tips from experienced parents and educators to help you get the best results from your playdough recipe:
- Use warm water if boiling water is not available. Warm water still activates the ingredients, though it may take a bit longer to come together.
- Let children do the kneading. This builds hand strength and gives them a sense of ownership over their creation.
- Add a drop of glycerin for extra softness. Glycerin is a humectant that keeps the dough moist for even longer.
- Make batches in different sizes. A smaller batch is great for quick play sessions, while a larger batch is perfect for group activities.
- Label your containers. If you make multiple colors or scents, label each one so everyone knows what is what.
- Use a silicone mat for kneading. It prevents sticking and makes cleanup a breeze.
Making the best homemade playdough recipe at home is one of the simplest and most rewarding activities you can do. It costs almost nothing, takes just minutes, and provides hours of creative fun for children of all ages. From the moment you mix the dry ingredients to the final knead, the process is engaging, educational, and genuinely enjoyable.
Remember, the key to great homemade playdough is using the right ingredients, kneading thoroughly, and storing it properly. With these tips, your DIY playdough will stay soft, vibrant, and ready for play for weeks on end.
Now that you have everything you need, it is time to gather your ingredients and give this playdough recipe a try. Your kids will love it, and you will love how easy and affordable it is. Happy crafting!
Frequently Asked Questions
Can I make playdough without cream of tartar?
You can, but the texture will not be as smooth or long-lasting. Cream of tartar is the secret ingredient that keeps homemade playdough soft and pliable. If you must leave it out, add a small amount of lemon juice as a substitute, though the results will not be exactly the same.
Is homemade playdough safe for toddlers?
Yes, this homemade playdough recipe uses food-safe ingredients that are non-toxic and safe for toddlers. However, always supervise young children during playtime to prevent them from eating large amounts of the dough, which could cause stomach discomfort due to the high salt content.
How long does the homemade playdough last?
When stored in an airtight container, your DIY playdough can last for two to three months or even longer. If it starts to dry out, add a drop of oil and knead it back to a smooth, soft consistency. Always check for signs of mold before giving it to children.
Can I freeze playdough to make it last longer?
Yes, freezing is a great option for extending the shelf life of your playdough recipe creations. Wrap the dough tightly in plastic wrap and place it in a freezer-safe bag. When you are ready to use it, let it thaw at room temperature and knead it briefly to restore its soft texture.
What age is this playdough recipe appropriate for?
This easy playdough recipe is suitable for children of all ages. Toddlers and preschoolers will enjoy squishing and shaping the dough with supervision, while older children can take on more of the mixing and kneading process independently. It is a wonderful activity for kids at any developmental stage.
Can I use this playdough recipe in a classroom setting?
Absolutely. This homemade playdough recipe is perfect for classrooms because it is affordable, easy to make in large batches, and uses safe, non-toxic ingredients. Teachers can involve students in the mixing process as a collaborative hands-on learning activity that builds teamwork and fine motor skills.