Stop paying for gym memberships or expensive smart trainers! You can turn almost any bicycle into an effective, stable stationary bike using a simple bike trainer or DIY stand. This cost-effective solution lets you maintain your fitness year-round, regardless of weather, while using your own familiar bike. Follow our comprehensive guide to choose the right setup, assemble it safely, and optimize your indoor rides for maximum calorie burn and comfort.
Rain pouring down? Snow piling up? Dark when you leave work? These are the classic excuses that derail even the most committed cyclist’s training plan. But what if you could simply roll your trusty two-wheeled companion into the living room, basement, or garage and keep pedaling, no matter what’s happening outside? The secret is learning how to use your bike as a stationary bike. It’s not magic—it’s mechanics, and it’s one of the smartest, most economical fitness hacks for any cyclist. Forget the crowded, smelly gym or the staggering cost of a dedicated spin bike. Your current bike, the one perfectly fitted to your body, can become your ultimate indoor training machine. This guide will walk you through every single step, from choosing your equipment to perfecting your form, ensuring you get a safe, effective, and enjoyable workout all year round. Let’s turn that garage into your personal velodrome.
Key Takeaways
- Any bike can become stationary: With the right trainer or stand, road, mountain, and hybrid bikes can all be used for indoor training.
- Three main trainer types exist: Wheel-on (most common), direct-drive (replaces rear wheel), and roller (requires balance). Choose based on budget, space, and performance needs.
- Stability and safety are paramount: Proper setup on a level, non-slip surface and securely locking the bike into the trainer are non-negotiable to prevent accidents.
- You’ll need accessories: A front wheel riser block, a mat, and proper ventilation are essential for a realistic, comfortable, and clean indoor experience.
- Resistance is controlled manually or virtually: Basic trainers use a friction unit; advanced ones connect to apps like Zwift for automated, simulated resistance.
- Indoor riding is different: Expect more sweat, focus on maintaining good posture, and use entertainment or structured workouts to combat monotony.
- Maintenance is simplified but crucial: Keep your bike and trainer clean, check tire wear frequently, and store equipment properly to ensure longevity.
📑 Table of Contents
- Understanding Your Options: The “Stationary Bike” Spectrum
- Step-by-Step: Setting Up Your Wheel-On Trainer
- Safety and Stability: Non-Negotiable Rules
- Optimizing Your Indoor Ride: From Chore to Joy
- Maintenance, Troubleshooting, and Long-Term Care
- Beyond the Basics: Advanced Tips for the Dedicated Rider
- Conclusion: Your Year-Round Cycling Sanctuary is Ready
Understanding Your Options: The “Stationary Bike” Spectrum
Before you buy or build anything, you need to understand the landscape. “Using your bike as a stationary bike” isn’t one single method; it’s a category with a few distinct approaches, each with its own pros, cons, and price points. The right choice depends entirely on your bike type, your budget, your available space, and your training goals. Are you looking for a casual way to stay active on rainy days, or are you a serious athlete needing precise power data for interval training? Your answer points to a different solution.
The Classic Wheel-On Trainer (The Most Popular Choice)
This is the image most people have in their head. A wheel-on trainer is a standalone frame that holds your bike upright by clamping onto the rear axle and resting a roller against your rear tire. Your bike’s rear wheel remains on, spinning against the roller. Resistance is typically provided by a fluid, magnetic, or wind unit inside the roller itself. These are the workhorses of home cycling. They’re relatively affordable (from $100 to $500+), easy to install and remove (often in under a minute), and work with a vast range of bicycle wheel sizes (700c, 26″, 27.5″, 29″). The major trade-off is tire wear—you’ll burn through a rear tire much faster on a trainer—and a slight “slop” or delay in resistance feel compared to more advanced systems. For the vast majority of riders wanting a stable, simple, and budget-friendly setup, a quality wheel-on trainer is the perfect starting point.
The Direct-Drive Trainer (The Performance Powerhouse)
Step up in price and performance. A direct-drive trainer completely replaces your bike’s rear wheel. You remove the rear wheel, attach your bike’s chainring to a cassette on the trainer’s own resistance unit, and the bike becomes a fixed part of the machine. The advantages are significant: incredibly smooth and quiet operation, no tire wear (since your tire isn’t contacting anything), and—most importantly—built-in power meter accuracy. These trainers (from $800 to $3000+) are the standard for serious training apps like Zwift, TrainerRoad, and The Sufferfest because they provide accurate, real-time power data and can automatically adjust resistance to simulate hills and workouts. The downsides are the high cost and the minor hassle of removing/reinstalling your rear wheel every time you want to ride outside. If data and a road-like feel are your priorities, this is the pinnacle of how to use your bike as a stationary bike.
The Roller Trainer (The Skill-Based Classic)
This is the purest, most minimalist form of stationary cycling. Rollers are three cylindrical drums (usually aluminum) placed in a triangular frame. You simply ride your bike on top of them. There’s no clamping or securing; balance and steering are entirely up to you. They offer an incredibly realistic ride feel because the bike can move and sway naturally, engaging your core and handling skills. They’re very quiet, inexpensive ($100-$300), and store flat. However, they have a steep learning curve. Beginners will likely fall off within seconds. They’re not ideal for high-intensity interval training where you need to stand and hammer. Rollers are best for smooth, steady-state pedaling drills and riders who want to hone their balance. They represent a different philosophy of using your bike indoors—one focused on skill over convenience.
The DIY Solution: Building Your Own Stand
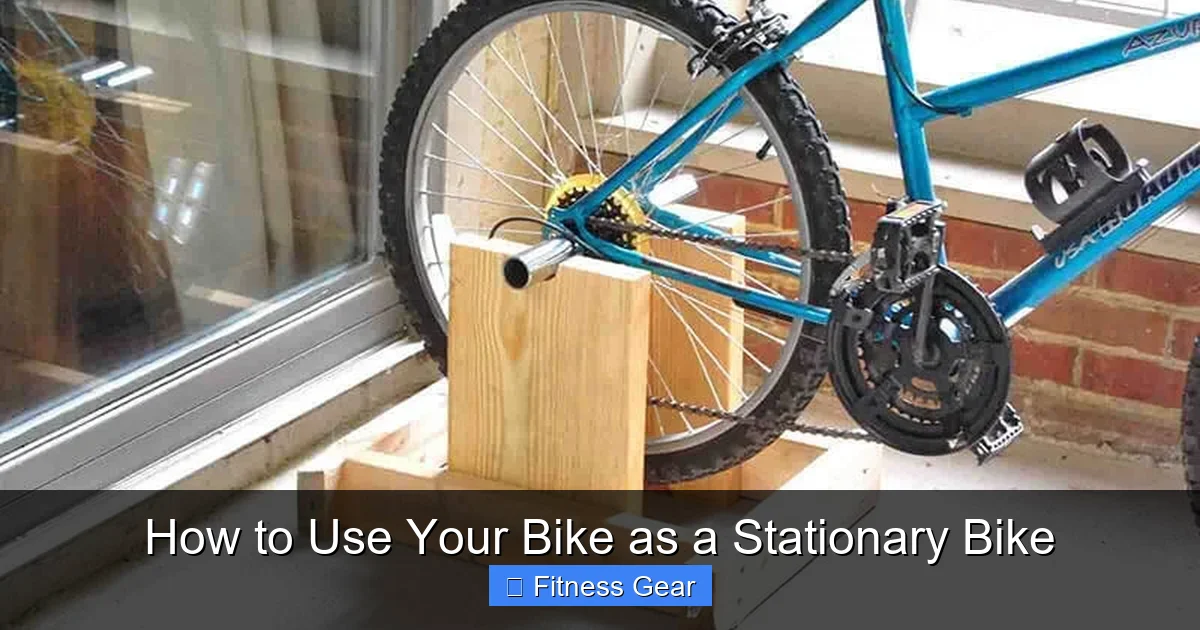
For the ultimate budget option or for a bike you don’t want to modify (like a vintage frame), you can create a stationary setup without a commercial trainer. The core concept is to support the bike’s rear axle and keep the front wheel off the ground. This can be done with a sturdy workbench, a custom wooden block with a notch for the axle, or even a pair of heavy books and some creative bracing. You’ll absolutely need a front wheel riser to keep the bike level and prevent the front tire from digging into the floor. While functional, DIY solutions are generally less stable, less safe, and offer no resistance mechanism (you’d be spinning freely). They’re really only suitable for very light pedaling or as a temporary fix. For any serious or regular use, investing in a proper trainer is strongly recommended for safety and effectiveness.
Step-by-Step: Setting Up Your Wheel-On Trainer
Assuming you’ve chosen the most common path—a wheel-on trainer—let’s get into the nitty-gritty of assembly. While models vary slightly, the core principles are universal. A proper setup is the difference between a smooth, quiet ride and a wobbly, dangerous, tire-shredding experience. Take your time here.

Visual guide about How to Use Your Bike as a Stationary Bike
Image source: res.cloudinary.com
1. Choose and Prepare Your Location
First, find your spot. You need a level, solid, non-slip surface. Concrete or a heavy-duty rubber gym mat over carpet is ideal. Avoid smooth hardwood, tile, or loose rugs. Your trainer will have wide, often spiked feet to grip the floor. Ensure there’s adequate ventilation (a fan is almost a necessity) and enough clearance on all sides, especially behind you, for safe mounting/dismounting and in case you fall. A corner of a garage or a spare bedroom corner works great. Measure your space: you need room for the trainer plus the length of your bike, plus a few feet of buffer.
2. Unbox and Assemble the Trainer
Carefully unbox your trainer. Most require minimal assembly: attaching the resistance unit/flywheel to the main frame, securing the legs, and sometimes adding the skewer (the special axle bolt that replaces your bike’s quick release). Follow the manufacturer’s instructions exactly. Tighten all bolts, especially those holding the resistance unit, to the specified torque. A loose part here is a major safety hazard. If your trainer came with a skewer, use it. It’s designed to handle the lateral forces of training. Your bike’s original quick release is not sufficient and can fail.
3. Prepare Your Bicycle
Shift your bike into the smallest chainring (front) and the largest cog (rear). This gives you the easiest gear to start pedaling and reduces strain when securing the bike. Check your rear tire pressure. Inflate it to the high end of the manufacturer’s recommended range (e.g., if it says 80-110 PSI, pump it to 110). A firm tire minimizes deformation on the roller, reduces slippage, and lessens premature wear. If your trainer came with a specific trainer tire (often thicker and with no tread pattern), consider installing it on the rear wheel now.
4. Mount the Bike onto the Trainer
This is the critical step. Lift the bike and align the rear axle with the trainer’s clamping mechanism. Most trainers have a quick-release style lever or a bolt-on clamp. Fully engage and securely lock the clamp. Give the rear wheel a firm tug to ensure it’s not going to slip out. Now, address the front wheel. Your bike’s front tire is now pointing straight up at the ceiling because the rear is elevated. You need a front wheel riser block (usually included with the trainer). Place this sturdy block under the front wheel. The goal is to get the bike as level as possible. A slight downward tilt at the front (1-2 inches) is acceptable and can feel more natural, but a severe incline strains your neck and back. Adjust the height of the riser until your handlebars are at a comfortable, familiar height.
5. Final Checks Before First Pedal Stroke
With the bike secured, spin the rear wheel by hand. It should rotate smoothly against the roller without excessive side-to-side wobble. Check that the chain is running true on the cassette and isn’t going to fall off. Ensure the front wheel is stable on the riser. Give the entire assembly a firm shake test. There should be no dangerous rocking. Finally, connect any accessories: a speed/cadence sensor if you want data, a heart rate monitor, or your tablet/phone to a handlebar mount. You are now ready to ride.
Safety and Stability: Non-Negotiable Rules
Riding a bike that is physically restrained is inherently different from riding on the open road. You cannot simply put a foot down if you lose balance at a stoplight. Therefore, safety protocols are not suggestions; they are essential. A poorly secured bike on a trainer can lead to a catastrophic fall, damaging your bike, your walls, and your body. Let’s build a safety-first mindset.
Visual guide about How to Use Your Bike as a Stationary Bike
Image source: bikesguider.com
The Foundation: Your Floor and Your Mat
Your trainer’s feet are designed to dig into soft surfaces like carpet to prevent walking. On hard floors, they can slip. Always use a high-quality, dense rubber trainer mat. This does three things: it protects your floor from sweat and scratches, it dampens vibration and noise (a huge perk for apartment dwellers), and most importantly, it provides a consistent, high-friction surface for the trainer’s feet to grip. A simple yoga mat is often too thin and can bunch up. Invest in a mat designed for bike trainers, at least 3mm thick and large enough to encompass the trainer’s entire footprint and a bit more.
Securing the Axle: The Single Most Important Action
This cannot be stressed enough. The rear axle is the fulcrum of all forces. If it slips out of the clamp, the bike will pivot violently. For quick-release (skewer) systems: tighten the lever until it requires significant force to close. You should feel the resistance building over the last few inches of travel. If it closes with a slap of your wrist, it’s not tight enough. For bolt-on systems, use a wrench to tighten the nut firmly. Re-check this tightness after your first few rides, as it can settle. Never, ever use your bike’s original quick-release skewer unless the trainer manufacturer explicitly states it’s compatible. Use the heavy-duty skewer that came with the trainer.
Managing Resistance and Heat
Starting in too hard a gear is a common beginner mistake. Always start in your easiest gear (small chainring, largest cog). As you warm up, shift into progressively harder gears. The resistance unit on a wheel-on trainer works by creating drag on the roller. This generates significant heat. Never touch the resistance unit or the roller immediately after a hard workout. They can be hot enough to cause burns. Let the unit cool for 10-15 minutes before touching or storing. Also, ensure there is clear airflow around the resistance unit. Don’t place it against a wall or in a tight closet.
Mounting, Dismounting, and Falling
Climbing onto a stationary bike is trickier than a spin bike because the pedals are higher and the bike can rock. Always come to a complete stop before attempting to mount or dismount. Put one foot firmly on the floor, then swing your other leg over the saddle from behind (the “backwards” method is often safer and easier than trying to step over the front). To dismount, slow to a stop, plant both feet, and swing your leg back over the saddle. Practice this a few times at a standstill. If you do feel yourself falling, try to fall sideways and away from the trainer, not forwards or backwards into it. Letting go of the handlebars is often safer than trying to cling to them as you go down.
Optimizing Your Indoor Ride: From Chore to Joy
Let’s be honest: staring at a blank wall while pedaling for an hour is soul-crushing. The physical setup is only half the battle. The mental game of indoor cycling is where most people fail. Your goal is to replicate, or even improve upon, the engagement and effectiveness of an outdoor ride. This requires environment, data, and structure.

Visual guide about How to Use Your Bike as a Stationary Bike
Image source: verywellfit.com
Create Your Environment: Air, Sight, and Sound
Ventilation is your #1 priority. You will sweat 2-3 times more indoors with no wind. Position a powerful fan (or two) directly in front of you. A breeze across your face and torso is a game-changer for comfort and performance. Next, address the visual monotony. Don’t just face a blank wall. Mount a tablet or laptop on your handlebars. Use it to stream workouts (Peloton Digital, Apple Fitness+, etc.), ride virtual worlds (Zwift, RGT Cycling, Rouvy), or even watch a movie or TV show. The key is having something to focus on that makes the time pass. Finally, create a great audio setup. Good headphones or a dedicated speaker system for music or podcast audio will immerse you. Consider a dedicated indoor cycling playlist with a steady, driving beat.
Structure Your Workout: You Need a Plan
Wandering on the trainer with no goal is the fastest way to boredom and plateau. You need a workout structure. For beginners, start with 20-30 minute steady-state rides at a comfortable, conversational pace. For intermediates and beyond, embrace interval training. This is where the trainer shines. Apps like Zwift (which gamifies riding in a virtual world) or TrainerRoad (which focuses on science-based, data-driven workouts) are phenomenal. They will automatically adjust your resistance if you have a smart trainer, or simply tell you what gear to be in and for how long. A typical interval session might be: 10 min warm-up, 5×3 minutes at high intensity with 3 minutes easy recovery, 10 min cool-down. This structure is far more effective and time-efficient than a long, steady grind.
Dial in Your Bike Fit and Form
Just because you’re indoors doesn’t mean fit matters. In fact, it matters more because you’re in a fixed position for longer. Ensure your saddle height is correct (a slight bend in the knee at the bottom of the pedal stroke). Pay attention to your handlebar height. Many people raise their bars slightly for indoor comfort to reduce back strain. Focus on a smooth, circular pedal stroke. Pull up as well as push down. Engage your core. Avoid rocking your hips. A mirror in front of you can help you monitor your form. Small adjustments here prevent numbness, knee pain, and backaches that can derail your training.
Maintenance, Troubleshooting, and Long-Term Care
Your bike and trainer are a team. Treat them well, and they’ll serve you for thousands of miles. Neglect them, and you’ll face squeaks, slippage, and premature wear. A little regular maintenance goes a very long way.
The Biggest Issue: Tire Wear and Slippage
The rear tire is the sacrificial lamb in a wheel-on setup. It will wear out fast. To mitigate this: keep it properly inflated (as mentioned, on the high side). Consider a dedicated trainer tire, which is made of a harder, slicker compound designed for this exact purpose. Check the tire frequently for cuts, glazing, or excessive wear. Slippage—where the tire spins on the roller instead of driving it—is usually caused by low tire pressure, a worn/smooth tire, or a wet/contaminated roller. Fix it by inflating the tire, cleaning the roller with isopropyl alcohol, and if needed, lightly scuffing the tire with sandpaper to remove the glazed layer.
Routine Cleaning and Inspection
Sweat is corrosive. After every ride (or at least weekly), wipe down your bike frame, handlebars, and saddle with a damp cloth. Pay special attention to the headset, stem, and seatpost, which can accumulate salty sweat residue. Every month or so, give the trainer a once-over. Check all bolts and clamps for tightness. Wipe down the resistance unit and roller. If you have a fluid trainer, check for any signs of leaks around the seals. For magnetic or wind trainers, ensure there’s no debris caught in the mechanism. A clean machine is a quiet, efficient machine.
Storage and Seasonal Care
If you’re not using your trainer daily, store it properly. Release the clamp on the rear axle to relieve pressure on the skewer and the axle itself. This prevents the clamp from slowly deforming the skewer over time. Store the trainer in a cool, dry place away from direct sunlight, which can degrade plastic components. If you live in a humid area, consider a silica gel pack in your trainer bag. At the end of the indoor season (spring), give everything a thorough clean, check for wear on the trainer tire and the trainer’s own components, and make a note of any parts that may need replacing before next winter.
Beyond the Basics: Advanced Tips for the Dedicated Rider
Once you’ve mastered the fundamentals, you can fine-tune your setup for elite-level performance and simulation. This is where you truly bridge the gap between indoor and outdoor riding.
Simulating Real-World Gradients and Weight
A simple wheel-on trainer gives a consistent, static resistance. It doesn’t know if you’re “climbing” or on the flats. To simulate hills, you must manually shift your bike’s gears. But you can make this feel more realistic. First, use your front wheel riser. The higher you make the front wheel (within reason, keeping the bike level), the more of your weight is shifted forward onto the handlebars, mimicking the body position of a climb. Second, consider adding weight to your bike or frame. A heavy backpack or weight vest can simulate the feel of a real body mass on a climb, changing the inertia and making low-cadence efforts feel more authentic. It’s a crude but effective hack.
Calibrating for Accurate Power (If Possible)
If you have a smart direct-drive trainer, calibration is automatic. But some high-end wheel-on trainers now have optional power sensors. If you add a separate power meter to your bike (crank-based or pedal-based), you can get accurate power data regardless of the trainer. However, the resistance curve of the trainer itself won’t change automatically. For the most realistic simulation, you’d need a “smart” wheel-on trainer (like the latest Tacx or Wahoo models) that can connect to apps and vary resistance via a motor. This is the premium end of the how to use your bike as a stationary bike spectrum, but it delivers an experience nearly identical to a direct-drive unit at a (slightly) lower cost and with the convenience of keeping your rear wheel on.
Noise Dampening for Apartment Living
If you live in an apartment, noise is your neighbor’s concern. The sound comes from two places: the tire-on-roller contact (a low hum) and the resistance unit itself (fluid trainers are quietest, wind trainers are loudest). Maximize dampening: use the thickest, largest trainer mat you can find. Place a dense rug or piece of carpet *underneath* the mat for another layer. If possible, position the trainer against an interior wall, not a shared wall. Some riders build a simple isolation platform with a sheet of plywood and gym foam. Choose a fluid or magnetic trainer over a wind unit. And always keep the roller and tire clean and properly inflated; a slipping tire makes a horrific squealing noise.
Conclusion: Your Year-Round Cycling Sanctuary is Ready
Learning how to use your bike as a stationary bike is one of the most empowering things a cyclist can do. It hands you complete control over your training schedule, freeing you from the tyranny of weather, daylight, and gym hours. You’ve now got the knowledge: you understand the different trainer types, you can confidently assemble a safe and stable setup, you know how to fight the boredom with apps and structure, and you have the maintenance plan to keep everything running smoothly for years. The initial investment is a fraction of a dedicated spin bike or a gym membership, and the return is a lifetime of consistent fitness. So, clear that corner in your basement, order that trainer or grab your riser block, and get rolling. Your strongest, fittest self is waiting for you indoors, on your own bike, ready to pedal through whatever season comes next.
Frequently Asked Questions
What is the best type of trainer for a beginner?
For most beginners, a basic wheel-on magnetic or fluid trainer is the best starting point. They are affordable, easy to use, and require minimal setup. They provide enough resistance for general fitness, weight loss, and building base endurance without the complexity or cost of direct-drive smart trainers.
Is it safe to use a bike trainer on carpet?
It can be safe if you use a dense, high-quality rubber trainer mat underneath. The mat prevents the trainer’s feet from sinking into the carpet, which would cause instability and tipping. Never place a trainer directly on a thick, loose-pile carpet without a firm mat as a barrier.
How loud are bike trainers?
Noise levels vary significantly by type. Wind trainers are the loudest (like a small airplane propeller). Magnetic trainers produce a moderate whirring sound. Fluid trainers are generally the quietest, offering a smooth, low hum. Direct-drive smart trainers are very quiet, with the main sound coming from the drivetrain. Using a mat and proper tire inflation greatly reduces noise on all types.
Will using a trainer damage my bike tire?
Yes, the rear tire will wear out much faster on a trainer due to the constant friction and heat against the roller. This is normal and expected. To minimize wear, use a dedicated trainer tire (slick, hard compound), keep it properly inflated to the high end of the recommended PSI, and inspect it regularly for cuts or excessive glazing.
Can I use a mountain bike on a road bike trainer?
Almost always, yes. The key compatibility factor is the rear axle width and type (quick release vs. thru-axle). Modern trainers come with adapters for virtually all standards, including 12x142mm and 12x148mm thru-axles common on mountain bikes. Always check your trainer’s specifications to ensure it supports your bike’s axle standard before purchasing.
Do I need special maintenance for my bike after using it on a trainer?
You should give your bike a more thorough wipe-down after trainer use than after an outdoor ride, as sweat drips down and can corrode metal parts on the frame, stem, and seatpost. Regularly check the rear tire for wear as mentioned. The drivetrain (chain, cassette) may get dirtier faster from trainer use, so keep your chain clean and lubricated. Otherwise, standard bike maintenance routines apply.