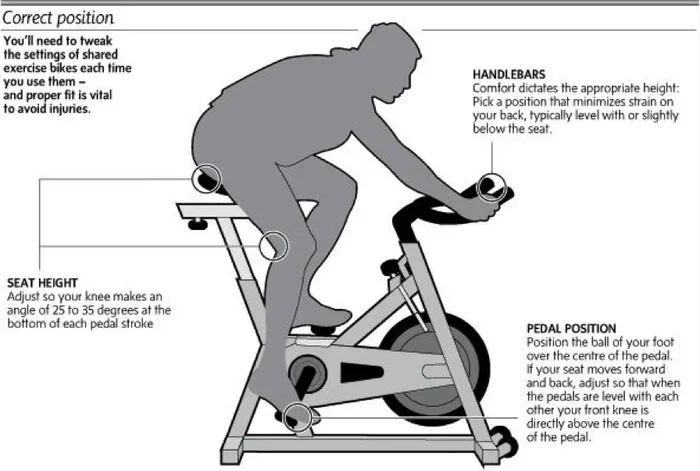
How to Position Yourself on a Spin Bike

Learning how to position yourself on a spin bike correctly is the single most important step toward a safe, effective workout. Your saddle height, handlebar reach, and body alignment all work together to prevent injury and boost your cycling power. This guide walks you through every adjustment you need to make for the perfect ride.
Key Takeaways
- Saddle height matters: Adjust so your knee has a slight bend at the pedal’s lowest point.
- Knee alignment is key: Set the saddle so your knee tracks directly over the pedal spindle.
- Handlebar position affects comfort: Position handlebars to keep your back flat and shoulders relaxed throughout the ride.
- Protect your joints: Keep your core tight and never lock your knees during pedaling.
- Foot placement drives power: Place the ball of your foot directly over the pedal axle for optimal force.
- Stay relaxed yet engaged: Keep a slight bend in your elbows and avoid tension in your arms.
- Listen to your body: Make small adjustments gradually to prevent strain and find your perfect setup.
📑 Table of Contents
- Why Proper Spin Bike Positioning Matters
- How to Position Yourself on a Spin Bike: The Core Principles
- How to Adjust a Spin Bike to Your Body Type and Height
- Common Mistakes When Finding Your Spin Bike Position
- How to Check If Your Spin Bike Position Is Correct
- Quick Tips for a Better Spin Bike Position Every Ride
- Final Thoughts: Own Your Spin Bike Position
Why Proper Spin Bike Positioning Matters
Getting the most out of your indoor cycling session starts long before you start pedaling. How to position yourself on a spin bike is one of those topics that too many riders brush off. They hop on, start spinning, and hope for the best. But the truth is, your spin bike position affects everything — from your comfort to your calorie burn to whether you walk away with a sore lower back or a strong, healthy body.
Think about it this way. You wouldn’t run a 5K in shoes that don’t fit. So why would you cycle for 45 minutes on a bike that’s set up wrong? Proper bike setup and correct positioning help you train harder, recover faster, and actually enjoy the ride. Whether you’re a beginner or a seasoned cyclist, nailing your spin bike position is the single biggest upgrade you can make today.
In this guide, I’m going to walk you through everything. From measuring your bike seat height to fine-tuning your handlebar adjustment, you’ll get a step-by-step system that works. No guesswork. No pain. Just a proper bike setup that makes every ride feel better.
How to Position Yourself on a Spin Bike: The Core Principles
When people ask me about how to position yourself on a spin bike, I always start with three core areas: seat height, seat fore-aft position, and handlebar height. These three adjustments control your entire cycling form on the bike. Get them right, and everything else falls into place.
Start With Your Seat Height
Your bike seat height is the foundation of your entire position. If your saddle is too low, your knees will bend too much and you’ll waste energy. Too high, and your hips rock side to side with every pedal stroke, which leads to lower back pain and knee strain.
Here’s the simplest way to check. Hop off the bike and stand beside it. The top of your stationary bike fit saddle should line up with the top of your hip bone. That’s your baseline. Hop back on and place your heel on the pedal at the lowest point of the stroke. Your leg should be almost fully extended — about 95 to 100 percent straight. When you clip in or use the ball of your foot, you’ll have a slight, healthy bend at the knee.
- Heel method: Place your heel on the pedal, leg nearly straight at the bottom of the stroke.
- Ball-of-foot method: When you clip in or use the ball of your foot, you get about a 25 to 35 degree knee bend.
- Hip bone method: Stand beside the bike and match saddle height to the top of your hip bone.
Set Your Seat Fore-Aft Position
Next up is moving your saddle forward or backward. This affects your hip angle and how your weight distributes over the pedals. For most riders, a neutral spin bike position means your knee sits directly over the ball of your foot when the pedal is at the 3 o’clock position.
To check this, sit on the bike and look down. Imagine a vertical line going straight down from your kneecap. It should land right over the ball of your foot. If your knee drifts forward, slide the seat back. If it falls behind, slide it forward. This small tweak makes a huge difference in comfort while cycling and knee health over time.
Find the Right Handlebar Height
Your handlebar adjustment controls your upper body posture. For beginners and recreational riders, the handlebars should be at the same height as your saddle or slightly higher. This promotes an upright riding position that’s easy on your spine, shoulders, and neck.
More advanced riders sometimes drop the handlebars below saddle height for a more aggressive, aerodynamic posture. But that’s a progression. Don’t rush it. An uncomfortable upright riding position is always better than a painful aggressive one. You can always lower the bars later as your flexibility and core strength improve.
How to Adjust a Spin Bike to Your Body Type and Height
There’s no one-size-fits-all spin bike adjustments formula. Your body shape, flexibility, and cycling experience all play a role. But here’s a practical breakdown that covers most body types and gets you close to perfect every time.
Adjusting for Shorter Riders
Shorter riders often worry about reaching the handlebars or feeling cramped. For you, keep the saddle at or just below hip bone height. Make sure your bike saddle position isn’t pushed too far forward, which can make the reach feel even shorter. A slightly higher handlebar setting helps you sit tall and breathe deeply during tough climbs.
Adjusting for Taller Riders
Taller riders need more extension through the leg and often need a higher saddle. Your stationary bike posture benefits from a saddle set a touch above the hip bone line — maybe half an inch higher. You may also need to slide the saddle slightly back and raise the handlebars enough to avoid hunching over. If you’re tall and still feeling pinched in the hips, it might also be worth checking if the bike frame itself is large enough.
Adjusting for Longer Torso or Short Legs
This combo is tricky on some spin bikes. You may need to raise the saddle higher than usual to get proper leg extension, but that pushes your hips forward. In this case, a slight forward saddle position combined with a higher handlebar helps. The goal is maintaining a proper bike setup where you feel balanced and powerful, not stretched out.
Adjusting for Shorter Torso or Long Legs
Here, the saddle may sit lower without causing hip rock, but you’ll need to slide it slightly forward to avoid your knees drifting past your toes. Your spin bike position might also benefit from lower handlebars since you naturally have less distance between your saddle and the bar.
| Body Type | Saddle Height | Saddle Position | Handlebar Height |
|---|---|---|---|
| Shorter Rider | At hip bone level | Neutral to slightly back | Same as saddle or higher |
| Taller Rider | Half inch above hip bone | Neutral to slightly back | Same as saddle or slightly higher |
| Long Torso, Short Legs | Above hip bone level | Neutral | Higher than saddle |
| Short Torso, Long Legs | At or below hip bone level | Neutral to slightly forward | Same as saddle or lower |
Common Mistakes When Finding Your Spin Bike Position
Even experienced riders make spin bike position mistakes. Here are the ones I see most often, and how to fix them.
Setting the Seat Too Low
This is the number one mistake. Riders set the saddle low because it feels easier to pedal. But you’re actually losing power and putting unnecessary stress on your knee alignment. A low saddle forces your knee to bend too sharply at the bottom of the stroke, which can lead to injury over time. Always aim for that near-full extension at the bottom.
Ignoring the Fore-Aft Position
People adjust their seat height and then forget about forward and backward placement. This is a huge miss. Your hip angle changes completely based on where the saddle sits. A saddle too far forward rotates your pelvis and compresses your lower back. Too far back and you’ll feel like you’re reaching for the pedals. Take two minutes to check your knee alignment over the pedal. It’s worth it.
Keeping Handlebars Too Low Too Soon
There’s a lot of pressure in spin classes to look aggressive with dropped handlebars. But dropping the bars before your core strength and flexibility can support it leads to neck pain, shoulder tension, and numb hands. Build up gradually. Focus on your cycling form at a comfortable height first, then lower the bars in small increments over weeks or months.
Not Re-Checking After Changes
Your body changes. You get more flexible. Your resistance training on bike improves. Your pedaling technique evolves. What worked three months ago might not work now. I recommend re-checking your entire spin bike adjustments setup every few weeks or whenever you feel discomfort.
How to Check If Your Spin Bike Position Is Correct
Adjusting is one thing. Verifying is another. Here’s a simple checklist you can run through after every setup to make sure your spin bike position is dialed in.
The Self-Check Method
Follow these steps every time you get on a bike:
- Stand beside the bike. Check that the saddle top matches your hip bone height.
- Sit on the saddle. Place your heel on the pedal at the lowest point. Your leg should be nearly straight.
- Look down at your knee. When the pedal is at 3 o’clock, your kneecap should sit directly above the ball of your foot.
- Grip the handlebars. Your shoulders should be relaxed, not hunched up by your ears.
- Check your back. You should feel a gentle, natural curve — not a rounded or overly arched lower back.
- Pedal smoothly. Does your foot placement on pedals feel stable and secure? Any sliding around means your bike saddle position or cleat setup needs work.
The Test Ride Method
After your self-check, do a short test ride. Pedal at a comfortable cadence — around 70 to 80 RPM — for about two minutes. Pay attention to these signals:
- Do your hands feel numb or tingly? Your handlebars might be too low or your reach too long.
- Is your lower back pain flaring up? Your saddle might be too far forward or your handlebars too low.
- Are your knees hurting on the inside or outside? Your hip angle or knee alignment over the pedal might be off.
- Do you feel unstable or like you’re rocking side to side? Your bike seat height is probably too high.
- Does everything feel smooth and powerful? Then your proper bike setup is right on target.
When to Get Professional Help
Sometimes DIY adjustments aren’t enough. If you’re dealing with persistent pain, a bike fitting from a professional can be a game-changer. A bike fitter uses motion capture tools and biomechanical analysis to fine-tune your indoor cycling posture down to the millimeter. It’s worth the investment if you ride regularly or train for events.
Quick Tips for a Better Spin Bike Position Every Ride
Now that you know the fundamentals of how to position yourself on a spin bike, here are some bonus tips that take your setup from good to great.
Loosen Your Grip
One of the first things I notice when someone has a poor spin bike position is death-grip hands on the handlebars. You don’t need to hold on tight. Your pedaling technique and core should stabilize you. Loosen your grip, drop your shoulders, and let the bike do its job. This alone can reduce neck and shoulder tension significantly.
Engage Your Core
A strong core stabilizes your pelvis and takes pressure off your lower back. Before you start pedaling, take a deep breath, brace your abs lightly, and maintain that engagement throughout the ride. This is especially important during heavy climbs and sprints where your resistance training on bike efforts are highest.
Move Around on the Bike
Even with a perfect proper bike setup, sitting in one position for 45 minutes is tough on your body. Change hand positions frequently. Move your hips slightly forward and back. Stand up for climbs. These micro-moves improve blood flow and keep your comfort while cycling high throughout the session.
Use Clipless Pedals for Better Pedaling Technique
If your studio or gym allows it, clipless pedals help you apply power through the entire stroke. Your foot placement on pedals stays secure, and you get a more efficient cadence. Just make sure you practice unclipping before you go hard. Trust me, you’ll want to know how to get out of the clip before your first big sprint.
Re-Check After Every New Bike or Seat
Different bikes have different frame geometry. A new saddle can shift your hip angle even if the height feels the same. Anytime you change equipment, run through the full setup checklist again. It takes two minutes and saves you from weeks of discomfort.
Pair Your Position With Smart Training
A great spin bike position works best when combined with smart training. Learning how to do interval training on a stationary bike or how to do HIIT training on a stationary bike becomes much more effective when your body is set up to handle the workload without breaking down. Proper positioning lets you push harder and recover faster.
Final Thoughts: Own Your Spin Bike Position
Learning how to position yourself on a spin bike isn’t a one-time thing. It’s a skill you refine over time. As your body adapts, as your cycling form improves, and as you learn more about your own biomechanics, your setup will evolve. The important thing is to start with the basics — bike seat height, saddle position, and handlebar adjustment — and build from there.
Don’t ignore pain. Don’t rush aggressive setups. And don’t be afraid to re-check your spin bike adjustments regularly. A well-positioned rider is a stronger, healthier, and happier rider. Take the time to get your proper bike setup right, and every ride — from your first warm-up pedal to your final sprint — will feel better. Now get out there and own that bike.
Frequently Asked Questions
How to Position Yourself on a Spin Bike Correctly?
Start by setting your seat height so your knee has a slight bend when the pedal is at the lowest point. Keep your back straight and your core engaged throughout the ride. Your arms should rest lightly on the handlebars with a slight bend in your elbows.
Where Should Your Feet Be Placed on a Spin Bike?
Position the ball of your foot directly over the pedal spindle for the most efficient power transfer. Use toe cages or clipless pedals to keep your feet secure during intense intervals. Avoid placing your feet too far forward or back to prevent strain on your ankles.
How High Should the Handlebars Be on a Spin Bike?
Beginners should set the handlebars at the same height or slightly above the seat for a more upright and comfortable position. As you build strength and flexibility, you can lower them to simulate a more aggressive riding posture. Your arms should extend fully without locking your joints.
What Is the Correct Seat Position for Spin Bike Setup?
Slide the seat forward or back until your front knee aligns directly over the ball of your foot when the pedal is at the three o’clock position. A simple test is to sit on the bike and place your heel on the pedal at the bottom — your leg should be fully extended. Once you clip in with the ball of your foot, you should have that perfect slight bend in your knee.
How Should You Position Your Back and Arms on a Spin Bike?
Keep your back flat and neutral, avoiding any excessive rounding or arching. Your shoulders should be relaxed and down, away from your ears, with your grip on the handlebars firm but not tense. Your arms act as stabilizers, not as weight-bearing supports, so let your core do the heavy lifting.
What Are the Most Common Mistakes People Make When Positioning Themselves on a Spin Bike?
The most common error is setting the seat too low, which puts unnecessary pressure on your knees and reduces your power output. Another mistake is hunching over the handlebars instead of keeping your chest lifted and open. Finally, many riders grip the handlebars too tightly, which creates tension in the neck, shoulders, and upper back.