How to Position Yourself on a Stationary Bike
Proper positioning on a stationary bike is the foundation of every effective indoor cycling session. When you set up your bike correctly, you reduce injury risk, boost pedaling efficiency, and enjoy longer, more comfortable workouts. This guide walks you through every key adjustment step by step.
Have you ever hopped on a stationary bike and felt off balance within minutes? Maybe your knees ached, your back felt strained, or your legs just didn’t seem to be working right. The problem almost always comes down to one thing: positioning.
How to position yourself on a stationary bike is one of the most important skills you can learn as a cyclist. Whether you are a complete beginner or someone who has been indoor cycling for years, getting your setup right changes everything. It affects your comfort, your performance, and even how many calories you burn. In this guide, we will break down every single adjustment you need to make. You will learn how to set your seat, align your handlebars, place your feet, and hold your body in a way that feels natural and powerful.
By the time you finish reading, you will have a clear roadmap to a perfect ride every single time. Let us dive in.
Key Takeaways
- Seat height matters most: A properly adjusted seat protects your knees and maximizes power output.
- Handlebar position affects your back and shoulders: Getting this right prevents pain and improves endurance.
- Foot placement on the pedals changes everything: Correct foot position boosts cycling efficiency and comfort.
- Your posture tells the whole story: Maintaining a neutral spine keeps you safe and strong throughout every ride.
- Small adjustments make big differences: Even minor tweaks to your setup can transform your workout experience.
- Everyone’s body is different: Personalizing your bike fit ensures the best results for your unique needs.
📑 Table of Contents
- Why Proper Positioning on a Stationary Bike Matters
- Adjusting Your Seat for the Perfect Ride
- Handlebar Placement and Reach
- Foot Placement and Pedal Technique
- Body Posture and Upper Body Alignment
- Common Positioning Mistakes and How to Fix Them
- Putting It All Together: Your Positioning Checklist
- Final Thoughts on Stationary Bike Positioning
Why Proper Positioning on a Stationary Bike Matters
Some people treat a stationary bike like a piece of furniture. They just sit on it and start pedaling. But that approach leads to discomfort, poor results, and sometimes even injury. Proper bike positioning is not just about looking like a pro. It is about making your body work smarter, not harder.
When your bike is set up correctly, your muscles fire in the right sequence. Your joints stay aligned. Your breathing flows more easily. You can push harder and last longer without feeling wiped out. On the flip side, a poorly positioned bike can cause knee pain, lower back strain, neck tension, and even numbness in your hands or feet.
The good news is that fixing your position is not complicated. It takes a few minutes and a basic understanding of how your body connects to the bike. Once you know the fundamentals, you can adjust your setup in minutes and feel the difference immediately.
How Correct Positioning Boosts Your Performance
Think of your stationary bike like a tool. A hammer works great when you hold it correctly. The same goes for a bike. When your body is in the right position, you generate more power with every pedal stroke. Your cycling efficiency improves dramatically. You also use less energy to maintain the same speed, which means you can go longer without fatigue.
Proper positioning also helps you target the right muscles. A well-fitted bike engages your glutes, quads, and hamstrings the way they are supposed to work. You get a better lower body workout without straining areas that should not be doing the heavy lifting.
Adjusting Your Seat for the Perfect Ride
The seat is the single most important part of your bike setup. If your seat is too high, too low, too far forward, or too far back, nothing else will feel right. Getting the seat position correct should always be your first step.
Seat Height: The Foundation of Good Positioning
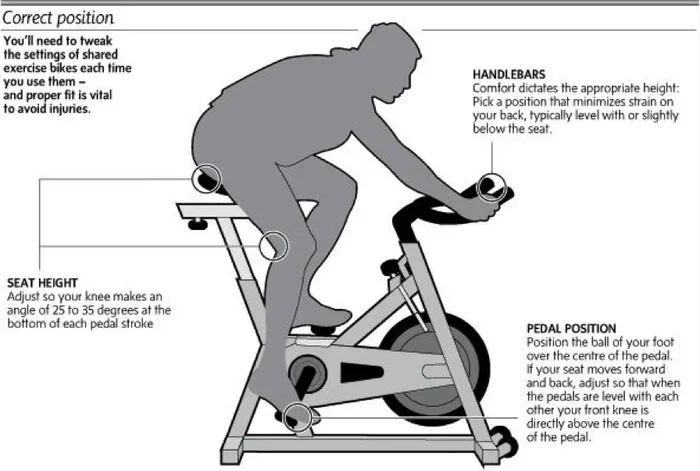
Start by sitting on the bike and placing your heel on the pedal at its lowest point. Your leg should be completely straight at this position. When you switch to the balls of your feet (the normal pedaling position), you will have a slight bend in your knee. This is the sweet spot.
If your seat is too low, your knees will angle inward or outward. This puts unnecessary stress on your joints. If the seat is too high, you will rock your hips side to side with every pedal stroke, which wastes energy and causes discomfort.
Here is a quick checklist for seat height:
- Your heel should touch the pedal with a straight leg at the bottom of the stroke.
- Your knee should have a slight bend when your foot is on the ball of your foot.
- Your hips should not rock side to side while pedaling.
- You should feel stable and balanced in the saddle.
Seat Fore and Aft Position
Seat height is only half the equation. The forward and backward position of your seat matters too. When your pedal is at the 3 o’clock position (far forward and level), your front knee should be directly over the ball of your foot. This is called the knee-over-pedal-spindle alignment, and it is the gold standard for proper bike fit.
If your seat is too far forward, you will feel stretched out and put too much pressure on your arms. If it is too far back, you lose power and put extra strain on the back of your knees.
For more detailed guidance on this step, check out our article on how to adjust the seat on a stationary bike. It covers every angle in depth.
Handlebar Placement and Reach
Your handlebars affect your upper body position more than you might think. Getting them right keeps your back comfortable and your shoulders relaxed throughout your ride.
Finding the Right Handlebar Height
Most stationary bikes allow you to raise or lower the handlebars. If you are a beginner, start with the handlebars at the same height as the seat or slightly above. This keeps your back straight and takes pressure off your lower spine.
As you get more comfortable, you can lower the handlebars slightly for a more aggressive riding position. But never drop them so low that you have to hunch your shoulders or stretch your neck upward. That is a quick path to pain and discomfort.
Handlebar Reach: How Far Should You Stretch?
When you grip the handlebars, your elbows should be slightly bent, not locked straight. You want to feel close enough to the handlebars that you can comfortably reach them without leaning forward excessively. Your upper body should be relaxed, not stretched to the breaking point.
A good rule of thumb is that you should be able to lightly touch the front of the bike with your chest while keeping your back flat. If you feel like you are reaching too far, move the handlebars closer. If you feel cramped, push them slightly further away.
Getting your handlebar setup right also helps with indoor cycling comfort during longer sessions. You will be able to ride for 30, 45, or even 60 minutes without your shoulders creeping up toward your ears.
Foot Placement and Pedal Technique
Where you place your feet on the pedals might seem like a small detail, but it has a huge impact on your cycling posture and overall efficiency. Wrong foot placement can cause foot numbness, ankle pain, and reduced power output.
The Ball of Your Foot Goes on the Pedal
The ball of your foot (the padded area just behind your toes) should sit directly over the pedal axle. This is the strongest and most efficient point of contact. It allows your ankle to move naturally and your calf muscles to engage properly with every stroke.
Avoid placing your toes on the pedal or letting your foot slide forward. Both positions reduce your leverage and can cause hot spots on your feet, especially during longer rides.
Clipping In vs. Flat Pedals
Some stationary bikes come with clip-in pedals that lock your shoes in place. Others use standard flat pedals. Both options work well. Clip-in pedals give you more control and allow you to pull up on the pedal as well as push down, which increases your pedaling technique efficiency. Flat pedals are simpler and more accessible for beginners.
If you use clip-in pedals, make sure you release your feet easily and practice getting in and out before you start a serious workout. Slipping and catching your foot mid-ride can throw off your balance and cause awkward movements.
Quick Tips for Better Foot Positioning
- Keep your feet parallel to the ground at all times.
- Avoid pointing your toes downward or upward excessively.
- Use the balls of your feet as the primary contact point.
- If your shoes are slippery, use toe cages or straps for grip.
- Adjust your cleat position if you use clip-in pedals for optimal alignment.
Body Posture and Upper Body Alignment
Your posture on the bike determines how your entire body feels after a workout. Slouching, hunching, or leaning too far forward all lead to pain and reduced performance. A strong, neutral posture keeps your body aligned and your breathing unrestricted.
Keeping a Neutral Spine
Your back should be relatively straight, with a slight natural curve in the lower back. Avoid rounding your shoulders forward or arching your back excessively. Think of yourself as standing tall, even while you are sitting on the bike.
Your core muscles play a big role here. Engaging your core slightly helps you maintain an upright position without slouching. It also transfers more power from your upper body into the pedals.
Relax Your Shoulders and Arms
One of the most common mistakes people make is shrugging their shoulders up toward their ears. This creates tension in your neck, shoulders, and upper back. Consciously relax your shoulders and let them drop down and back.
Your arms should be relaxed and slightly bent. You are not pulling on the handlebars with force. You are simply guiding the bike and maintaining balance. A death grip on the handlebars leads to hand numbness, wrist pain, and unnecessary tension throughout your upper body.
For tips on making your overall ride more comfortable, read our guide on how to make a stationary bike seat more comfortable. It pairs perfectly with good posture techniques.
Common Positioning Mistakes and How to Fix Them
Even experienced riders sometimes fall into bad habits. Knowing what to avoid helps you stay on track and get the most from every session.
Mistake 1: Seat Too Low
A seat that is too low forces your knees to bend deeply with every pedal stroke. This puts extra pressure on your kneecap and the surrounding tendons. Over time, it can lead to patellar tendonitis and chronic knee pain. Raise your seat until your leg is nearly straight at the bottom of the pedal stroke.
Mistake 2: Hunching Over the Handlebars
Leaning too far forward rounds your back and compresses your chest. This makes it harder to breathe deeply and can cause lower back pain within minutes. Adjust your handlebar height or reach to keep your back flat and your chest open.
Mistake 3: Sitting Too Far Back on the Seat
When you sit too far back, you lose the ability to generate power through your legs. Your pedaling becomes inefficient, and your calves do most of the work instead of your glutes and quads. Slide your seat forward until you can push through the full pedal stroke with authority.
Mistake 4: Locking Your Knees
Never fully straighten your legs at the bottom of the pedal stroke. A slight bend in your knee acts as a natural shock absorber and protects your joints. Locking your knees transfers impact directly into your joints and can cause serious damage over time.
Mistake 5: Neglecting Your Feet
As we covered above, foot placement is critical. Many riders ignore their feet entirely and wonder why they feel numb or sore after a ride. Take a moment before every workout to check that your feet are positioned correctly on the pedals.
Putting It All Together: Your Positioning Checklist
Now that you know all the individual pieces, let us put them together into a simple routine you can follow every time you ride.
- Adjust the seat height so your leg is straight with your heel on the pedal at the lowest point.
- Set the seat fore and aft so your front knee aligns over the ball of your foot at the 3 o’clock pedal position.
- Position the handlebars at a comfortable height with a slight reach that keeps your elbows bent and shoulders relaxed.
- Place the balls of your feet over the pedal axles and keep your feet parallel to the ground.
- Engage your core and sit tall with a neutral spine and dropped shoulders.
- Take a test ride for 2 to 3 minutes and listen to your body. Make small adjustments as needed until everything feels balanced and comfortable.
Once you have your positioning dialed in, you can focus on what really matters: the workout itself. For ideas on how to make the most of your time on the bike, check out our article on how to get a good workout on a stationary bike. It covers workout structures, intensity levels, and progression strategies.
Remember that your body may need slight adjustments over time. As you get stronger and more flexible, your ideal position may shift a bit. Listen to your body, make small tweaks, and do not be afraid to experiment.
Final Thoughts on Stationary Bike Positioning
Positioning yourself correctly on a stationary bike is the single most impactful thing you can do for your indoor cycling experience. It protects your body, boosts your performance, and makes every ride more enjoyable. You do not need expensive equipment or professional fitting services to get it right. A few minutes of careful adjustment before each workout goes a long way.
Start with the seat. Move to the handlebars. Check your feet. Set your posture. Follow the checklist, trust the process, and feel the difference. Once proper positioning becomes second nature, you will wonder how you ever rode without it.
The best part is that good positioning compounds over time. As your body adapts to the correct alignment, you will notice better endurance, stronger legs, and less soreness after every session. Keep refining your setup, stay consistent with your rides, and enjoy the journey. Your stationary bike is a powerful tool, and now you know exactly how to use it the right way.
Frequently Asked Questions
How do I know if my seat is at the right height on a stationary bike?
Sit on the bike and place your heel on the pedal at its lowest position. Your leg should be completely straight. When you switch to the balls of your feet, you should have a slight bend in your knee. If your hips rock side to side while pedaling, your seat is likely too high.
Should my handlebars be higher or lower than my seat?
For beginners, having the handlebars at the same height as the seat or slightly above is ideal. This keeps your back straight and reduces strain on your lower spine. As you gain experience, you can lower them a bit for a more aggressive position, but never drop them so low that you feel stretched or hunched.
What is the correct foot position on a stationary bike pedal?
The ball of your foot should sit directly over the pedal axle. This is the strongest contact point and allows your ankle to move naturally. Avoid placing your toes on the pedal or letting your foot slide too far forward, as both positions reduce power and comfort.
How often should I check my bike positioning?
You should check your setup before every workout, especially if you share the bike with others. Your body also changes over time, so revisit your fit every few weeks to make sure everything still feels right. Small adjustments can make a big difference in comfort and performance.
Can poor positioning on a stationary bike cause knee pain?
Yes, absolutely. A seat that is too low or too far forward puts extra stress on your knees. Locking your knees at the bottom of the pedal stroke also causes joint strain. Proper positioning distributes force evenly across your joints and muscles, which helps prevent pain and injury.
Do I need special shoes for a stationary bike?
You do not need special shoes to get started. Regular athletic shoes work fine on flat pedals. However, if you want more efficiency and control, clip-in shoes and pedals can help. They keep your feet locked in place and allow you to pull up on the pedals for a more complete pedaling motion.