How to Fill Up a Bike Tire with Air

Filling your bike tire with air is a simple but critical skill for any cyclist. Using the right pump for your valve type (Presta or Schrader) and inflating to the manufacturer’s recommended PSI (pounds per square inch) is essential for speed, comfort, and safety. This guide walks you through identifying your valve, checking pressure, and mastering the pumping technique to avoid flats and blowouts.
Key Takeaways
- Identify Your Valve Type: Know if you have a Presta (narrow, with a lock nut) or Schrader (wide, like a car tire) valve. This determines which pump head you need.
- Find the Recommended PSI: Always check the sidewall of your tire for the manufacturer’s inflation range. This number, not your pump’s gauge, is your target.
- Use a Floor Pump with a Gauge: A good floor pump with an accurate pressure gauge is the fastest, easiest, and most precise way to inflate tires correctly.
- Pump Smoothly and Listen: Use full, smooth strokes. If you feel major resistance or hear a “poof,” you may have a pinch flat or a damaged tire/rim.
- Check Pressure Regularly: Tire pressure naturally decreases over weeks. Check before every long ride or at least once a week for optimal performance.
- Don’t Overinflate: Exceeding the max PSI can cause a dangerous blowout and a harsh, uncomfortable ride. When in doubt, inflate to the middle of the range.
- Secure the Valve Stem: After inflating, always tighten the lock nut on a Presta valve finger-tight to prevent air leakage and dirt ingress.
[FEATURED_IMAGE_PLACEHOLDER]
📑 Table of Contents
- Introduction: Why Proper Inflation is Your First Line of Defense
- Understanding Your Equipment: Valves, Pumps, and Pressure
- The Step-by-Step Process: From Valve to Perfect Pressure
- Troubleshooting: Common Problems and Solutions
- Beyond the Basics: Advanced Tips for Optimal Performance
- Conclusion: A Simple Skill for a Better Ride
Introduction: Why Proper Inflation is Your First Line of Defense
You hop on your bike, push off, and something feels… off. The ride is sluggish, you feel every little crack in the pavement, and you’re working harder than you should. More often than not, the culprit is simple: your tires aren’t filled with the right amount of air. Knowing how to fill up a bike tire with air isn’t just a mechanical chore; it’s the single most important routine maintenance task you can perform for safety, efficiency, and fun. Under-inflated tires increase rolling resistance, making you slower and tire you out faster. They’re also far more susceptible to pinch flats—those dreaded “snake bite” punctures caused by the tire compressing fully against the rim. Over-inflated tires, on the other hand, reduce traction, create a bone-jarring ride, and can even lead to a catastrophic blowout. Mastering this skill puts you in control, ensuring your bike performs as intended and your rides are smooth, predictable, and enjoyable. This guide will take you from novice to confident, covering everything from valve identification to perfect pressure.
Understanding Your Equipment: Valves, Pumps, and Pressure
Before you even touch a pump, you need to understand the three key components: the valve on your tire, the pump you’ll use, and the pressure number you’re aiming for. Getting these fundamentals straight is half the battle.

Visual guide about How to Fill Up a Bike Tire with Air
Image source: diymountainbike.com
The Two Main Valve Types: Presta vs. Schrader
Look at the stem poking out of your wheel rim. You’ll either see a Presta valve or a Schrader valve. They are not interchangeable without an adapter, so identification is step one.
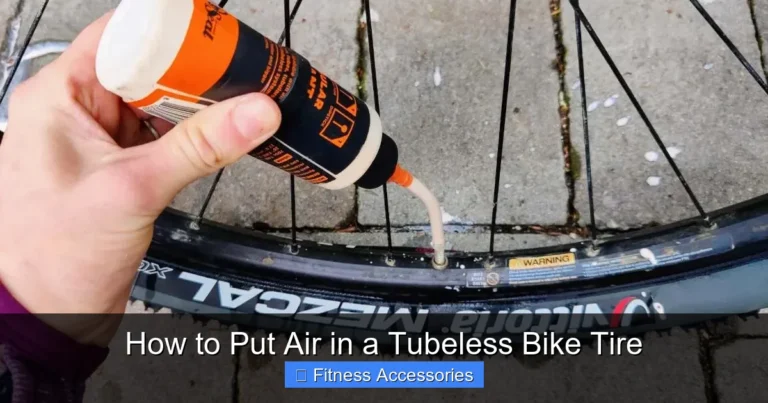
- Presta Valve: This is the skinnier, more common valve on road bikes, mountain bikes, and many hybrids. It’s made of metal and has a small, knurled lock nut at the top. To let air in or out, you must first unscrew this tiny nut (it doesn’t come off completely, just loosen it). The valve core is delicate; it can be damaged if you force a pump head meant for a Schrader valve onto it.
- Schrader Valve: This is the same stout, spring-loaded valve found on car tires. It’s wider, has a small metal pin in the center, and you simply press the pin to release air. It’s common on lower-end bikes, kids’ bikes, cruisers, and many e-bikes. It’s robust and easier for public air pumps to accommodate.
Pro Tip: If you have both types of bikes, get a dual-head pump or a small adapter ($2-$5) to make one pump work with both valves.
Choosing Your Weapon: Pump Selection
Not all pumps are created equal. For regular home use, a high-quality floor pump is the undisputed champion. Its long barrel and large piston move a huge volume of air with minimal effort, getting a completely flat tire inflated in under a minute. Look for one with a built-in, accurate pressure gauge and a universal pump head that automatically fits both Presta and Schrader valves (you’ll hear a click).
For on-the-go fixes, a mini pump or CO2 inflator is essential. Mini pumps are compact but require significant effort and many strokes. CO2 systems use small cartridges to inflate a tire instantly—perfect for race day or a quick fix, but they can be tricky to regulate precisely and are a one-time-use item per cartridge. Never rely solely on a mini pump for a regular inflation routine; it’s for emergencies only.
Decoding the Number: Finding Your Correct PSI
This is the most critical piece of information. The pressure for your tire is not a suggestion; it’s a specification. Look at the sidewall of your tire. You’ll see something like: Inflate to 80-110 PSI or Max Pressure 65 PSI. This range is determined by the tire’s construction and the rim’s strength.
- Road Bike Tires: Typically require high pressure (80-130 PSI) to minimize rolling resistance on smooth pavement.
- Mountain Bike Tires: Run much lower pressure (20-40 PSI for tubeless, 30-50 PSI for tubed) to increase traction and absorb bumps on rough trails.
- Hybrid/City Tires: Fall somewhere in the middle (50-70 PSI), balancing comfort and efficiency.
Always start in the middle of the recommended range. Your weight, riding style, and terrain will dictate the perfect number within that window. Heavier riders or those on smooth roads may trend toward the higher end; lighter riders on bumpy paths may prefer the lower end for more cushion.
The Step-by-Step Process: From Valve to Perfect Pressure
Now that you’re equipped with knowledge, let’s get physical. Here is the foolproof, safe method to fill up a bike tire with air.

Visual guide about How to Fill Up a Bike Tire with Air
Image source: i.ytimg.com
Step 1: Preparation and Inspection
Before you pump, do a quick once-over. Spin the wheel and look for any obvious cuts, embedded glass, or worn-down tread. Check the rim tape (the strip covering the spoke holes inside the rim) is intact and centered. A quick visual can prevent you from inflating a tire with a pre-existing flaw that could cause a blowout. Also, ensure the valve stem is straight and not cross-threaded in the rim hole.
Step 2: Attaching the Pump Head Correctly
This is where most beginners struggle. For a Presta valve:
- Loosen the small lock nut at the top of the valve stem by turning it counter-clockwise a few turns. You’ll hear a tiny puff of air—this is normal.
- Press the pump head firmly onto the valve stem. For a lever-lock style head, pull the lever back, place it on, then push the lever down to lock it in place. You should feel a secure connection. If air is leaking around the head, reseat it.
For a Schrader valve, simply press the pump head straight down onto the valve until it seats fully. The internal pin will depress, opening the valve. You may need to unscrew any protective cap first.
Critical Check: Before you start pumping vigorously, give the pump a test squeeze. You should feel resistance and see the gauge needle move. If air is leaking loudly around the connection, reattach the head.
Step 3: Pumping with Purpose
Now, pump. Use your body weight and legs, not just your arms. If using a floor pump, place it on the ground, grip the handles, and push down with your full body weight in a smooth, controlled motion. Pull up less forcefully. This efficient motion gets more air in per stroke and prevents fatigue. Keep an eye on the gauge. For a completely flat tire, you’ll see the needle move slowly at first, then more quickly as the tire shape returns.
Step 4: Reaching the Target Pressure
Pump until the gauge reads your target PSI. Do not guess. Use the gauge. For high-pressure road tires (100+ PSI), you’ll need to pump firmly and consistently. It gets harder as you approach the target pressure—this is normal. For lower-pressure mountain bike tires, you’ll reach the number with fewer, easier strokes.
Step 5: The Final Seal and Check
Once at your target pressure:
- For a Presta valve: finger-tighten the lock nut clockwise. Do not use tools, as overtightening can damage the valve. This prevents slow leaks and keeps dirt out.
- For a Schrader valve: Screw the protective cap back on finger-tight.
- Gently push on the tire with your thumb. It should feel firm, with only a tiny bit of give. There should be no bulges or soft spots.
- Give the wheel a final spin and listen. Any hissing sound means you have a leak at the valve or a puncture. Re-check your connection.
Troubleshooting: Common Problems and Solutions
Even with careful steps, issues can arise. Here’s how to diagnose them.

Visual guide about How to Fill Up a Bike Tire with Air
Image source: bikeforgeeks.com
The Pump Head Keeps Falling Off/Air Leaks
Cause: Incorrect head for the valve, or a poor seal. A Presta valve in a Schrader-only head will never seal. For universal heads, ensure the rubber grommet inside the head is clean and not cracked. You may need to pull the lever after placing it on a Presta valve for some models.
Fix: Use the correct head. For stubborn Presta valves, slightly loosen the lock nut further. Clean the valve stem.
The Tire Won’t Hold Pressure
Cause: This is almost always a puncture or a valve issue. First, listen at the valve stem with your ear while squeezing the tire. If it’s leaking there, the valve core may be faulty (rare) or the lock nut isn’t tight. If the leak is elsewhere, you have a puncture.
Fix: Tighten the Presta lock nut. For a Schrader valve, ensure the cap is on. If leaking persists, the tire/tube needs a patch or replacement. Use soapy water on a fully inflated tire to find the exact leak point (bubbles will form).
I Can’t Get to the Recommended PSI
Cause: You might have a small, low-volume pump (like a mini pump) that isn’t designed for high-pressure road tires. The tire or tube may also have a slow leak, making it impossible to build pressure.
Fix: Switch to a proper floor pump. If using a floor pump and still can’t reach pressure, submerge the inflated tire in water to check for slow leaks. You may need a new tube.
The Tire Feels Hard, But the Gauge is Low
Cause: Your pump’s gauge is likely inaccurate or of poor quality. Cheap, built-in gauges on some mini pumps are notoriously unreliable.
Fix: Use a separate, high-quality, standalone pressure gauge ($15-$30) to verify. Trust the standalone gauge over the pump’s gauge. This small investment solves countless confusion problems.
Beyond the Basics: Advanced Tips for Optimal Performance
Once you’ve mastered the fundamentals, these tips will refine your inflation routine for peak performance and longevity.
Temperature’s Effect on Pressure
Air pressure is not static. It changes with temperature. A tire inflated to 80 PSI on a cool morning (50°F) could read 85 PSI on a hot afternoon (90°F). The rule of thumb is a 1 PSI change for every 10°F change in temperature. Therefore, check your pressure when the tire is “cold,” meaning before you ride or at least three hours after riding. Never deflate a hot tire to reach the “cold” recommended PSI; it will be dangerously under-inflated when it cools.
The Tubeless Revolution
Many modern mountain and gravel bikes use tubeless setups. Inflating these requires a few extra steps. You must first ensure the tire bead is seated evenly on the rim all the way around. Then, using a high-volume floor pump or a dedicated air compressor, you often need a rapid burst of air to “pop” the bead into place. Many tubeless tires also require sealant (like Stan’s NoTubes) inside, which automatically plugs small punctures. The inflation pressure for tubeless is typically 5-10 PSI lower than the same tire with a tube, as the system is less prone to pinch flats.
Storage and Long-Term Care
If you store your bike for the season, don’t leave the tires completely flat. This can cause the tire casing to develop a “set” and become permanently deformed. Inflate them to the maximum recommended PSI before storage and check them every few months. For long-term storage, hanging the bike or placing it on stands takes weight off the tires entirely, which is even better.
Conclusion: A Simple Skill for a Better Ride
Filling your bike tire with air is a deceptively simple act that has a profound impact on your cycling experience. It’s the direct link between you and the ground, affecting everything from speed and efficiency to comfort and safety. By taking five minutes to understand your valve, find your correct pressure on the tire sidewall, and use a proper pump with a reliable gauge, you take complete command of your bike’s performance. You’ll ride faster, feel fewer flats, and enjoy a smoother, more predictable journey every time you push off. Make checking your tire pressure a weekly habit—it’s the easiest, cheapest, and most effective form of bike maintenance you can do. Now, go inflate those tires and feel the difference on your next ride.
Frequently Asked Questions
What happens if I over-inflate my bike tire?
Over-inflating beyond the maximum PSI on the tire sidewall is dangerous. It dramatically increases the risk of a blowout, where the tire casing fails explosively. It also makes the ride extremely harsh, reduces traction, and can damage your rims. Always stay within the manufacturer’s specified range.
Can I use a car tire air pump at a gas station?
Yes, but with caution. Gas station pumps are high-volume and designed for Schrader valves. They often have very inaccurate gauges. If you have Presta valves, you’ll need a cheap adapter. Use the pump in very short bursts, constantly checking your own gauge, as it’s easy to over-inflate quickly and cause a blowout.
Why does my tire lose air so quickly?
All tires, even perfect ones, lose a small amount of air over time (1-3 PSI per week) due to the microscopic permeability of the tube/tire material. A rapid loss (more than 10 PSI in a day) indicates a problem: a puncture, a faulty valve core, or a poor seal at the valve stem. Inspect the tire and tube for debris and check the valve connection.
Should I inflate my tires to the maximum PSI listed?
Not necessarily. The listed range (e.g., 60-90 PSI) is a safety window. Inflating to the maximum gives the least rolling resistance on perfectly smooth roads but results in a very harsh ride and poor traction on rough surfaces. Start in the middle of the range and adjust based on your weight and terrain. Heavier riders may need the higher end; lighter riders on bumpy roads may prefer the lower end.
What’s the difference between “high pressure” and “high volume” pumps?
A high-pressure pump (like a typical floor pump) has a narrow barrel and is designed to move a small volume of air to very high PSI (100+), ideal for road bike tires. A high-volume pump (often used for tubeless MTB tires or inflating air mattresses) has a wide barrel and moves a large amount of air quickly but may not reach very high pressures. For most cyclists, a standard high-pressure floor pump with a gauge is the best all-around choice.
How often should I check my bike tire pressure?
Check your tire pressure before every ride if you want to be precise, especially for performance cycling. At a minimum, check it once a week. Tires can lose 1-5 PSI per week naturally. Riding on under-inflated tires is the fastest way to get pinch flats and cause premature tire wear. Developing the habit of a quick pre-ride squeeze is a hallmark of an experienced cyclist.