How to Do a Bent Over Row with Barbell
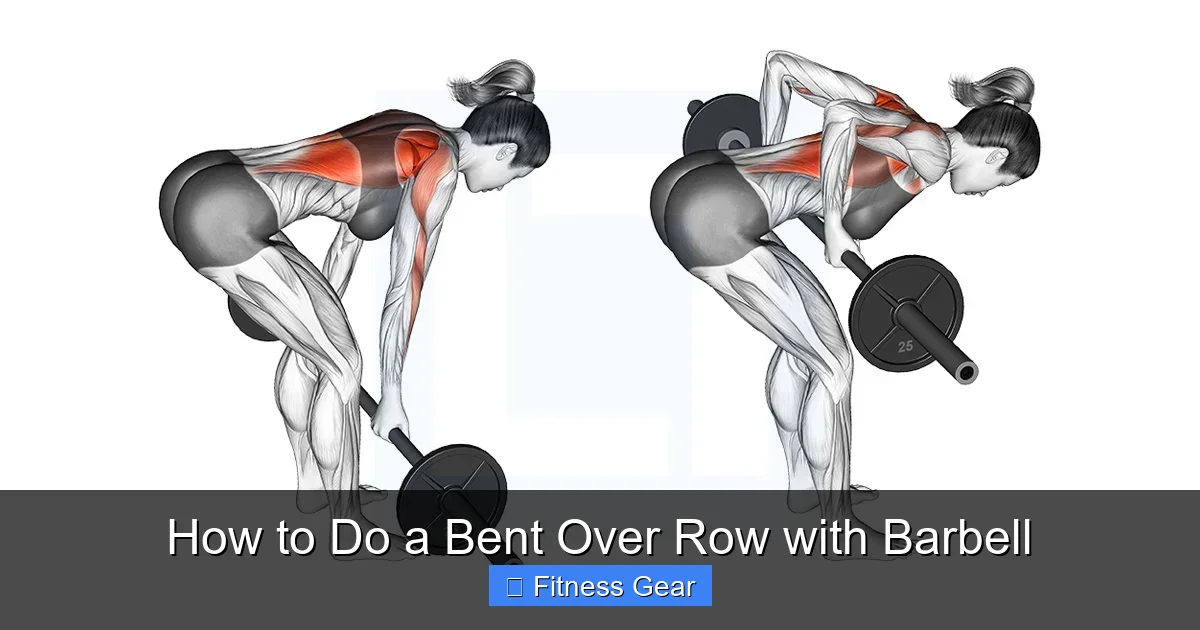
Want a stronger, thicker back? The barbell bent‑over row is a powerhouse move that builds size and improves posture. This guide walks you through setup, technique, variations, and safety cues so you can row with confidence and avoid injury.
Key Takeaways
- Understanding How To Do A Bent Over Row With Barbell: Provides essential knowledge
📑 Table of Contents
- Introduction: Why the Bent‑Over Row Deserves a Spot in Your Routine
- 1. Preparing Your Space and Equipment
- 2. Mastering the Starting Position
- 3. Executing the Row: The Move Step by Step
- 4. Common Mistakes and How to Fix Them
- 5. Variations to Keep Progressing
- 6. Programming the Bent‑Over Row into Your Routine
- Conclusion: Row Your Way to a Stronger Back
Introduction: Why the Bent‑Over Row Deserves a Spot in Your Routine
If you’ve ever walked into a gym and seen someone pull a heavy barbell from the floor to their torso, you’ve witnessed one of the most effective back‑building exercises on the planet. The bent‑over row with a barbell works the latissimus dorsi, rhomboids, traps, and even the biceps, while also demanding core stability. In short, it’s a full‑body mover that translates to better posture, stronger pulling power, and a more balanced physique.
But like any compound lift, the bent‑over row can turn into a disaster if performed with sloppy form. Rounding the spine, using momentum, or gripping the bar incorrectly can lead to shoulder pain or lower‑back strain. That’s why this article breaks down **how to do a bent over row with barbell** step by step, from setting up the rack to fine‑tuning the finish.
1. Preparing Your Space and Equipment
Choosing the Right Barbell
Most gyms have a standard 45‑lb (20‑kg) Olympic barbell, which is perfect for beginners. If you’re new, start with an empty bar or a light loading plate. The bar should feel balanced in your hands—any wobble means you need a better grip or a different bar.

Visual guide about How to Do a Bent Over Row with Barbell
Image source: fitdominium.com
Selecting Weight Plates
Pick plates that let you add weight in 5‑lb (2.5‑kg) increments. This makes it easier to progress without overloading too quickly. Remember, the goal is to perfect the movement before you chase heavy numbers.
Setting Up the Rack
Place the bar on a squat rack or a low‑profile rack at about mid‑shin height. This height lets you lift the bar off the ground without excessive knee bend, keeping the hinge at the hips the primary driver.
Footwear and Clothing
Wear flat, stable shoes—think weight‑lifting shoes or minimalist trainers. Avoid running shoes with thick cushions; they can destabilize you when you hinge forward.
2. Mastering the Starting Position
Foot Placement
Stand with feet shoulder‑width apart. Your toes can point slightly outward, but keep them grounded. This stance gives a solid base and prevents you from wobbling as you pull.
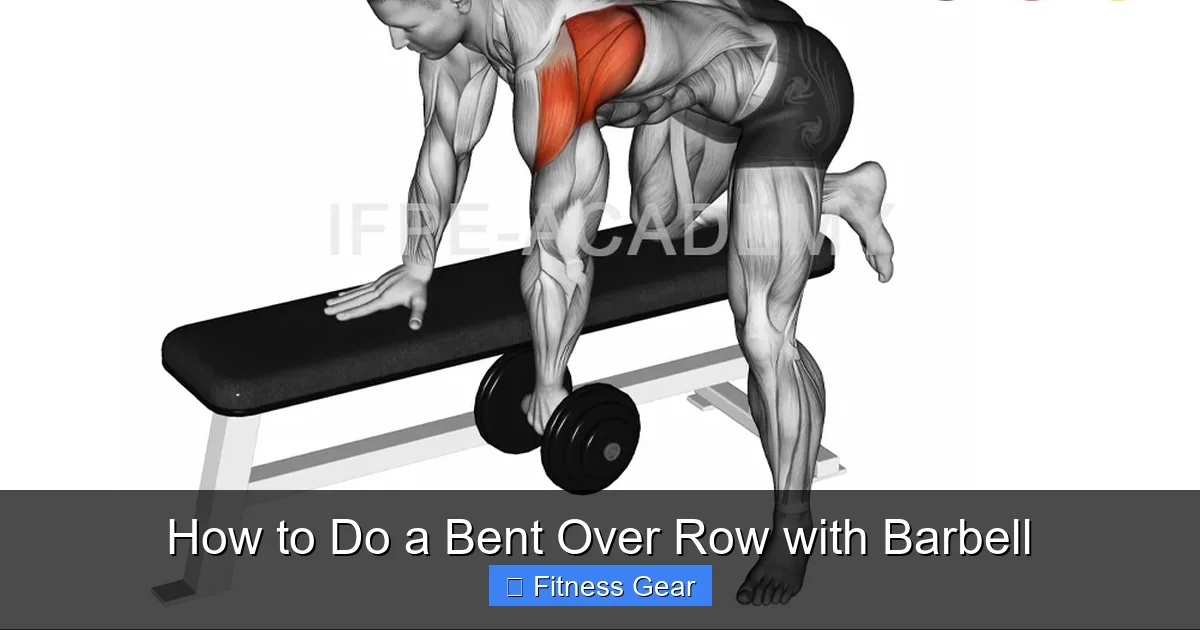
Visual guide about How to Do a Bent Over Row with Barbell
Image source: ifpe-academy.com
The Hip Hinge
Push your hips back as if you’re closing a car door with your glutes. Your torso should lean forward until it’s almost parallel to the floor—about a 45‑to‑90‑degree angle, depending on flexibility. Keep the spine neutral: no rounding, no excessive arch.
Grip Options
- Overhand (pronated) grip: Palms face down; emphasizes upper back and traps.
- Underhand (supinated) grip: Palms face up; recruits more biceps.
- Mixed grip: One hand overhand, one underhand; useful for heavy loads but can create muscular imbalances if overused.
Choose a grip that feels comfortable and aligns with your training goal. For most beginners, an overhand grip is safest.
Hand Width
Place your hands just outside shoulder width. A narrower grip targets the lats more, while a wider grip hits the rear delts and traps. Keep the bar centered over the middle of your feet.
Core Activation
Brace your core like you’re about to be punched in the stomach. This intra‑abdominal pressure protects the spine throughout the lift.
3. Executing the Row: The Move Step by Step
Step 1 – Lift Off
With the bar on the floor, engage your lats, keep the back flat, and pull the bar upward by extending your hips. The bar should travel in a straight line close to your shins.
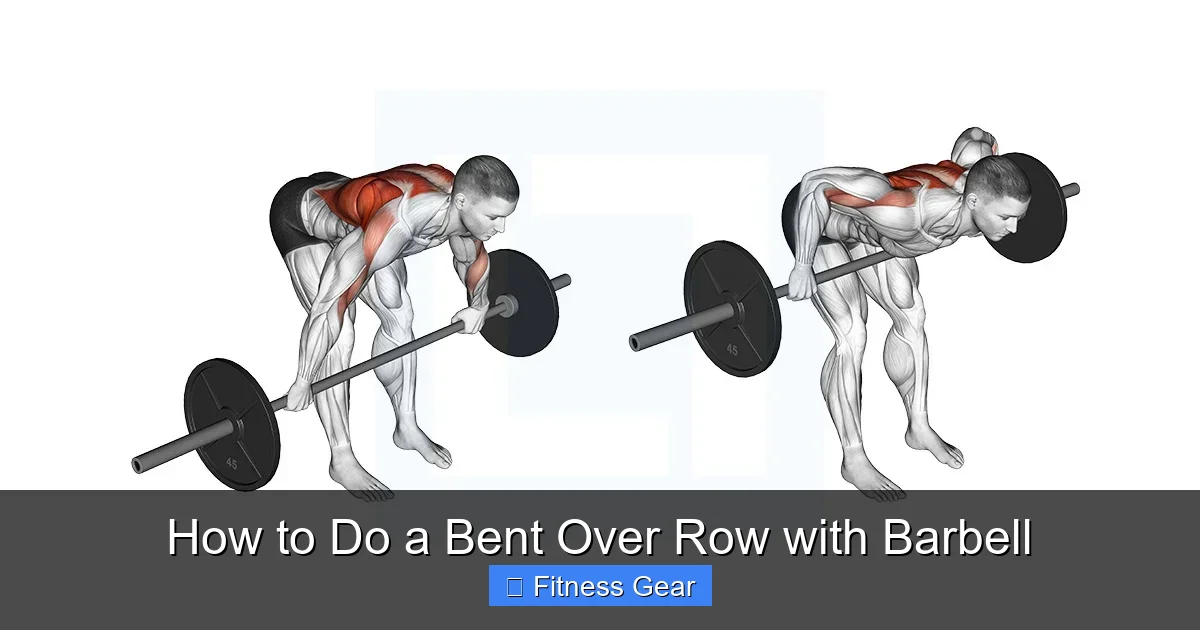
Visual guide about How to Do a Bent Over Row with Barbell
Image source: liftmanual.com
Step 2 – The Pull
Once the bar passes the knees, drive your elbows back and up, pulling the bar toward your lower rib cage. Imagine trying to tuck your elbows into your sides. Keep the shoulders down and away from your ears.
Step 3 – The Squeeze
At the top of the movement, pause for a brief 1‑second contraction. Squeeze the shoulder blades together—this is where the back muscles do the most work.
Step 4 – The Reset
Lower the bar in a controlled manner, extending the arms fully while maintaining the hinge. The bar should travel back down the same path, touching the floor lightly before the next rep.
Breathing Pattern
Exhale sharply as you pull the bar toward you. Inhale as you lower it back down. This rhythm helps maintain intra‑abdominal pressure and keeps the core engaged.
4. Common Mistakes and How to Fix Them
Rounding the Lower Back
Often caused by using too much weight or a weak core. Reduce the load, tighten your abs, and practice the hinge with a dowel rod along your spine to feel the neutral position.
Using Momentum (Jerk)
If you’re “jerking” the bar off the floor, you’re turning a row into a deadlift. Reset between reps and focus on a smooth, controlled pull.
Elbows Flaring Out
Flared elbows shift stress to the shoulders. Keep elbows close to the body, pulling them back rather than out to the sides.
Insufficient Range of Motion
Stopping halfway reduces muscle activation. Pull until the bar lightly contacts the lower ribs, and fully extend at the bottom.
Grip Too Wide or Too Narrow
Both extremes can strain the wrists or limit lat engagement. Aim for just outside shoulder width and adjust based on comfort.
5. Variations to Keep Progressing
Pendlay Row
Start each rep with the bar on the floor, pause, then row. This eliminates momentum and forces a strict form. Great for powerlifters.
Reverse Grip Row
Using an underhand grip shifts emphasis to the biceps and lower lats. Keep the same hip hinge and avoid excessive elbow flare.
Single‑Arm Barbell Row
Place one hand on a bench for support, row with the opposite hand. This isolates each side, helping correct imbalances.
Paused Row
Pause for 2‑3 seconds at the top of each rep. The extra time under tension boosts hypertrophy.
Resistance‑Band Assisted Row
Loop a band around the bar for added tension at the top of the lift. Useful for advanced lifters seeking variable resistance.
6. Programming the Bent‑Over Row into Your Routine
Frequency
Most lifters benefit from 1‑2 rowing sessions per week. Pair it with a push‑day (bench press, overhead press) to maintain a balanced push‑pull split.
Sets and Reps
- Strength focus: 4‑5 sets of 3‑6 reps, heavy weight, long rest (2‑3 min).
- Hypertrophy focus: 3‑4 sets of 8‑12 reps, moderate weight, moderate rest (60‑90 sec).
- Endurance/conditioning: 2‑3 sets of 15‑20 reps, light weight, short rest (30‑45 sec).
Progression Strategy
Use the “2‑plus‑2” rule: add 2 lb (1 kg) to each side of the bar every two workouts once you can complete the top rep range with good form.
Deload Weeks
Every 4‑6 weeks, reduce the load by 30‑40 % for a week. This prevents overtraining and keeps your nervous system fresh.
Conclusion: Row Your Way to a Stronger Back
The bent‑over row with a barbell is a timeless, versatile lift that can make a noticeable difference in your strength, posture, and aesthetics. By mastering the setup, maintaining a neutral spine, and progressing thoughtfully, you’ll reap the benefits without risking injury. Keep the movement smooth, respect your body’s limits, and enjoy the feeling of pulling that heavy bar toward you. Your back will thank you, and every other lift—deadlifts, pull‑ups, even bench press—will feel stronger as a result.
Frequently Asked Questions
What muscles does the barbell bent‑over row primarily target?
The row works the latissimus dorsi, rhomboids, middle and lower trapezius, rear deltoids, and also engages the biceps, forearms, and core for stability.
Can I do bent‑over rows if I have lower‑back pain?
Yes, but start with a very light load, focus on a neutral spine, and consider a supported variation like a chest‑supported row until your back feels stronger.
How much weight should a beginner start with?
Begin with just the bar (45 lb/20 kg) or add a small plate on each side. The key is to perfect form before adding more weight.
Is a mixed grip safe for heavy rows?
A mixed grip can help you hold heavier loads, but use it sparingly to avoid muscular imbalances and potential wrist strain.
Should I warm up with lighter rows before my working sets?
Absolutely. Perform 2‑3 warm‑up sets, gradually increasing weight while keeping reps in the 8‑12 range to prime the muscles and joints.
How often should I train the bent‑over row each week?
Most lifters see best results training the row 1‑2 times per week, paired with complementary pulling exercises for balanced development.