How to Cook Frozen Corn on the Cob in Under 20 Minutes
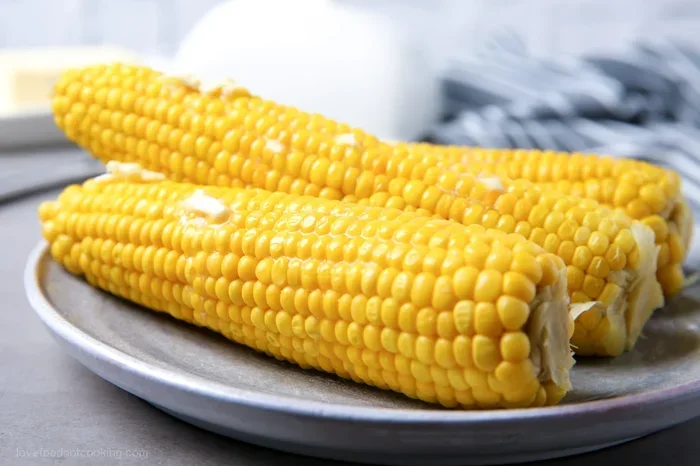
Cooking frozen corn on the cob is quick, easy, and surprisingly delicious. You can boil, steam, or microwave frozen corn in under 20 minutes and have a tasty side dish ready for any meal. This guide covers every method with simple tips to get the best flavor and texture every time.
There are few things as satisfying as a warm ear of corn on the cob sitting on your dinner plate. Whether you are feeding a family of four or just cooking for yourself, how to cook frozen corn on the cob is a skill worth mastering. Frozen corn is convenient, affordable, and packed with nutrients. Best of all, you can have it on the table in under 20 minutes.
Many people think cooking frozen corn is complicated or that the results will be bland. That could not be further from the truth. With the right technique, your frozen corn can taste just as good as fresh corn straight from the garden. In this guide, we will walk you through every step, from thawing to seasoning, so you get perfect results every single time.
We will cover three popular methods: boiling, steaming, and microwaving. Each method has its own advantages, and we will explain when to use each one. By the end of this article, you will feel confident cooking frozen corn like a pro. Let us get started.
Key Takeaways
- Fast Preparation: Most methods take 10-20 minutes, making frozen corn a perfect quick side dish.
- Multiple Cooking Methods: Boiling, steaming, and microwaving all work great for frozen corn on the cob.
- No Thawing Required: You can cook frozen corn directly without thawing it first.
- Easy Seasoning: Butter, salt, pepper, and herbs transform simple corn into a flavorful treat.
- Budget-Friendly: Frozen corn is affordable, nutritious, and available year-round.
- Perfect for Beginners: These methods are simple enough for anyone, even first-time cooks.
📑 Table of Contents
- Why Frozen Corn on the Cob Is a Great Choice
- How to Thaw Frozen Corn on the Cob
- How to Boil Frozen Corn on the Cob
- How to Steam Frozen Corn on the Cob
- How to Microwave Frozen Corn on the Cob
- Seasoning and Serving Your Cooked Corn
- Common Mistakes When Cooking Frozen Corn
- Expert Tips for the Best Frozen Corn
- Conclusion
Why Frozen Corn on the Cob Is a Great Choice
Frozen corn often gets a bad reputation. People assume it is less tasty or less healthy than fresh corn. The reality is quite different. Frozen corn is picked at peak ripeness and flash-frozen to lock in flavor and nutrition. This means you are getting corn that is just as nutritious as fresh corn, sometimes even more so.
Nutritional Benefits of Corn
Corn is a good source of fiber, vitamins B and C, and several minerals. It also contains antioxidants that support overall health. Because frozen corn is processed right after harvesting, many of these nutrients are preserved better than in fresh corn that has been sitting on a store shelf for days.
Convenience and Cost Savings
One of the biggest advantages of frozen corn is convenience. You do not need to shuck, clean, or prep the corn before cooking. Just grab a bag from the freezer, and you are ready to go. Frozen corn is also much cheaper than fresh corn out of season, making it a smart choice for budget-conscious cooks.
Year-Round Availability
Fresh corn on the cob is a summer treat for many people. But with frozen corn, you can enjoy this delicious vegetable any time of year. Whether it is January or July, your freezer always has a ready supply of corn waiting for you.
How to Thaw Frozen Corn on the Cob
Before we dive into cooking methods, let us talk about thawing. Do you need to thaw frozen corn before cooking? The short answer is no. You can cook corn straight from the freezer. However, there are times when thawing can improve the texture and flavor.
When to Thaw and When Not To
If you are planning to boil or steam your corn, there is no need to thaw it first. Cooking from frozen actually helps the corn hold its shape and texture. However, if you plan to grill or air-fry your corn, a quick thaw can help ensure even cooking.
How to Thaw Quickly
If you do want to thaw your corn, the easiest method is to place the ears under cool running water for about five minutes. Another option is to leave the bag in the refrigerator overnight. Avoid using warm water or the microwave to thaw, as this can start cooking the corn unevenly and make it mushy.
Quick Tip
If you are in a hurry, cook your corn directly from frozen. It works perfectly well for boiling and steaming, and it saves you precious time on busy weeknights.
How to Boil Frozen Corn on the Cob
Boiling is the most popular method for cooking frozen corn on the cob. It is simple, fast, and produces tender, juicy ears of corn every time. Here is exactly how to do it.
Step-by-Step Boiling Instructions
- Fill a large pot with enough water to cover the corn completely.
- Add a teaspoon of salt and a tablespoon of sugar to the water. The sugar enhances the natural sweetness of the corn.
- Bring the water to a rolling boil over high heat.
- Carefully place the frozen corn ears into the boiling water. Do not thaw them first.
- Reduce the heat slightly and let the corn boil for 5 to 8 minutes.
- Check for doneness by piercing a kernel with a fork. It should be tender but still slightly crisp.
- Remove the corn with tongs and let it drain for a moment before serving.
Tips for Perfect Boiled Corn
Do not overcook your corn. Overcooked corn becomes mushy and loses its sweet flavor. Five to eight minutes is the sweet spot for most frozen corn. If you prefer softer corn, you can add a minute or two, but do not exceed ten minutes of boiling.
Another great tip is to add a splash of milk to the boiling water. This gives the corn a richer, creamier flavor that pairs beautifully with butter. Some cooks also add a pat of butter directly into the boiling water for extra richness.
Common Mistakes to Avoid
The biggest mistake people make when boiling frozen corn is using too little water. Make sure the corn is fully submerged. Another mistake is adding salt too early if you are using a aluminum pot, as this can cause discoloration. Stick to a stainless steel or stainless-coated pot for the best results.
How to Steam Frozen Corn on the Cob
Steaming is a wonderful alternative to boiling. It preserves more of the corn’s natural flavor and nutrients because the corn is not sitting in water. Steamed corn also has a slightly firmer texture that many people prefer.
How to Steam Corn on the Cob
- Fill a large pot with about two inches of water and place a steamer basket inside.
- Bring the water to a boil over high heat.
- Place the frozen corn ears into the steamer basket. Do not stack them too tightly.
- Cover the pot with a lid and let the corn steam for 8 to 10 minutes.
- Check for doneness by squeezing a kernel gently. It should be plump and tender.
- Remove the corn carefully and serve immediately.
Steaming vs. Boiling: Which Is Better?
Both methods produce delicious results, but they have slight differences. Boiling is faster and more hands-off, while steaming gives you a firmer texture and preserves more nutrients. If you want the healthiest option, steaming is the way to go. If you want speed and convenience, boiling wins.
| Method | Time | Texture | Nutrient Retention | Ease |
|---|---|---|---|---|
| Boiling | 5-8 minutes | Soft and juicy | Good | Very Easy |
| Steaming | 8-10 minutes | Firm and sweet | Excellent | Easy |
| Microwaving | 3-5 minutes | Moist and tender | Good | Easiest |
How to Microwave Frozen Corn on the Cob
If you want the fastest method possible, microwaving is your best friend. You can have perfectly cooked corn on the cob in just a few minutes with minimal cleanup.
Microwave Cooking Instructions
- Leave the corn in its husk or wrap it in a damp paper towel.
- Place the ear(s) on a microwave-safe plate.
- Microwave on high for 3 to 5 minutes per ear.
- Let the corn rest for one minute before handling.
- Peel back the husk (if using) and add your favorite toppings.
Why This Method Works
The microwave heats the water inside the corn kernels, creating steam that cooks the corn from the inside out. This results in juicy, tender corn with minimal effort. The husk or damp towel helps trap moisture and keeps the corn from drying out.
One of the best things about microwaving frozen corn is that you can cook multiple ears at once. Just add one extra minute per additional ear. This makes it perfect for feeding a crowd without spending hours in the kitchen.
Quick Tip
For extra flavor, spread a thin layer of butter on the corn before microwaving. The butter melts perfectly during cooking and adds richness to every bite.
Seasoning and Serving Your Cooked Corn
Cooking the corn is only half the battle. The right seasoning can turn good corn into great corn. Fortunately, corn pairs well with a wide variety of flavors, so you can get creative here.
Classic Seasonings
- Butter and Salt: The timeless combination. Melted butter and a sprinkle of sea salt is all you need for simple, delicious corn.
- Garlic Butter: Mix softened butter with minced garlic and a pinch of parsley for a savory twist.
- Chili Lime: Sprinkle chili powder, a squeeze of lime juice, and a pinch of salt for a zesty kick.
- Herb Butter: Combine butter with fresh herbs like thyme, rosemary, or dill for an elevated flavor profile.
Serving Ideas
Cooked corn on the cob makes a fantastic side dish for barbecues, family dinners, and holiday meals. Serve it alongside grilled meats, salads, or roasted vegetables. For a fun twist, slice the kernels off the cob and add them to salads, soups, or casseroles.
Storing Leftover Corn
If you have leftovers, let them cool completely before storing. Place cooked corn in an airtight container and refrigerate for up to three days. You can also freeze cooked corn for longer storage. Reheat leftover corn in the microwave for 30 seconds to one minute, or enjoy it cold in salads.
Common Mistakes When Cooking Frozen Corn
Even though cooking frozen corn is straightforward, a few common mistakes can ruin the results. Here is what to watch out for.
- Overcooking: This is the number one mistake. Overcooked corn becomes tough and starchy. Stick to the recommended cooking times.
- Not Using Enough Water: When boiling, make sure the corn is fully covered. Partially submerged corn cooks unevenly.
- Skipping the Seasoning: Plain corn is fine, but a little seasoning goes a long way. Do not skip the butter or salt.
- Cooking From a Partially Thawed State: If you do thaw your corn, cook it right away. Leaving thawed corn at room temperature can lead to bacterial growth.
- Using a Small Pot: Give the corn room to move around in the pot. Crowding leads to uneven cooking.
Expert Tips for the Best Frozen Corn
Here are some pro tips that will take your frozen corn to the next level. These small changes make a big difference in flavor and texture.
- Add Sugar to the Water: A tablespoon of sugar in the boiling water brings out the natural sweetness of the corn.
- Use Fresh Herbs: Toss fresh basil or cilantro into the boiling water for an aromatic boost.
- Let the Corn Rest: After cooking, let the corn sit for two to three minutes. This allows the heat to distribute evenly.
- Brush with Olive Oil: Instead of butter, try a light coating of olive oil for a heartier, more rustic flavor.
- Pair with Complementary Dishes: Corn pairs wonderfully with grilled chicken, fish tacos, or a fresh summer salad.
Conclusion
Learning how to cook frozen corn on the cob is one of the easiest and most rewarding kitchen skills you can develop. Whether you choose to boil, steam, or microwave your corn, the process is simple and the results are delicious. In under 20 minutes, you can have a nutritious, flavorful side dish that the whole family will love.
Remember to avoid overcooking, season generously, and experiment with different flavors to find your perfect combination. Frozen corn is a versatile ingredient that works with so many meals and cuisines. Keep a bag in your freezer at all times, and you will always have a quick, healthy side dish ready to go.
Now that you know all the best methods and tips, it is time to get cooking. Grab a bag of frozen corn from your freezer, pick your favorite method, and enjoy a delicious ear of corn on the cob tonight. You will be surprised at how easy and satisfying it can be.
Frequently Asked Questions
Can I cook frozen corn on the cob without thawing it first?
Yes, absolutely. You can cook frozen corn directly from the freezer. This works well for boiling, steaming, and microwaving. Cooking from frozen actually helps the corn maintain its shape and texture better than thawed corn.
How long does it take to boil frozen corn on the cob?
Boiling frozen corn on the cob takes about 5 to 8 minutes once the water returns to a boil. The exact time depends on how many ears you are cooking and how tender you prefer your corn. Five minutes gives you a slightly firmer bite, while eight minutes produces softer corn.
Is frozen corn as healthy as fresh corn?
Yes, frozen corn is just as healthy as fresh corn. It is typically flash-frozen at peak ripeness, which locks in most of its nutrients. In some cases, frozen corn may actually retain more vitamins than fresh corn that has been stored for several days.
Can I grill frozen corn on the cob?
Yes, you can grill frozen corn, but it is best to thaw it first for more even cooking. Preheat your grill to medium-high heat and cook the corn for about 10 to 15 minutes, turning occasionally. Brushing with butter and seasoning after grilling adds great flavor.
What is the best way to store cooked corn on the cob?
Let cooked corn cool completely, then place it in an airtight container in the refrigerator. It will keep for up to three days. You can also freeze cooked corn for up to six months. Reheat gently in the microwave or enjoy it cold in salads and soups.
Can I add spices directly to the water when boiling corn?
Yes, adding spices to the boiling water is a great way to infuse flavor into the corn. Try adding a bay leaf, a few peppercorns, or a garlic clove to the water. You can also add chili flakes or fresh herbs like thyme for an extra flavor boost.