How to Cook Corn on the Cob on the Stove Perfectly
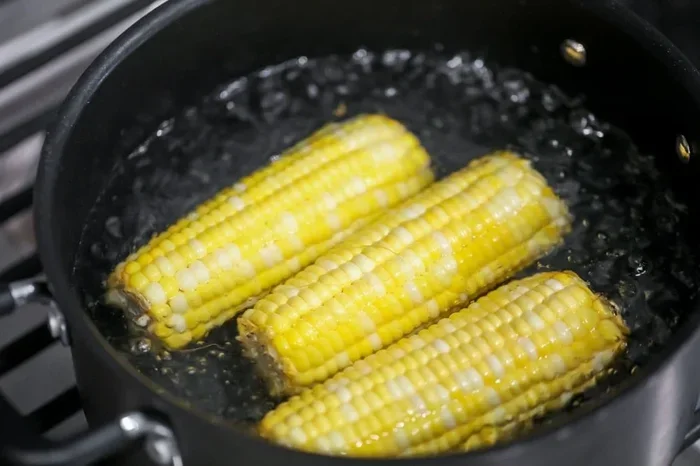
Learning how to cook corn on the cob on stove is one of the easiest kitchen skills you can master. This guide walks you through the entire process, from picking the perfect ears to boiling them to sweet, tender perfection. You will discover the ideal corn cooking time, the best seasoning tricks, and common mistakes to avoid. Whether you are a beginner or a seasoned cook, these simple steps guarantee restaurant-quality results right at home.
There is something truly special about cooking corn on the cob on stove at home. The sweet smell of boiling water, the pop of bright yellow kernels, and the first bite of warm, buttery corn straight from the pot — it is comfort food at its finest. Whether you are feeding a family at dinner or hosting a summer barbecue, stove top corn is a go-to side dish that never lets you down.
Many people think cooking corn is complicated. But the truth is, it is one of the simplest vegetables you can prepare. You need nothing more than a pot, some water, salt, and fresh ears of corn. In this guide, we will walk you through every step so your boiled corn on the cob comes out perfectly tender every single time.
We will cover everything from selecting the best corn at the store to timing your boil just right. You will also learn seasoning tricks that take your corn from ordinary to extraordinary. By the end of this article, you will feel confident enough to make stove top corn a regular part of your meal rotation.
Key Takeaways
- Use fresh corn: Look for bright green husks and plump kernels for the best flavor.
- Boiling is the best method: A simple pot of salted water on the stove delivers perfectly tender corn on the cob.
- Cook for 3 to 5 minutes: Overcooking makes corn mushy, so keep a close eye on the timer.
- Season the water: Adding sugar, butter, or herbs to the boiling water enhances the natural sweetness.
- Don’t skip the resting step: Letting corn sit in the hot water for a few extra minutes helps it absorb flavor.
- Avoid common mistakes: Skipping the husk removal, using old corn, or overboiling are the top errors to dodge.
- Experiment with flavors: Try chili lime, garlic butter, or herb-infused water for variety.
📑 Table of Contents
- Why Cooking Corn on the Cob on Stove Is the Best Method
- How to Pick the Best Corn for Stove Top Cooking
- Step-by-Step Guide to Cooking Corn on the Cob on the Stove
- Seasoning Ideas to Elevate Your Stove Top Corn
- Common Mistakes to Avoid When Boiling Corn
- Pro Tips for the Best Stove Top Corn Every Time
- How Long Does Cooked Corn Last?
- Frequently Asked Questions
- Conclusion
Why Cooking Corn on the Cob on Stove Is the Best Method
You might be wondering why we are focusing on the stove. There are actually several ways to cook corn — grilling, microwaving, and air frying are all popular options. But boiling corn on the stove has some real advantages that make it the top choice for home cooks.
First, it is incredibly simple. You do not need any special equipment. A large pot, some water, and a stove burner are all you need. Second, boiling gives you even cooking. Every kernel gets the same amount of heat, so you avoid the uneven results that sometimes happen on a grill. Third, stove top cooking lets you control the flavor. You can add butter, sugar, herbs, or spices directly to the water, and the corn absorbs all of that goodness as it cooks.
Another big advantage is speed. Unlike roasting or grilling, which can take 20 to 30 minutes, boiling corn on the cob is ready in just a few minutes. This makes it perfect for busy weeknight dinners when you need a quick and healthy side dish.
The Science Behind Perfect Boiled Corn
Understanding a little bit about how corn cooks can help you get better results. Corn kernels are full of starch and natural sugars. When you heat them in water, the starch gelatinizes, which gives the kernels their soft, tender texture. The natural sugars caramelize slightly, which is what gives boiled corn its sweet flavor.
Here is the key: timing matters a lot. If you cook corn too long, the starch breaks down too much and the kernels become mushy. The sugars also over-caramelize, which can make the corn taste slightly bitter. On the other hand, if you undercook it, the kernels will be tough and chewy. Finding that sweet spot — usually between 3 and 5 minutes — is the secret to perfect stove top corn.
How to Pick the Best Corn for Stove Top Cooking
The quality of your corn starts at the store or market. Even the best cooking technique will not save old or poor-quality corn. Here is what to look for when choosing ears for your corn on the cob recipe.
Check the husk. The husk should be bright green and snug against the ear. Dry, yellow, or loose husks are signs that the corn is old. Fresh corn has a vibrant green husk that still feels slightly damp.
Peek at the kernels. Pull back the husk just a little and look at the kernels. They should be plump, tightly packed, and uniform in size. Avoid corn with shriveled or missing kernels.
Feel the silk. The silk at the top should be light brown and slightly sticky. Dark, dry, or brittle silk means the corn has been sitting too long.
Squeeze gently. Give the ear a gentle squeeze. It should feel firm and full. If it feels hollow or loose, the kernels have dried out.
Buy local when possible. Corn that has traveled long distances loses sweetness quickly. Farmer’s markets and local farm stands often have the freshest sweet corn on stove ready to cook.
Step-by-Step Guide to Cooking Corn on the Cob on the Stove
Now for the fun part — actually cooking the corn! Follow these simple steps for stove top corn that tastes amazing every time.
Step 1: Prepare the Corn
Start by removing the husk and silk. Pull off the outer leaves and peel away the thin, papery husk underneath. Use a soft brush or your fingers to remove all the silk threads. Some people like to leave a few layers of husk on during cooking for extra flavor, but for the most even result, peel it all off.
Rinse the ears under cool running water to remove any remaining silk. Pat them dry with a clean towel. At this point, you can also trim the stem end if it looks woody or uneven.
Step 2: Fill a Large Pot with Water
Grab a pot that is big enough to hold all the ears of corn in a single layer. Fill it about two-thirds full with water. You want enough water to fully cover the corn with a few inches to spare. Too little water will cause the temperature to drop when you add the corn, which leads to uneven cooking.
Step 3: Bring the Water to a Rolling Boil
Place the pot on the stove over high heat. Add a generous pinch of salt to the water — this seasons the corn from the inside out. Some cooks like to add a teaspoon of sugar, which enhances the natural sweetness of the kernels. You can also add a tablespoon of butter at this stage for extra richness.
Wait for the water to reach a full, rolling boil before adding the corn. A gentle boil is not enough. You want big, vigorous bubbles to ensure the corn cooks evenly and quickly.
Step 4: Add the Corn and Cook
Carefully lower the ears of corn into the boiling water. Use tongs to avoid splashing. Make sure the water returns to a boil quickly after adding the corn. If it takes too long to boil back up, your cooking time will be longer, which can lead to overcooked corn.
Once the water is boiling again, set a timer. For fresh corn on the cob, cook for 3 to 5 minutes. If the corn is very fresh and sweet, 3 minutes is often perfect. Older corn or corn that has been stored in the fridge for a few days may need closer to 5 minutes.
Here is a quick reference for corn cooking time:
- Very fresh, sweet corn: 3 minutes
- Fresh corn at room temperature: 4 minutes
- Refrigerated corn (1 to 3 days old): 5 minutes
- Frozen corn (uncooked): 5 to 7 minutes
Step 5: Remove and Rest
When the timer goes off, use tongs to carefully lift the corn out of the pot. Place the ears on a cutting board or a warm serving platter. Let them rest for 1 to 2 minutes. This resting period allows the kernels to finish cooking gently from residual heat and helps the flavors settle.
Step 6: Season and Serve
Now comes the fun part — seasoning! The classic approach is to brush the hot corn with melted butter and sprinkle with salt and pepper. But you can get creative here. Try a squeeze of fresh lime juice and a sprinkle of chili powder for a Mexican-style twist. Or spread on a garlic-herb butter for something more savory.
Serve the corn immediately while it is hot and steamy. Stove top corn is best enjoyed right away, but you can also let it cool and serve it as a room-temperature side dish for picnics or barbecues.
Seasoning Ideas to Elevate Your Stove Top Corn
Plain boiled corn is delicious on its own, but a little extra seasoning takes it to the next level. Here are some corn on the cob seasoning ideas to try:
- Classic Butter and Salt: Melted butter, flaky sea salt, and a squeeze of lemon. Simple and always satisfying.
- Chili Lime: Brush with butter, then sprinkle with chili powder, lime zest, and a pinch of cumin. Perfect for summer gatherings.
- Garlic Herb: Mix softened butter with minced garlic, chopped parsley, and a dash of paprika. Spread it on warm corn for an irresistible flavor.
- Sweet and Spicy: Combine honey, melted butter, cayenne pepper, and a pinch of cinnamon. This sweet-heat combo is surprisingly addictive.
- Cheesy: Sprinkle freshly grated Parmesan or cotija cheese over hot corn. The warmth melts the cheese slightly for a creamy finish.
- Asian-Inspired: Drizzle with sesame oil, soy sauce, and a sprinkle of toasted sesame seeds. A unique twist on traditional boiled corn on the cob.
Feel free to mix and match these ideas. Part of the joy of cooking corn on the cob on stove is making it your own. Once you find a seasoning combination you love, it becomes your go-to recipe.
Common Mistakes to Avoid When Boiling Corn
Even though boiling corn is simple, there are a few mistakes that can ruin the results. Here is what to watch out for when making stove top corn.
Overcooking the corn. This is the number one mistake. Many people leave corn boiling for 10 or 15 minutes, thinking more time equals more tenderness. The opposite is true. Overcooked corn becomes mushy and loses its sweet flavor. Stick to 3 to 5 minutes for the best texture.
Using old corn. Corn loses its sweetness and moisture quickly after harvest. If your corn has been sitting in the fridge for more than a week, it will not taste as good no matter how well you cook it. Always try to use fresh corn within a day or two of purchase.
Not salting the water enough. The boiling water is your only chance to season the corn from the inside. If you use too little salt, the corn will taste bland. Add a good handful of salt to the water — it should taste pleasantly salty, like the ocean.
Cooking at a low boil. A gentle simmer is not hot enough. You need a full, rolling boil to cook corn properly. A low boil will result in unevenly cooked kernels and a longer cooking time, which increases the risk of mushiness.
Adding milk or sugar unnecessarily. Some old recipes call for adding milk or large amounts of sugar to the water. These are not needed for fresh corn and can actually mask its natural flavor. Let the quality of the corn speak for itself.
Pro Tips for the Best Stove Top Corn Every Time
A few extra tips can make a big difference in your corn on the cob results. Here are some expert tricks that home cooks and chefs swear by.
Use a large pot. Crowding the pot leads to uneven cooking. Give each ear of corn plenty of room so the water circulates freely around every kernel.
Add a pinch of sugar. This is an old-fashioned trick that really works. A small amount of sugar in the boiling water brings out the natural sweetness of the corn without making it taste sweet. Just a teaspoon or two is enough.
Shuck the corn just before cooking. Leaving corn sitting without its husk causes it to dry out quickly. If you are not ready to cook it right away, keep the husk on until just before you drop it in the water.
Make sure the water covers the corn completely. If any part of the ear sticks out above the waterline, that section will cook unevenly and may come out slightly tough.
Let corn sit in hot water after boiling. If you want extra-tender corn, turn off the heat and let the ears sit in the hot water for an additional 5 minutes. This gentle finishing method prevents overcooking while ensuring every kernel is perfectly tender.
Experiment with broth instead of water. For an extra layer of flavor, try using chicken or vegetable broth as your cooking liquid. The corn absorbs the savory broth as it boils, creating a deeper, more complex taste.
How Long Does Cooked Corn Last?
Cooked corn on the cob can be stored in the refrigerator for up to 5 days. Let it cool completely before wrapping it in foil or placing it in an airtight container. When you are ready to eat it, you can reheat it by boiling it again for 1 to 2 minutes or by microwaving it wrapped in a damp paper towel.
You can also freeze cooked corn. Cut the kernels off the cob, spread them on a baking sheet to flash freeze, and then transfer them to a freezer bag. Frozen corn keeps for up to 6 months and works great in soups, salads, and casseroles.
Frequently Asked Questions
How long does it take to cook corn on the cob on the stove?
It typically takes 3 to 5 minutes to boil fresh corn on the cob on the stove. The exact time depends on how fresh the corn is and how tender you like it. Very fresh, sweet corn may only need 3 minutes, while older corn might need closer to 5. Always use a timer so you do not overcook it.
Do I need to peel the husk before boiling corn?
Yes, you should remove the husk and silk before boiling. Leaving the husk on can result in uneven cooking and a slightly grassy flavor. Some people prefer to leave a few inner husk leaves on for extra flavor, but for the most consistent results, peel the corn completely before cooking.
Can I add butter to the boiling water?
Absolutely! Adding a tablespoon or two of butter to the boiling water is a great way to infuse the corn with richness and flavor. The butter melts and mixes into the water, coating the kernels as they cook. This is one of the easiest ways to make your stove top corn taste extra delicious.
What is the difference between boiling and steaming corn?
Boiling submerges the corn completely in water, while steaming cooks it above the water using trapped steam. Boiling is faster and more even, but steaming can preserve slightly more of the corn’s natural sweetness and texture. Both methods work well on the stove, but boiling is the most popular approach for corn on the cob.
Can I cook frozen corn on the cob on the stove?
Yes, you can boil frozen corn on the cob. Just increase the cooking time to 5 to 7 minutes since the corn starts from a frozen state. Make sure the water is at a full rolling boil before adding the frozen corn, and add an extra minute or two if the ears are particularly large or thick.
Why is my boiled corn rubbery or tough?
Rubbery or tough corn is usually the result of overcooking. Corn kernels contain starch that breaks down when exposed to too much heat for too long. To avoid this, stick to the 3-to-5-minute window for fresh corn and set a timer. Using very fresh corn also helps, as older corn tends to lose its tender texture more quickly.
Conclusion
Cooking corn on the cob on stove is one of those kitchen skills that everyone should have in their arsenal. It is fast, simple, and delivers consistently delicious results. With just a pot of boiling water and a few minutes of your time, you can serve up sweet, tender, perfectly cooked corn that the whole family will love.
Remember the key points: choose fresh corn, bring the water to a full boil, cook for just 3 to 5 minutes, and season generously. Avoid the common pitfalls of overcooking and using old corn, and you will have perfect stove top corn every single time.
Now that you know how easy it is, give it a try at your next meal. Whether it is a weeknight dinner or a weekend gathering, boiled corn on the cob is a side dish that never fails to impress. Happy cooking!