How Do You Tighten the Belt on a Treadmill
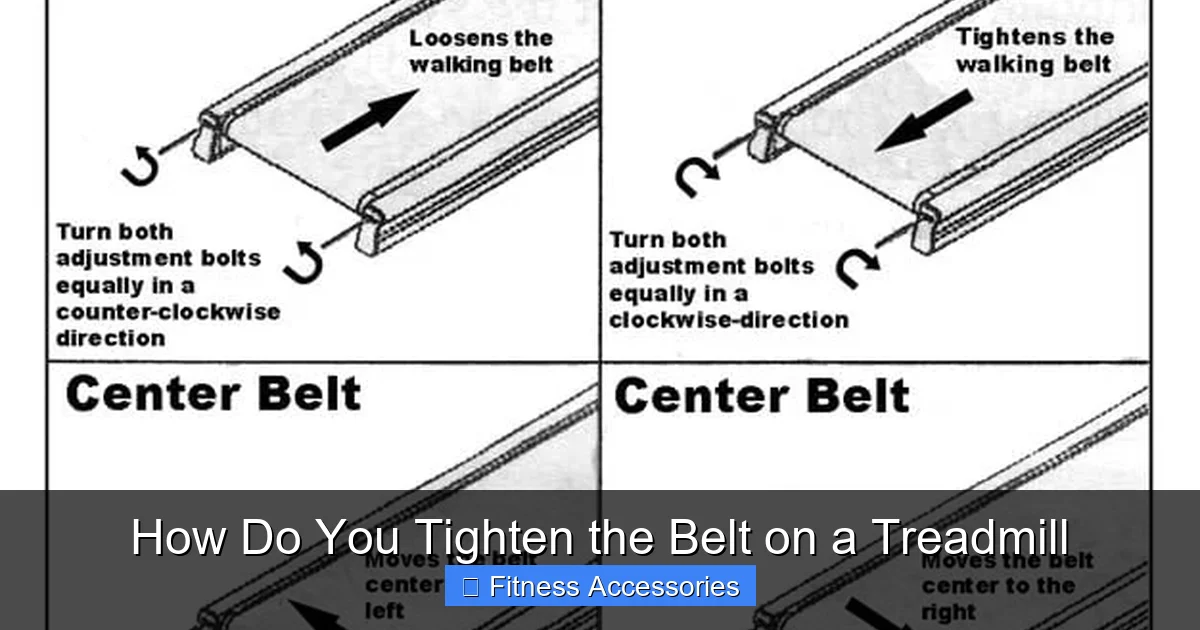
A slipping treadmill belt is a common issue that’s usually fixable at home with basic tools. The process involves locating the adjustment bolts at the rear of the machine and turning them in small, equal increments to increase tension. Always unplug the treadmill first and test the belt after each adjustment to avoid over-tightening, which can damage bearings and the motor.
Key Takeaways
- Safety First: Always unplug the treadmill before attempting any adjustments to prevent accidental startup.
- Diagnose Correctly: A belt that slips to one side typically needs alignment, not just tightening. Tightening addresses central slippage.
- Small, Equal Adjustments: Turn both rear roller bolts ¼ turn at a time, alternating sides, to maintain even tension and alignment.
- Test Frequently: Plug in and walk on the treadmill after each adjustment to check for proper tension and tracking before making more changes.
- Avoid Over-Tightening: An overly tight belt creates excessive friction, strains the motor, and causes premature wear on bearings and the belt itself.
- Lubrication is Separate: Belt tension and belt lubrication are two different maintenance tasks. Never lubricate a belt to fix slippage; it’s dangerous and ineffective.
- Know Your Limits: If the belt is severely stretched, the roller bearings are worn, or adjustments don’t work, consult the manual or a professional technician.
📑 Table of Contents
- Introduction: Why Your Treadmill Belt Needs Proper Tension
- Understanding Your Treadmill: The Belt and Roller System
- Tools, Safety, and Preliminary Checks
- Step-by-Step: How to Tighten the Belt on a Treadmill
- Troubleshooting: What If Tightening Doesn’t Fix the Slippage?
- Preventative Maintenance: Keeping Your Belt in Top Shape
- Conclusion: Confidence Through Knowledge
Introduction: Why Your Treadmill Belt Needs Proper Tension
You’re in the middle of a brisk walk, heart rate climbing, when suddenly the belt under your feet feels loose, slips, or shifts to one side. It’s not just annoying—it’s a safety hazard and a sign your treadmill needs immediate attention. Learning how to tighten the belt on a treadmill is an essential skill for any home gym owner. It’s a straightforward maintenance task that saves you from costly service calls and keeps your workouts running smoothly.
This guide will walk you through everything you need to know, from understanding the mechanics of your treadmill belt to performing a precise, safe adjustment. We’ll cover the common causes of a slipping belt, the exact tools you’ll need, a foolproof step-by-step process, and how to troubleshoot if the problem persists. By the end, you’ll have the confidence to tackle this job yourself and ensure your treadmill operates safely and efficiently for years to come.
Understanding Your Treadmill: The Belt and Roller System
Before you touch a wrench, it helps to understand what you’re working on. A treadmill belt doesn’t just spin on its own; it’s a loop of durable material that rides on a system of rollers. The two most important rollers are the front roller (near the console) and the rear roller (at the back of the deck). The belt is a continuous loop that goes around both rollers. The motor turns the front roller, which then drives the belt. The rear roller is typically adjustable.

Visual guide about How Do You Tighten the Belt on a Treadmill
Image source: treadmillreviewguru.com
The Role of Tension
Proper belt tension is critical. The belt must be taut enough to grip the rollers without slipping, but not so tight that it creates excessive drag. Think of it like the chain on a bicycle—too loose and it skips; too tight and it grinds. On a treadmill, the tension is controlled by the position of the rear roller. Most treadmills use an adjustment bolt on each side of the rear roller assembly. Turning these bolts clockwise typically pulls the roller back, tightening the belt. Turning them counterclockwise loosens it.
Slippage vs. Misalignment: Diagnosing the Problem
This is the most crucial distinction. A slipping belt (where the belt slows down or stops under your weight while the rollers keep turning) is almost always a tension issue. However, a misaligned or tracking belt (where the belt drifts to the left or right side of the deck) is often an alignment issue, not a tightness issue. Sometimes, a severely loose belt will also track poorly. We will address alignment within the tightening process, but the primary goal here is to eliminate central slippage.
Tools, Safety, and Preliminary Checks
Preparation is half the battle. Gathering the right tools and performing some basic checks will make the job smoother and prevent damage to your machine.

Visual guide about How Do You Tighten the Belt on a Treadmill
Image source: oglf.org
Essential Tools You’ll Need
- Allen Wrench (Hex Key): This is the most common tool. Check your treadmill’s manual for the exact size (typically 5mm or 6mm, but it varies). It’s best to have a set to find the perfect fit.
- Screwdriver: Some models use Phillips head or flathead screwdriver adjustments instead of Allen bolts.
- Clean Cloth: For wiping away any dust or debris from the adjustment bolts.
- Flashlight: The area under the rear roller can be dark.
Non-Negotiable Safety Steps
1. UNPLUG THE TREADMILL. This cannot be stressed enough. The treadmill must be completely disconnected from any power source. The motor can engage unexpectedly during your adjustments, leading to severe injury.
2. Clear the Area. Remove any obstacles, water bottles, or mats from around the treadmill. Ensure you have enough space to kneel or sit beside it safely.
3. Read the Manual. Your treadmill’s manufacturer may have specific instructions or warnings. The manual is your best resource for model-specific details, including the correct adjustment method and torque specifications if available.
Before You Adjust: The “Feel Test” and Visual Inspection
With the treadmill unplugged, manually check the belt. Press down on the belt in the center of the deck. You should feel a slight resistance, typically about 2-3 inches of lift. If you can lift it 4+ inches easily, it’s definitely too loose. Also, inspect the belt and deck surface for excessive wear, deep scratches, or signs of lubrication (which should never be on the belt surface). These could indicate other problems.
Step-by-Step: How to Tighten the Belt on a Treadmill
Now for the main event. Follow these steps precisely for a safe and effective adjustment.

Visual guide about How Do You Tighten the Belt on a Treadmill
Image source: oglf.org
Step 1: Access the Rear Roller Adjustment Bolts
Carefully move to the rear of the treadmill. You will see the belt looped around a roller. On either side of this rear roller assembly, there should be an adjustment bolt or screw. They may be covered by plastic end caps that you can pry off gently with a flathead screwdriver. Have your appropriate Allen wrench or screwdriver ready.
Step 2: The Adjustment Protocol (The Golden Rule)
This is the most important part. You must make small, incremental, and equal adjustments on BOTH sides. Never adjust only one side, as this will cause the belt to track (run crooked) and potentially damage the belt and deck edges.
- Start with a ¼ turn: Turn the bolt on the RIGHT side clockwise by a quarter turn. You will feel it get tighter.
- Then the LEFT side: Immediately turn the bolt on the LEFT side clockwise by a quarter turn.
- Repeat: Continue this alternating pattern (Right ¼, Left ¼) for 2-3 full cycles (so each bolt has been turned ½ to ¾ of a full turn total).
Why alternate? This ensures the rear roller stays parallel to the front roller, which is essential for proper belt tracking. Adjusting both sides equally maintains that parallel alignment.
Step 3: Test the Belt Tension
After your initial set of adjustments (e.g., 3 full cycles), it’s time to test.
- Plug the treadmill back in.
- Set the speed to low (1.0 – 2.0 mph).
- Step onto the belt and walk. Pay close attention. Does the belt still slip under your weight? Does it feel smooth? Does it track straight (stay centered on the deck)?
- The “Lift Test” (with power OFF): After unplugging again, re-check the center lift. It should now be firmer, around 1-2 inches of give. If it’s still too loose, repeat Step 2.
Step 4: Check and Correct Tracking
If, after tightening, the belt is running fine but has drifted to one side, you need a minor tracking adjustment. This is done by slightly loosening the bolt on the side the belt is drifting TOWARDS and slightly tightening the bolt on the side it’s drifting AWAY FROM.
- Example: If the belt is tracking to the left, you would loosen the left adjustment bolt by 1/8 turn and tighten the right bolt by 1/8 turn.
- Make these tiny adjustments (1/8 turn) and then test again. The goal is a belt that stays perfectly centered on the deck during operation.
Step 5: Final Verification
Once the belt no longer slips and tracks straight, do a final test at a moderate walking speed (2.5-3.0 mph) for a minute or two. Listen for any unusual noises (squealing, grinding). Feel for any rough spots or vibrations. If everything is smooth and quiet, you’ve successfully tightened your belt. Re-attach any plastic end caps you removed.
Troubleshooting: What If Tightening Doesn’t Fix the Slippage?
What if you’ve tightened the belt to what feels like a safe maximum (you can barely lift it ½ an inch) and it still slips? The problem is likely not tension. Here are the other culprits.
1. Worn or Glazed Belt
Over time, the underside of the belt (the part that contacts the rollers) can become smooth and glazed from heat and friction, losing its grip. A visual inspection might show a shiny, almost plastic-like surface. Solution: A worn belt needs to be replaced. It’s a consumable part.
2. Worn Roller Bearings
The rollers themselves spin on bearings. If these bearings are worn, damaged, or clogged with debris, they won’t spin freely. The belt might slip because the roller is dragging, not because the belt is loose. You might hear a grinding or humming noise. Solution: Roller bearings often need to be cleaned, repacked with grease, or the entire roller assembly replaced. This is a more advanced repair.
3. Insufficient or Incorrect Lubrication
This is a huge point of confusion. You should NEVER apply lubricant (silicone spray, wax) to the belt itself to fix slippage. Lubrication is applied to the deck surface (the board the belt rides on) to reduce friction between the belt and deck. If the deck is dry and not properly lubricated (as per manufacturer specs), it can cause the belt to feel “sticky” and potentially slip. However, slippage on the rollers is a separate issue. Solution: Check your manual. If lubrication is due, apply the correct type and amount of lubricant to the deck, NOT the belt or rollers. Wipe away any excess immediately.
4. Loose Front Roller or Motor Pulley
Less common, but possible. The front roller or the pulley on the motor shaft could have become loose. This would cause the belt to slip regardless of rear tension. Solution: This requires checking set screws on the motor pulley and front roller. If you’re not comfortable, call a technician.
Preventative Maintenance: Keeping Your Belt in Top Shape
An ounce of prevention is worth a pound of cure. Regular maintenance will drastically reduce the frequency with which you need to tighten the belt on a treadmill.
Establish a Cleaning Routine
Dust, sweat, and carpet fibers are the enemies of your treadmill. They can get into roller bearings and the motor, causing drag and wear. Weekly, wipe down the belt, deck, and rollers (you can access them from the sides/rear) with a slightly damp cloth. Monthly, use a vacuum with a crevice tool to suck debris from around the roller ends and motor compartment.
Follow a Lubrication Schedule
This is the #1 maintenance task. Most manufacturers recommend lubricating the deck every 150-200 miles of use or every 3-6 months. Use ONLY the lubricant specified in your manual (usually 100% silicone). Apply it correctly to the center strip of the deck, then run the belt at a low speed for a few minutes to distribute it evenly. A well-lubricated deck reduces belt drag and wear.
Regular Tension Checks
Make a habit of doing the “lift test” every few months. Catching a slight loosening early means a tiny adjustment (just a ¼ turn) is all that’s needed, preventing major slippage and belt damage.
Inspect the Belt and Deck
Look for signs of wear: fraying edges, deep grooves, or rough spots on the deck. A damaged deck will shred a new belt quickly. Replace the deck or belt as recommended by the manufacturer.
Conclusion: Confidence Through Knowledge
Mastering how to tighten the belt on a treadmill transforms you from a frustrated user into a capable caretaker of your fitness equipment. The process is simple in theory—access the bolts, turn them equally, test, and repeat—but its power lies in the disciplined execution of small, measured adjustments. Remember the core principles: unplug, diagnose correctly (slippage vs. tracking), adjust both sides equally, and test frequently.
By combining proper adjustment with a robust maintenance routine of cleaning and lubrication, you’ll ensure your treadmill belt remains taut, true, and ready for every workout. You’ll enjoy a safer, quieter, and more effective machine for years. If you ever feel unsure during the process, your treadmill’s manual is your ultimate guide. And when the problem points to worn internal components, don’t hesitate to seek a qualified technician. Your investment in proper care pays dividends in reliability and performance, mile after mile.
Frequently Asked Questions
How often should I check and tighten my treadmill belt?
Perform a simple “lift test” (pressing the center of the belt) every 3 months. If you can lift it more than 3 inches, a minor adjustment is needed. Frequency depends on usage; heavy users may need to check monthly.
What happens if I over-tighten the treadmill belt?
Over-tightening creates excessive friction, which puts a heavy load on the motor, causes it to overheat, and leads to premature failure of the front and rear roller bearings. It also dramatically increases belt and deck wear.
Can I use WD-40 or household oil to lubricate my treadmill belt?
Absolutely not. Only use the lubricant specified by your treadmill’s manufacturer, typically 100% silicone spray. Petroleum-based products like WD-40 will degrade the belt and deck materials, create a fire hazard, and void your warranty.
My belt tracks to the left after I tightened it. What should I do?
A tracking issue after tightening means the rear roller is slightly angled. To fix it, slightly loosen the adjustment bolt on the side the belt is drifting towards (e.g., loosen left bolt if belt goes left) and tighten the bolt on the opposite side by the same small amount (1/8 turn). Test and repeat.
The belt is tight but still slips when I run. Why?
If proper tension doesn’t solve slippage, the culprit is likely a worn/glazed belt, worn roller bearings, or an incorrectly lubricated deck. The belt may no longer have enough grip on the rollers. Inspect these components and consider professional diagnosis.
When should I call a professional instead of adjusting it myself?
Call a technician if: the belt is severely stretched or damaged; you hear grinding noises from the roller area; adjustments do not improve the problem; you are uncomfortable working with power tools or inside the machine; or if your treadmill is still under warranty (to avoid voiding it).