How to Do Bench Press with Dumbbells at Home
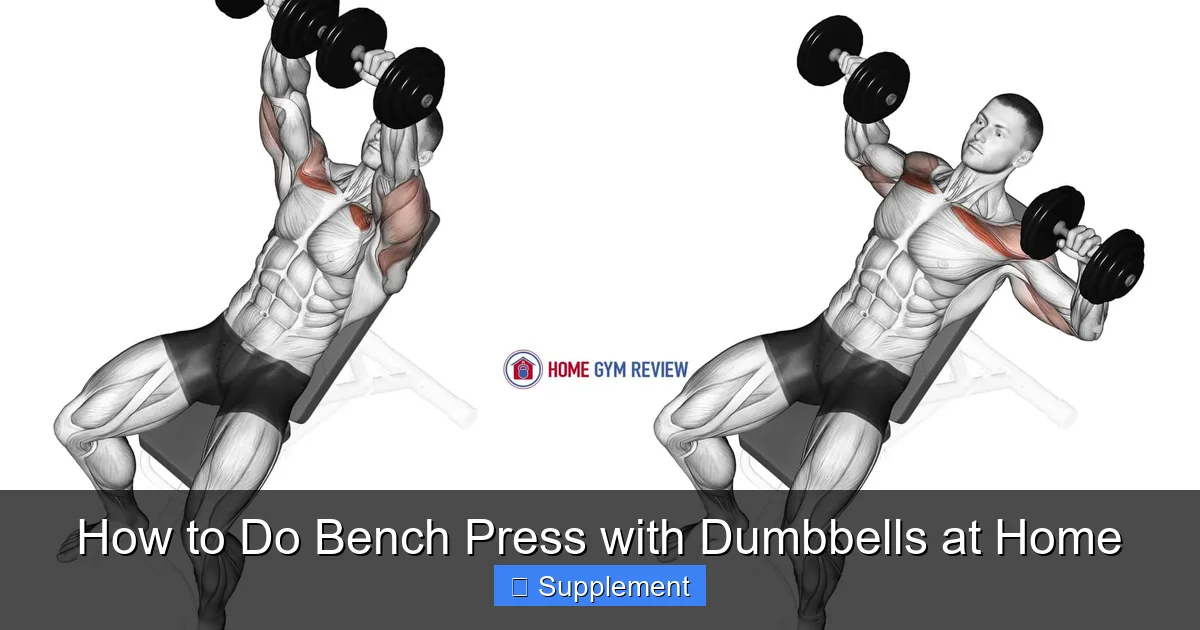
Mastering the dumbbell bench press at home is a powerful way to build a strong, defined chest without a gym membership. This guide provides everything you need: from selecting the right bench and dumbbells to perfecting your form for safety and muscle growth. You’ll learn the precise step-by-step technique, common mistakes to avoid, and how to progressively overload your muscles for continuous gains. By following this structured approach, you can effectively target your pectorals, shoulders, and triceps from the comfort of your living room.
So, you’ve decided to build a powerful chest, but the idea of crowded gyms, long waits for the bench, or expensive memberships isn’t appealing. Fantastic news! The dumbbell bench press is arguably one of the most effective and versatile exercises you can do for upper body strength and aesthetics, and it’s perfectly suited for a home gym setup. Unlike the barbell, dumbbells allow for a greater range of motion, help correct muscle imbalances, and engage more stabilizer muscles. But doing it correctly and safely at home requires a bit of know-how. This comprehensive guide will walk you through every single detail, from unboxing your equipment to nailing your 100th rep. Think of me as your personal coach, here to help you build a safe, effective, and muscle-building routine.
We’re going to cover the absolute essentials: the gear you truly need, how to set up your space, the biomechanics of a perfect press, and how to structure your workouts for steady progress. Whether you’re a complete beginner touching a dumbbell for the first time or an intermediate lifter looking to refine their technique, this article is for you. Let’s turn your home into the most effective chest gym you’ve ever used.
Key Takeaways
- Safety is paramount: Always use a spotter or safety bars, and never press weight you cannot control, especially when training alone at home.
- Equipment matters: A stable, adjustable bench and a set of hexagonal (hex) dumbbells are the essential, non-negotiable tools for safe and effective pressing.
- Form over ego: A full range of motion with controlled movement, keeping wrists neutral and elbows at a 45-degree angle, recruits more muscle and prevents injury.
- The mind-muscle connection is key: Focus on squeezing your chest muscles at the top of each rep rather than simply moving the weight from point A to point B.
- Progressive overload is mandatory: To build muscle and strength, you must systematically increase the challenge by adding weight, reps, or sets over time.
- Warm-ups are not optional: Prepare your shoulders, chest, and triceps with dynamic stretches and light sets to prime your nervous system and prevent strains.
- Consistency beats intensity: A well-structured routine performed 2-3 times per week with adequate rest yields far better long-term results than sporadic, exhausting sessions.
📑 Table of Contents
- The Unbeatable Advantages of the Dumbbell Bench Press at Home
- Essential Home Gym Equipment: What You Actually Need
- Mastering the Technique: The Step-by-Step Dumbbell Bench Press
- Common Mistakes That Derail Progress and Cause Injury
- Programming Your Progress: Sets, Reps, and Progression
- Variations to Maximize Your Chest Development
- Conclusion: Your Home Chest Journey Starts Now
The Unbeatable Advantages of the Dumbbell Bench Press at Home
Before we dive into the “how,” let’s solidify the “why.” Why should this be a cornerstone of your home training? The benefits extend far beyond just building a bigger chest.
Superior Range of Motion and Stretch
With a barbell, the range of motion is limited by the width of your grip and the bar itself. Dumbbells, however, can travel down much lower, allowing your pectoral muscles to achieve a deep, intense stretch at the bottom of the movement. This increased stretch under load is a potent trigger for muscle growth (hypertrophy). You’re able to work the muscle through its full functional capacity, leading to better overall development and flexibility in the chest and shoulder joints.
Elimination of Strength Imbalances
How many times have you seen someone press a barbell, only for it to veer to one side? Dumbbells force each arm to work independently. Your stronger side cannot compensate for your weaker side. This is crucial for balanced development, preventing the lopsided appearance that can happen with exclusive barbell work. It also builds crucial stabilizer strength in your shoulders, core, and even your upper back, as those muscles work overtime to keep the weights traveling in a straight, controlled path.
Unmatched Safety and Control for Solo Lifters
This is the biggest game-changer for home gyms. If you’re training alone and you fail a rep with a barbell on your chest, you’re in serious trouble. With dumbbells, if you can’t complete a rep, you simply stop. You can safely lower the weights to your sides or even drop them (on a suitable surface) without being trapped. This psychological safety net allows you to push your sets with confidence, knowing you have an escape route. It encourages you to train to true muscular failure, which is key for growth, without the inherent danger.
Endless Variety and Joint-Friendly Options
The dumbbell bench press isn’t one exercise; it’s a family. By simply adjusting the angle of your bench (incline, flat, decline) or your grip (neutral, standard), you can shift the emphasis onto different parts of your chest, shoulders, and triceps. This variety is fantastic for preventing boredom, avoiding overuse injuries, and ensuring you’re hitting your muscles from all angles for complete development. The natural, unrestricted movement path is also generally easier on the shoulder joints compared to the fixed path of a barbell, especially for those with pre-existing shoulder issues.
Essential Home Gym Equipment: What You Actually Need
You don’t need a commercial gym’s worth of gear. A minimalist, high-quality setup is all that’s required. Let’s break down the absolute essentials and the nice-to-haves.
Visual guide about How to Do Bench Press with Dumbbells at Home
Image source: barbend.com
The Bench: Your Foundation
This is the most critical piece. Do not use a wobbly dining chair, a flimsy folding table, or your bed. You need a dedicated weight bench. Look for these features:
- Stability: It must feel rock-solid. No rocking, no flexing. Wider bases are generally more stable.
- Weight Capacity: Check the manufacturer’s rating. A good bench should safely support at least 600 lbs (272 kg) total (your body + weights).
- Adjustability: An adjustable bench (incline/decline) is a massive asset, allowing you to perform flat, incline, and decline presses. If budget/space is tight, a solid flat bench is perfectly acceptable for building a great chest.
- Padding: Comfortable, firm padding about 2-3 inches thick is ideal for heavy pressing.
Popular, reliable options for home use include the Rep Fitness FB-5000, the Rogue Adjustable Bench 2.0, or the Bowflex 5.1 Series. Investing in a good bench is investing in your safety and long-term progress.
The Dumbbells: Your Tools
Here’s where you have options.
- Fixed Hex Dumbbells: The classic, gold-standard. They’re durable, simple, and have a stable hexagonal head that prevents rolling. If you have the budget and space, buying a full set (e.g., 10-50 lbs in 5 lb increments) is ideal.
- Adjustable Dumbbells: A brilliant space and cost-saver for most home gyms. Systems like the Bowflex SelectTech or PowerBlock allow you to dial in the weight you need in seconds. Ensure the mechanism is smooth, secure, and the handle is comfortable. This is the most practical solution for most people.
- Shape: Hexagonal (hex) heads are preferred for benching as they sit flat on your chest and don’t roll. Pro-style dumbbells with round heads can roll, which is a safety hazard.
Pro Tip: Start with a weight that allows you to complete your target reps with 1-2 reps “in reserve” (RIR). You should feel challenged but in control. For beginners, a pair of 15-25 lb dumbbells is a common starting point for flat pressing.
Your Space and Safety Gear
You need a clear area with a non-slip floor. Rubber gym mats are highly recommended to protect your floor and the dumbbell heads. Consider a pair of lifting gloves or wrist wraps if you have wrist discomfort. For heavy pressing, a set of dumbbell collars (if using adjustable dumbbells with spin-lock sleeves) is a must to ensure plates don’t unscrew mid-rep. Finally, have a plan for what to do if you fail. Can you safely drop the dumbbells onto your mats? Is there a clear space beside the bench?
Mastering the Technique: The Step-by-Step Dumbbell Bench Press
Now, the moment you’ve been waiting for. Let’s break down the flat dumbbell bench press into its component parts. We’ll focus on the standard “neutral” or “hammer” grip, where your palms face each other.

Visual guide about How to Do Bench Press with Dumbbells at Home
Image source: fitnessvolt.com
Step 1: The Setup – Position is Everything
This is where 80% of success is determined. A bad setup leads to bad form and injury.
- Bench Height: Sit on the bench and plant your feet firmly. Your shins should be vertical or nearly vertical when you lie back. If the bench is too high, your feet will dangle, reducing stability. If it’s too low, you’ll struggle to get the weights into position. Most adjustable benches have ideal settings for pressing.
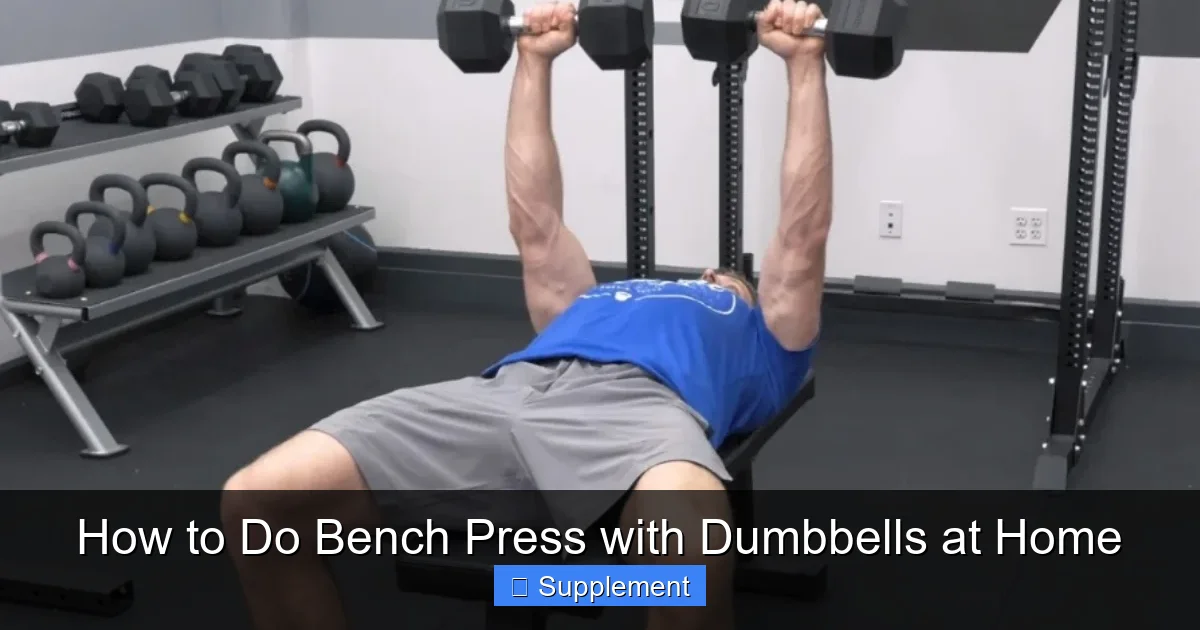
- Body Position: Lie back so your eyes are just under the bar (if you had one). Your head, upper back, and glutes should be in firm contact with the bench. Your lower back will naturally arch—this is good and natural! Do not force an excessive arch. Your feet should be flat on the floor, driving through your heels. This full-body tension is your foundation.
- Dumbbell Pick-Up: This is crucial. Do not try to heave heavy dumbbells from the floor while lying down. Sit up, place the dumbbells on your thighs, one at a time. Then, lean back slightly and use your thighs to “kick” the dumbbell up as you lie back, guiding it with your other hand. The weight should end up directly over your chest, with your arms extended but not locked out. Your elbows should be slightly bent, and your wrists should be in a neutral, straight alignment—not bent backward.
Step 2: The Descent – Control is King
Take a deep breath, bracing your core as if about to be punched. Begin the descent by thinking about pulling your elbows down and back, not just letting the weight fall. A great cue is to imagine you’re trying to “tuck your elbows into your back pockets.” This keeps your upper arms at roughly a 45-degree angle to your torso, which is the safest and most effective position for shoulder health and pec engagement. The dumbbells should travel in a slight arc, coming down until your upper arms are roughly parallel to the floor, or you feel a deep stretch in your chest. Your forearms should remain vertical throughout the movement. The descent should take about 2-3 seconds. Never bounce the weights off your chest—this removes tension, damages tissue, and is extremely dangerous.
Step 3: The Press – Drive and Squeeze
The moment of truth. As the dumbbells touch or hover lightly over your chest, immediately begin the press. Drive your feet into the floor and think about “pushing the floor away from you” with your feet. This helps engage your entire posterior chain and creates full-body tension. Focus on pressing the weights in that same slight arc, bringing them together in a “V” shape at the top. As the weights near lockout, forcefully squeeze your chest muscles (pectorals) as hard as you can for a one-second pause. Exhale during this phase. Do not fully lock out your elbows at the top; maintain a soft bend to keep tension on the muscles, not the joints.
Step 4: The Reset – Repeat with Purpose
After the squeeze, begin your next controlled descent. The number of repetitions you perform depends on your goal. For strength (3-6 reps), use heavier weight with longer rest (2-3 minutes). For hypertrophy (muscle growth, 8-12 reps), use moderate weight with moderate rest (60-90 seconds). For muscular endurance (15+ reps), use lighter weight with shorter rest (30-60 seconds). Always maintain the same rigorous form for every single rep.
Common Mistakes That Derail Progress and Cause Injury
Even with the best intentions, these errors creep in. Identifying and fixing them is non-negotiable for long-term success.
Visual guide about How to Do Bench Press with Dumbbells at Home
Image source: darebee.com
Elbow Flare: The Shoulder Killer
This is the #1 mistake. Flaring your elbows out to your sides (forming a “T” shape with your torso) places enormous shear stress on your shoulder joint’s rotator cuff. It also takes the emphasis off your chest and onto your front deltoids. Fix: Use the “elbows to back pockets” cue. Keep your upper arms at a 45-degree angle to your body throughout the entire movement.
Bouncing the Dumbbells Off the Chest
Using momentum and elasticity from the bounce to help you press the weight is cheating. It removes the muscle-building eccentric (lowering) phase, risks bruising your sternum, and can cause the dumbbells to slip and injure your ribs or shoulders. Fix: Control the weight all the way down until you feel a stretch. Lightly touch your chest or stop an inch above it. The dumbbells should never accelerate downward.
Arching the Lower Back Excessively
A natural, slight arch is fine and even beneficial for creating a stable “shelf” for your shoulders. But if your lower back is lifting so high you could slide a small child under it, you’re over-arching. This compresses your spine and turns the exercise into a dangerous, unstable movement. Fix: Focus on keeping your glutes firmly planted on the bench. If you find yourself arching uncontrollably, you’re likely using too much weight. Reduce the load and focus on full-body tension.
Uneven Pressing and Wrist Collapse
One dumbbell consistently lags behind the other, or your wrists bend backward under the weight. Uneven pressing indicates strength imbalances or lack of focus. Wrist collapse (hyperextension) puts all the stress on the joint ligaments, not your muscles, and can lead to sprains. Fix: Use a “mirror” in your mind—visualize both weights moving in perfect sync. For wrists, ensure you’re holding the dumbbell handle in the center of your palm, and actively “crack” your knuckles forward to maintain a straight, neutral wrist alignment. Wrist wraps can help if you have mobility issues.
Using Too Much Weight, Too Soon
Ego lifting is the fastest route to a plateau or an injury. Sacrificing form for a few extra pounds means you’re no longer training your chest effectively; you’re just struggling to move a weight. Fix: Film yourself from the side. Does your form break down? Do your elbows flare? Does your back arch excessively? If yes, the weight is too heavy. Drop the weight and rebuild your technique.
Programming Your Progress: Sets, Reps, and Progression
Knowing how to do an exercise is only half the battle. You need a plan to get stronger and bigger over weeks and months. Here’s a simple, effective framework.
Choosing Your Rep Range and Sets
For most people aiming for muscle growth (hypertrophy) and strength, the 6-12 rep range is ideal. A great starting template is:
- 3-4 working sets per exercise.
- 8-12 repetitions per set.
- Rest 60-90 seconds between sets.
For pure strength (focusing on the 1-6 rep range), you’d use heavier weights, fewer reps (3-5), and longer rest periods (2-3 minutes). As a beginner/intermediate, sticking to the 8-12 range is most efficient for overall development.
The Law of Progressive Overload
Your muscles adapt. To keep growing, you must progressively challenge them. This is the single most important principle in strength training. You can achieve it by:
- Adding Weight: This is the most straightforward. Once you can complete all your sets and reps with perfect form (e.g., 4 sets of 12), try adding 2.5-5 lbs to the dumbbells next session.
- Adding Reps: If you can’t add weight yet, aim to do one more rep with the same weight. If you did 3×10 last week, try for 3×11 this week.
- Adding Sets: Once you’re comfortably doing 3 sets, add a 4th set.
- Improving Form & Mind-Muscle Connection: Sometimes, simply focusing harder on the squeeze and controlling the eccentric phase provides a new stimulus.
Pro Tip: Use a notebook or a notes app. Log your workouts: date, exercise, dumbbell weight, sets x reps, and how you felt. This data is your roadmap to progress.
Sample Weekly Chest Workout (Home Dumbbells)
Here’s how to integrate this into a balanced week. Train chest 2 times per week with at least 2 days of rest in between.
- Day 1 (Monday): Flat Dumbbell Bench Press: 3 sets of 8-12 reps. Incline Dumbbell Press: 3 sets of 10-15 reps. Dumbbell Flyes: 3 sets of 12-15 reps.
- Day 2 (Thursday): Flat Dumbbell Bench Press: 4 sets of 6-10 reps (heavier). Push-Ups (weighted if possible): 3 sets to near failure. Cable or Band Pull-Aparts (for rear delts): 3 sets of 15-20 reps.
Always warm up with 5-10 minutes of dynamic shoulder mobility (arm circles, band pull-aparts) and 1-2 light warm-up sets of your first exercise.
Variations to Maximize Your Chest Development
Don’t just do flat presses forever. These variations target different fibers of the pectoral muscle and keep your joints happy.
Incline Dumbbell Bench Press
Setting your bench to a 30-45 degree angle shifts the emphasis to your upper pectorals (the “clavicular head”), which are crucial for that full, rounded chest look. The setup and form are identical to the flat press. You will likely use 10-20% less weight than your flat press, and that’s normal. This is a fantastic movement to pair with your flat presses.
Decline Dumbbell Bench Press
With the bench angled downward (feet higher than head), you target the lower pectorals. This can help create a “full” look at the bottom of the chest. Be cautious with this variation; the inverted position can increase blood pressure. Use a spotter if possible and avoid going too heavy. The setup is similar, but you may need to position the dumbbells slightly higher over your lower chest/upper abdomen.
Neutral Grip vs. Standard (Supinated) Grip
We’ve focused on the neutral grip (palms facing each other), which is generally the most shoulder-friendly. You can also use a standard grip (palms facing your feet, like a barbell press). This grip may allow you to press slightly more weight and engages the triceps a bit more. Experiment with both. The key is that your wrists stay neutral—do not let them bend backward in either grip.
Conclusion: Your Home Chest Journey Starts Now
There you have it. The complete blueprint for building a powerful, sculpted chest with dumbbells at home. It boils down to this: invest in a stable bench and good dumbbells, master the controlled, full-ROM technique with a focus on chest contraction, prioritize safety above all else, and commit to the principle of progressive overload. Consistency is your greatest ally. You don’t need a fancy gym; you need a plan and the discipline to execute it. Start light, film your form, log your workouts, and add weight when you can. In a few months, you’ll look back and be amazed at the strength and physique you’ve built, one controlled rep at a time, in your own living room. Now, go get under those dumbbells!
Frequently Asked Questions
Can I do a bench press without a bench?
Yes, you can perform a floor press by lying on the floor, which limits the range of motion and protects your shoulders. You can also use a stability ball, but this requires more core stability and is less ideal for heavy pressing. A proper bench is still the best and safest option for full development.
How wide should my grip be for dumbbell bench press?
There’s no “barbell-width” grip with dumbbells. Simply hold the dumbbells so they are directly over the middle of your chest when your arms are extended. Your elbows should be at a 45-degree angle to your torso at the bottom of the movement, not flared out to the sides.
How many sets and reps should I do for muscle growth?
For most people, 3-4 working sets of 8-12 repetitions per exercise is the optimal range for hypertrophy (muscle growth). Focus on reaching muscular failure (or 1-2 reps shy of it) with perfect form within that rep range. Rest 60-90 seconds between sets.
Should I arch my back during the dumbbell bench press?
A slight, natural arch in your lower back is normal and helps create a stable base. However, you should not be hyperextending or lifting your hips off the bench. Keep your glutes firmly planted on the bench throughout the entire movement. If you’re arching excessively, you’re likely using too much weight.
How often should I train chest with dumbbells?
For optimal recovery and growth, train your chest 2-3 times per week, with at least 48 hours of rest between sessions targeting the same muscle groups. For example, training on Monday and Thursday allows for adequate recovery.
Can I really build a big chest with just dumbbells?
Absolutely. Dumbbells are arguably superior to barbells for chest development due to the increased range of motion and the need for stabilizer engagement. With consistent progressive overload, proper nutrition, and recovery, you can build an impressive chest using only dumbbells at home.