
How to Use Rowing Machine Without Hurting Back
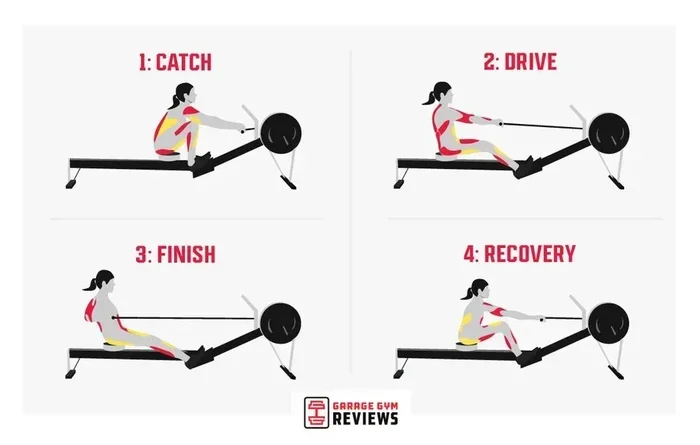
Using a rowing machine without hurting your back is all about proper form, smart settings, and listening to your body. This guide walks you through the correct rowing technique, common mistakes that cause back pain, and actionable tips to protect your spine. Whether you are a beginner or a seasoned gym-goer, you will learn how to row safely and effectively.
Rowing machines are one of the best tools for a full-body workout. They burn calories, build muscle, and boost your heart health. But here is the problem. Many people hop on a rowing machine and hurt their back within minutes. The good news is that back pain from rowing is almost always preventable. With the right rowing technique and a few simple adjustments, you can enjoy every session pain-free.
In this guide, we will show you exactly how to use a rowing machine without hurting your back. We will cover proper form, common mistakes, machine settings, and warm-up routines. By the end, you will feel confident and ready to row safely. Let us get into it.
Key Takeaways
- Proper form is everything: A correct rowing stroke keeps your back straight and engages your legs and core first.
- Start with low resistance: High resistance too soon is a top cause of back strain and poor technique.
- Avoid rounding your lower back: Keeping a neutral spine throughout the stroke prevents injury and pain.
- Use the damper wisely: Setting it too high forces your back to do the work instead of your legs.
- Warm up before every session: A quick warm-up primes your muscles and reduces the risk of back injury.
- Stop if you feel pain: Discomfort is a signal to check your form or reduce intensity immediately.
📑 Table of Contents
Why Does Your Back Hurt on a Rowing Machine?
Before we fix the problem, let us understand why it happens. Most back pain from rowing comes from poor technique. When you rely too much on your upper body, your back muscles take on too much load. This leads to strain, soreness, and sometimes serious injury.
Here are the most common reasons your back hurts:
- Rounding your lower back: This puts pressure on your spinal discs and muscles.
- Using too much resistance: Heavy settings force your back to compensate for weak leg drive.
- Yanking the handle too early: This shifts the workload from your legs to your back.
- Slouching at the finish: Leaning back too far hyperextends your spine.
- Skipping warm-ups: Cold muscles are tight muscles, and tight muscles are injury-prone muscles.
Once you know what causes the pain, fixing it becomes much easier. The next sections will walk you through each step in detail.
How to Set Up Your Rowing Machine Correctly
A proper setup is the foundation of a safe rowing stroke. If your machine is not adjusted to your body, no amount of good technique will save you. Take a few minutes before every session to get dialed in.
Adjust the Foot Straps
Place your feet in the straps so they sit across the widest part of your feet. Your toes should be visible just above the strap. This gives you a solid base to push off from during the drive phase of the rowing stroke.
Set the Damper Level
The damper controls how much air flows into the flywheel. Think of it like a gear on a bicycle. Most people set it too high. A setting between 3 and 5 is ideal for most users. Higher settings do not mean a better workout. They just mean more strain on your back. Keep it moderate and focus on smooth, controlled strokes.
Check the Seat and Rail
Make sure the seat glides freely along the rail. A sticky or uneven rail can throw off your rhythm and cause you to jerk your back. Wipe the rail down before each use with a clean cloth.
Monitor Your Handle Grip
Grip the handle lightly. A death grip on the handle creates tension in your shoulders and upper back. Keep your wrists flat and your grip relaxed. Think of holding a bird, not squeezing it.
The Proper Rowing Stroke: Step by Step
The rowing stroke has four phases. Each phase matters. Getting even one wrong can put your back at risk. Let us break them down so they are easy to follow.
Phase 1: The Catch
Start with your knees bent and your shins vertical. Lean forward slightly from your hips, not your waist. Keep your back straight and your core tight. Your arms should be extended and relaxed. This is the starting position for every stroke.
Phase 2: The Drive
This is where the power comes from. Push with your legs first. Once your legs are almost straight, lean back slightly from your hips. Then pull the handle toward your lower ribs with your arms. The order matters: legs, then hips, then arms. This sequence keeps your back safe and your strokes powerful.
Phase 3: The Recovery
Reverse the drive in reverse order. Extend your arms first, then lean forward from your hips, and finally bend your knees. Move smoothly and slowly during the recovery. Rushing this phase is a common cause of back strain.
Phase 4: The Finish
At the end of the drive, your legs are straight, your back is slightly leaned back, and the handle is at your lower ribs. Do not lean back too far. A small, controlled lean is all you need. Overextending your spine is a quick route to back pain.
Quick Tip: Practice the stroke on a low resistance setting first. Focus on the sequence: legs, hips, arms, then reverse. Speed will come with practice.
Common Mistakes That Cause Back Pain
Even experienced rowers make these errors. Knowing what to avoid is just as important as knowing what to do right.
Mistake 1: Using Your Back Instead of Your Legs
Your legs are the biggest and strongest muscles in your body. They should do most of the work. If you find yourself pulling with your back, your resistance is likely too high or your technique needs work. Reduce the damper and slow down until the leg drive feels natural.
Mistake 2: Hunching Your Shoulders
Many people round their shoulders forward during the catch. This tightens the muscles in your upper back and neck. Keep your shoulders relaxed and pulled slightly back. Imagine holding a pencil between your shoulder blades.
Mistake 3: Sitting Too Upright or Too Far Back
There is a sweet spot for your torso angle. Too upright and you lose power. Too far back and you strain your lower back. A slight lean of about 1 to 2 o’clock on a clock face is the sweet spot for most people.
Mistake 4: Bouncing in the Seat
Jerky movements on the seat transfer shock to your spine. Your strokes should be smooth and fluid. If your seat is bouncing, you are going too fast. Slow down and focus on control.
For more on proper rowing form, check out our guide on how to properly use a rowing machine for beginners and our step-by-step guide on how to use a rowing machine step by step.
Warm-Up Exercises to Protect Your Back
Never jump straight into intense rowing. A good warm-up wakes up your muscles and prepares your spine for the workout ahead. Spend 5 to 10 minutes on these exercises before you row.
Cat-Cow Stretches
Get on all fours and alternate between arching your back (cow) and rounding it (cat). Do 10 slow reps. This mobilizes your entire spine and relieves any stiffness.
Hip Circles
Stand with your feet shoulder-width apart and make slow circles with your hips. Do 10 circles in each direction. This loosens up your hip flexors, which play a big role in the rowing stroke.
Arm and Shoulder Rolls
Roll your shoulders forward 10 times, then backward 10 times. Reach your arms overhead and gently twist side to side. This releases tension in your upper back.
Bodyweight Squats
Do 10 slow bodyweight squats. This activates your glutes and quads, the primary muscles used during the drive phase of a rowing machine workout.
After your warm-up, row at a slow pace for 2 to 3 minutes. This lets your body transition into the movement pattern before you increase intensity.
How to Choose the Right Resistance for Your Back
Resistance is where many people go wrong. They think higher resistance equals a better workout. That is not true, especially for your back. The right resistance lets you maintain proper form without fatigue breaking down your technique.
Here is a simple guide to choosing the right setting:
- Beginners: Start at damper level 2 or 3. Focus on learning the stroke sequence.
- Intermediate: Damper level 4 or 5. You should feel challenge in your legs, not your back.
- Advanced: Damper level 5 or 6. Only increase if your form stays solid at lower levels.
A good rule of thumb: if your back starts to ache during a session, lower the resistance immediately. No workout is worth an injury. For more on building strength safely, read our article on how to use a rowing machine to build muscle.
When to Stop and Seek Help
Some soreness after rowing is normal, especially when you are new. But sharp or persistent pain is not. Know the difference between normal muscle fatigue and a warning sign.
Stop rowing and rest if you experience any of the following:
- Sharp pain in your lower back during a stroke
- Numbness or tingling in your legs or feet
- Pain that gets worse with each stroke
- Stiffness that does not go away after rest
- Pain that radiates down your legs
These could be signs of a disc issue, muscle tear, or nerve compression. A healthcare professional can properly diagnose the problem and give you a recovery plan. Do not push through sharp pain. Your back has no backup. Protect it.
Final Thoughts
Rowing is one of the most effective full-body workouts you can do. It builds strength, burns fat, and improves your cardiovascular health. But all of those benefits mean nothing if you hurt your back in the process.
The secret to a pain-free rowing session comes down to three things. First, master your proper rowing form. Second, keep your resistance at a manageable level. Third, always warm up before you row. These habits will protect your back and help you enjoy rowing for years to come.
Remember, your legs are the engine. Your core is the stabilizer. Your arms are just the connector. Let your legs do the heavy lifting and keep your back in a safe, neutral position. With practice, the right technique will become second nature.
Start slow, stay consistent, and listen to your body. A healthy back means more workouts, better results, and a happier you. Happy rowing.
Frequently Asked Questions
Can rowing cause long-term back damage?
Only if you use poor form consistently over time. When done correctly, rowing is actually one of the safest exercises for your back. Proper technique, appropriate resistance, and a good warm-up are all you need to prevent long-term issues.
What is the best rowing machine for people with back problems?
Air and magnetic rowers are generally the best options because they offer smooth, low-impact strokes. Avoid hydraulic rowers, which can force awkward positions. Always adjust the machine to fit your body before you start.
How long should a beginner row without experiencing back pain?
Start with 10 to 15 minutes at a low resistance and slow pace. As your form improves and your core gets stronger, you can gradually increase your time. Never increase duration, intensity, and resistance all at once.
Should I see a doctor if my back hurts after rowing?
Yes, if the pain is sharp, persistent, or radiates down your legs. Mild soreness from a new workout is normal, but lasting or severe pain is not. A doctor or physical therapist can help you rule out serious issues and guide your recovery.
Does core strength help prevent back pain on a rowing machine?
Absolutely. Your core stabilizes your spine during every stroke. Stronger abs and lower back muscles mean better posture and less strain. Add core exercises like planks and dead bugs to your routine for the best results.
How do I know if my rowing form is correct?
Record yourself rowing from the side and check your form. Your back should stay straight, your legs should drive first, and your movements should be smooth. You can also ask a certified trainer at your gym to review your technique in person.


