How to Make a Macrame Yoga Mat Strap
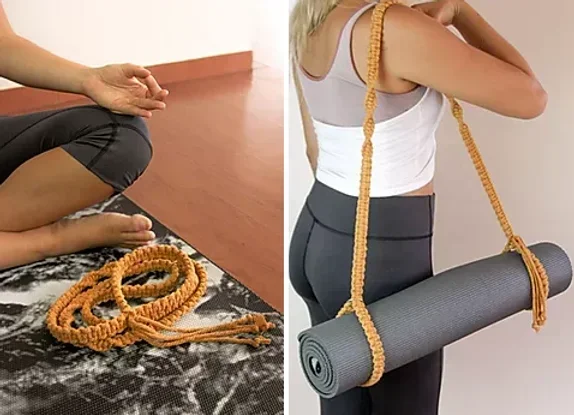
Making a macrame yoga mat strap is easier than you think and lets you craft a beautiful, functional carrier for your practice. This guide walks you through choosing the right materials, tying essential macrame knots, and assembling a DIY yoga strap that fits your mat perfectly. You will learn simple techniques that anyone can follow, even if you have never tried macrame before.
There is something really satisfying about using a yoga accessory that you made yourself. A macrame yoga mat strap does more than just carry your mat. It shows off your craft skills and adds a personal vibe to every practice session. Whether you are new to macrame or have been tying knots for years, this project is fun and rewarding.
In this guide, you will learn exactly how to make a macrame yoga mat strap from start to finish. We will cover everything from picking the right cord to finishing your strap with a clean, tidy look. By the end, you will have a handmade yoga mat carrier that you can proudly use or even gift to a friend.
You do not need any fancy tools or special training. Just some cord, your hands, and a little patience. Let us get started.
Key Takeaways
- Macrame yoga mat straps are simple to make: You only need a few supplies and basic knotting skills.
- Cotton cord is the best material: It is durable, soft, and easy to work with for beginners.
- Two key knots do most of the work: The square knot and the lark’s head knot are all you need.
- A homemade strap adds a personal touch: You can customize colors, patterns, and length to match your style.
- Handmade yoga accessories save money: Crafting your own strap costs a fraction of buying one retail.
- Proper length and width matter: A well-sized strap makes carrying your mat comfortable and secure.
📑 Table of Contents
- Why Make a Macrame Yoga Mat Strap?
- What You Will Need to Get Started
- Basic Macrame Knots You Need to Know
- Step-by-Step: How to Make Your Macrame Yoga Mat Strap
- Customizing Your Macrame Yoga Mat Strap
- Tips for Using and Caring for Your Macrame Yoga Mat Strap
- Common Mistakes to Avoid
- Expert Tips for Leveling Up Your Macrame Skills
- Conclusion
Why Make a Macrame Yoga Mat Strap?
A DIY yoga strap has many benefits that go beyond just holding your mat. When you make something with your own hands, you connect with it differently. Every time you grab your strap and head to class, you will feel that personal connection.
Store-bought straps can be expensive. They also come in limited sizes and colors. When you craft your own macrame yoga accessory, you control every detail. Want a longer strap? No problem. Prefer a certain color combo? Go for it.
Macrame is also a relaxing hobby. The repetitive knotting motion can feel almost meditative. Many people find that working on a macrame project helps them unwind after a long day. So you are not just making a strap. You are also giving yourself a calming creative outlet.
Benefits of a Handmade Yoga Strap
- Custom fit: You can size the strap exactly for your yoga mat length and width.
- Unique style: No one else will have the same strap. Your design is all yours.
- Cost savings: Basic macrame cord is very affordable and goes a long way.
- Eco-friendly: You can choose natural, sustainable materials like organic cotton.
- Skill building: Each project improves your knotting and weaving technique.
What You Will Need to Get Started
Gathering your supplies is the first step in making a macrame yoga mat strap. The good news is that you do not need much. A few simple items are all it takes to begin your yoga strap DIY journey.
Essential Materials
- Cotton cord: This is the most popular choice for macrame. It is soft, strong, and easy to knot. A 4mm to 5mm thickness works well for a yoga mat strap. You will need about 15 to 20 feet of cord depending on your design.
- Scissors: A sharp pair of scissors makes clean cuts. This keeps your cord ends neat and tidy.
- Measuring tape: You need to know your mat size before you start cutting cord. Measure both the length and width of your mat.
- Comb or brush: This helps you fringe and neaten the ends of your strap after you finish knotting.
- Optional: Beads or D-rings: These can add a decorative touch or make the strap easier to attach to your mat.
Choosing the Right Cord
Not all cord is the same. For a macrame yoga mat carrier, you want something sturdy enough to hold the weight of your mat but soft enough to handle comfortably. 3-ply cotton cord is a top choice among macrame beginners. It holds its shape well and does not fray easily.
If you prefer a softer feel, try braided cotton cord. It has a nice texture and drapes beautifully. Some crafters also use jute cord for a more rustic look. Just keep in mind that jute can be a bit rough on the hands during long knotting sessions.
Basic Macrame Knots You Need to Know
Before you start assembling your strap, it helps to learn a few basic knots. Do not worry. These knots are simple, and you will pick them up quickly. Think of them as the building blocks of every macrame pattern.
The Lark’s Head Knot
The lark’s head knot is how you attach your cord to a bar, ring, or anchor point. It is the most common starting knot in macrame. Here is how to do it:
- Fold your cord in half to form a loop.
- Push the loop through your anchor point (like a dowel or ring).
- Pull the two loose ends through the loop.
- Tighten gently by pulling both ends.
This knot creates a secure hold and looks clean. It is the foundation for many yoga strap designs. Once you master this knot, you are ready to move on to the next one.
The Square Knot
The square knot is the workhorse of macrame. It creates a flat, tight braid that is perfect for straps. Here is how to tie it:
- Take four cords. Two on the left (your working cords) and two on the right (your filler cords).
- Take the left working cord and cross it over the two filler cords, then under the right working cord.
- Now take the right working cord and cross it over the filler cords, then under the left working cord.
- Pull both ends tight. That is one square knot.
- Repeat in the opposite direction for the next knot to create a neat, flat braid.
Keep your tension even as you knot. Loose knots will make your strap look uneven. Tight, consistent knots give your handmade yoga accessory a polished, professional look.
The Spiral Knot
The spiral knot is just a series of square knots tied in one direction. Instead of alternating left and right, you keep going the same way. This creates a beautiful twisted rope effect. It is a great detail to add to the edges of your yoga mat handle or the strap body.
Step-by-Step: How to Make Your Macrame Yoga Mat Strap
Now for the fun part. You have your supplies and you know your knots. It is time to put it all together and create your very own macrame yoga mat strap. Follow these steps carefully, and you will have a finished strap in about one to two hours.
Step 1: Measure and Cut Your Cord
Start by measuring your yoga mat. Most standard mats are about 72 inches long and 24 inches wide. You want your strap to wrap around the mat and have enough length to form a comfortable carry handle.
Cut four pieces of cord, each about 60 inches long. If your mat is extra long or wide, add a few inches to each piece. Using a measuring tape ensures accuracy. It is better to cut a little longer than you need. You can always trim the ends later.
Step 2: Attach the Cords to Your Anchor
Fold each cord in half and use a lark’s head knot to attach them to a dowel, bar, or sturdy ring. Space the four cords evenly. You should now have eight working cords hanging down from your anchor point.
This setup gives you plenty of cord to work with. It also creates a symmetrical base for your macrame pattern. Make sure the knots are snug but not too tight. You want the cords to slide slightly if you need to adjust them.
Step 3: Create the Strap Body with Square Knots
Divide your eight cords into four groups of two. Take the first two groups (four cords total) and tie a row of square knots. Work your way across, using each set of four cords to create a continuous braid.
Keep knotting until the braid reaches your desired strap length. A good length for most people is about 50 to 55 inches. This gives you enough strap to wrap around the mat and still have a comfortable handle to hold.
As you knot, check the width of the braid. A width of about 2 to 3 inches works well for most yoga mats. If it feels too narrow, you can add more cords in your next project.
Step 4: Add the Handle Loop
Once the strap body is the right length, it is time to create the handle. Take the top two cords from each side and tie them together using a square knot. This forms a loop that your hand will fit through.
Make the loop about 6 to 8 inches long. This gives you a comfortable grip when you carry a yoga mat. Test the loop by slipping your hand through it. It should feel snug but not tight.
Some people like to add a D-ring at the junction of the strap and the handle. The ring makes it easier to attach the strap to the mat. It also adds a nice decorative detail to your yoga mat carrier.
Step 5: Finish and Trim the Ends
Now that your strap is assembled, it is time to finish it off. Use your scissors to trim the cord ends evenly. Then use a comb or brush to fray the ends slightly. This creates a soft, tasseled look that is very typical of macrame.
You can also melt the very tips of synthetic cords with a lighter to prevent fraying. However, cotton cord does not melt, so the combing method works best for it. Take your time with this step. Neat ends make a big difference in the overall appearance of your handmade yoga accessory.
Customizing Your Macrame Yoga Mat Strap
One of the best things about making your own strap is that you can make it truly yours. There are many ways to personalize your macrame yoga mat strap and make it stand out.
Color Combinations
Try using two or three colors of cord for a striped effect. Alternate colors as you knot to create a bold pattern. You can also use a neutral base color with pops of a bright accent color. This gives your strap a modern, stylish look.
Adding Beads
Beads add a nice touch of elegance to any macrame project. String wooden or ceramic beads onto your cord before you start knotting. Space them evenly along the strap for a decorative border. Beads also add a little weight, which can help the strap drape nicely.
Different Patterns
Once you are comfortable with square knots, you can experiment with more advanced macrame patterns. The diagonal braid, the half-hitch knot, and the cobra knot all create interesting textures. Try combining different patterns on different sections of your strap for a unique design.
If you want more inspiration, check out this helpful guide on how to make a yoga mat strap with rope. It covers some great techniques that translate well to macrame projects too.
Tips for Using and Caring for Your Macrame Yoga Mat Strap
Your strap is finished, and you are ready to hit the mat. But a little care goes a long way in keeping your macrame yoga mat carrier looking great for a long time.
How to Attach the Strap to Your Mat
Wrap the strap around your rolled or folded yoga mat. Slide the handle loop over one end, then bring the strap around and through the loop. Pull tight to secure. This method works well for most mat sizes and keeps your mat snug during transport.
If you find the strap sliding around, try adding a small D-ring or buckle to the strap body. This gives you a quick-release option and keeps the strap from shifting. For more tips on attaching straps to your mat, check out this guide on how to put a strap on a yoga mat.
Cleaning and Maintenance
Cotton cord can get dirty over time, especially if you carry your mat to outdoor classes or hot yoga sessions. Spot clean your strap with a damp cloth and mild soap. Let it air dry completely before using it again.
Avoid machine washing your macrame strap. The agitation can loosen the knots and distort the shape. If your strap needs a deeper clean, hand wash it gently and lay it flat to dry.
Storing Your Strap
When you are not using your strap, store it in a cool, dry place. Hanging it on a hook or coiling it loosely in a drawer works well. Avoid folding the cord sharply, as this can create permanent creases in the braided sections.
Proper storage also helps if you are someone who travels with your mat. A well-stored strap will be ready to go whenever you are. If you travel often and want to learn more about carrying your mat, read up on how to carry a yoga mat without a bag for additional creative solutions.
Common Mistakes to Avoid
Even simple projects can go wrong if you are not careful. Here are some common mistakes people make when crafting a macrame yoga strap and how to avoid them.
- Cutting cords too short: Always measure twice and cut once. Short cords make it hard to finish your strap properly.
- Inconsistent knot tension: Loose and tight knots alternating create an uneven look. Keep your tension steady throughout the project.
- Skipping the measurement step: Do not guess your mat size. Measure it accurately so your strap fits perfectly every time.
- Using the wrong cord thickness: Too thin and the strap will not hold. Too thick and it will be hard to knot. Stick with 4mm to 5mm cotton cord for the best results.
- Rushing the finishing step: Trimming and fraying the ends might seem minor, but it really affects the final look of your yoga strap DIY project.
Expert Tips for Leveling Up Your Macrame Skills
If you have already made one strap and want to try something more advanced, there are many directions you can go. Experienced macrame artists recommend starting with a simple design and gradually adding complexity.
Try experimenting with different cord materials. Hemp cord gives a natural, earthy feel. Satin cord adds a smooth, luxurious touch. Each material behaves differently when knotted, so you will learn something new with every project.
Another great way to improve is to watch video tutorials alongside written guides. Seeing the knots in motion helps you understand the tension and spacing better. Over time, you will develop your own style and speed. Before you know it, you will be making macrame yoga accessories for all your friends.
Also consider making multiple straps at once. Once you have the technique down, the process becomes very efficient. You can create a set of straps in different colors for different mats or as gifts. Check out how to use a yoga strap to carry mat for more ideas on how to make the most of your handmade strap.
Conclusion
Making a macrame yoga mat strap is a rewarding project that combines creativity with practicality. You learned how to choose the right cord, tie essential knots, and assemble a strap that fits your mat perfectly. Each step builds on the last, and by the end, you have a beautiful handmade yoga accessory that you can use every day.
Remember, the beauty of macrame is in the process. Do not worry about making it perfect. Every knot you tie is a step toward a finished piece that reflects your personal style. The more you practice, the better your DIY yoga strap projects will become.
So gather your supplies, pick out your favorite cord colors, and start knotting. Your new macrame yoga mat carrier is just a few hours away. Enjoy the journey, and happy crafting.
Frequently Asked Questions
What kind of cord is best for a macrame yoga mat strap?
Cotton cord is the best choice for most people. It is soft, strong, and easy to knot. A 4mm to 5mm thickness gives you the right balance of durability and comfort. You can also try braided cotton or 3-ply cord for a slightly different texture.
How long should a macrame yoga mat strap be?
A good length is about 50 to 55 inches for most standard yoga mats. This gives you enough strap to wrap around the mat and form a comfortable carry handle. Measure your mat first and add a few extra inches for the handle loop.
Can beginners make a macrame yoga mat strap?
Absolutely. This project is perfect for beginners. You only need to learn two basic knots: the lark’s head knot and the square knot. Once you get the hang of these, the rest of the strap comes together quickly and easily.
How do I clean my macrame yoga mat strap?
Spot clean your strap with a damp cloth and mild soap. Let it air dry completely before using it again. Avoid machine washing, as the agitation can loosen the knots and change the shape of your strap.
Can I add beads or other decorations to my strap?
Yes! Beads are a wonderful way to personalize your macrame strap. String them onto the cord before you start knotting, and space them evenly for a decorative border. You can also add D-rings or charms for extra style and functionality.
How long does it take to make a macrame yoga mat strap?
Most people finish a basic strap in about one to two hours. If you are new to macrame, it might take a little longer as you get comfortable with the knots. With practice, you will be able to make straps much faster.