How to Use a Hydraulic Rowing Machine 2
A hydraulic rowing machine offers a compact, space-saving workout that delivers powerful resistance without the bulk of water or air rowers. This guide will show you how to set up the machine correctly, master the proper rowing technique, and adjust the hydraulic resistance to match your fitness level. You’ll also learn common mistakes to avoid and tips to maximize your workout efficiency.
How To Use A Hydraulic Rowing Machine 2
Hydraulic rowing machines are one of the most popular choices for home gyms and fitness centers alike. If you have ever wondered how to get the most out of yours, you are in the right place. This guide covers everything you need to know about using a hydraulic rowing machine safely and effectively. You will learn proper setup, technique, common mistakes, and even a sample workout plan. Whether you are a complete beginner or looking to refine your skills, this article has practical tips that will help you right away.
Rowing is a fantastic full body workout that builds strength and endurance at the same time. A hydraulic rowing machine uses piston-based resistance to simulate the feel of on-water rowing. Unlike air or water rowers, hydraulic models are compact and often more affordable. This makes them a great option for people who want a serious workout without taking up too much space. Let us dive into the details of how to use one properly.
Key Takeaways
- Start slow: Adjust resistance to a low level before your first few sessions on the hydraulic rowing machine.
- Master your form: Keep your back straight, arms extended, and drive through your legs for each stroke.
- Check the pistons: Inspect hydraulic cylinders regularly for leaks to maintain smooth and consistent resistance.
- Track your strokes: Monitor stroke rate and split times to measure progress and stay motivated.
- Warm up first: Spend five minutes rowing at a gentle pace to prepare your muscles and joints.
- Breathe with rhythm: Exhale on the drive and inhale on the recovery for better endurance.
- Cool down after: Row at a slow pace for three to five minutes to prevent stiffness and soreness.
📑 Table of Contents
- What Is a Hydraulic Rowing Machine and How Does It Work?
- Setting Up Your Hydraulic Rowing Machine Correctly
- Mastering the Proper Rowing Technique
- Common Mistakes to Avoid on a Hydraulic Rowing Machine
- Sample Workout Plan for Your Hydraulic Rowing Machine
- Benefits and Limitations of Hydraulic Rowing Machines
- Tips for Getting the Most Out of Your Hydraulic Rowing Machine
What Is a Hydraulic Rowing Machine and How Does It Work?
A hydraulic rowing machine uses hydraulic cylinders or pistons to create resistance. When you pull the handles, fluid inside the cylinders pushes back against you. This mimics the feel of pulling through water. The resistance level depends on how much fluid pressure the machine generates.
Here is how the basic mechanics work:
- The piston or cylinder creates resistance as you pull.
- Fluid inside the system compresses to push back.
- You control the intensity by adjusting the resistance setting.
- The seat slides along a rail as you row forward and back.
One big advantage of a hydraulic rowing machine is its quiet operation. It does not roar like an air rower, so it works well in apartments and shared spaces. The compact design also makes storage easy. However, the resistance feel is slightly different from water or air rowers. Many users find hydraulic rowers perfect for steady-state cardio and moderate strength training.
Hydraulic vs Other Rowing Machine Types
Not all rowing machines are the same. Here is a quick comparison of hydraulic rowers with other popular types:
| Feature | Hydraulic | Air | Water |
|---|---|---|---|
| Resistance Type | Piston fluid | Flywheel air | Water tank |
| Noise Level | Quiet | Loud | Moderate |
| Space Required | Small | Medium | Large |
| Price Range | Budget-friendly | Mid-range | Higher-end |
| Resistance Feel | Smooth and consistent | Dynamic and explosive | Natural water feel |
If you are tight on space or budget, a hydraulic rowing machine is a smart choice. It delivers a solid rowing machine workout without the noise or size of other models.
Setting Up Your Hydraulic Rowing Machine Correctly
Proper setup makes a huge difference in your rowing experience. A hydraulic rowing machine that is not set up right can lead to poor form and even injury. Follow these steps to get started on the right foot.
Step-by-Step Setup Process
- Place the machine on a flat, hard surface. Carpet is okay, but a hard floor gives better stability.
- Unfold the frame if it is a folding model. Lock the side rails securely into place.
- Check the hydraulic cylinders. Make sure they are attached firmly to the seat rail and the footplate.
- Set the resistance level to the lowest setting if you are a beginner.
- Adjust the foot straps so they sit snugly across the balls of your feet.
- Sit on the seat and slide forward and back a few times to test the motion.
Once your hydraulic rowing machine is set up, take a moment to familiarize yourself with the controls. Most models have a simple display that shows your stroke rate, distance, and calories burned. Understanding these metrics helps you track your progress over time.
Quick tip: Always check the hydraulic fluid levels before your first few sessions. Low fluid can reduce resistance and affect your rowing machine workout quality. Refer to the manufacturer’s manual for specific maintenance guidance.
Mastering the Proper Rowing Technique
This is the most important part of using a hydraulic rowing machine. Good technique ensures you get the most out of every stroke while staying safe. The rowing motion has four distinct phases. Let us break them down.
The Four Phases of the Rowing Stroke
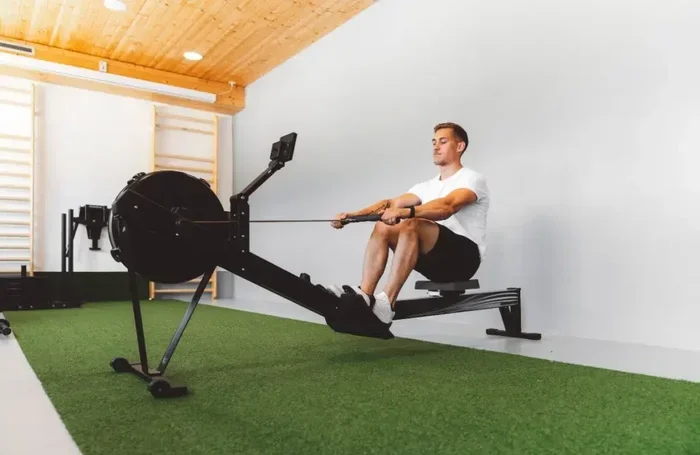
Phase 1: The Catch – Start with your knees bent and your shins vertical. Grab the handle with an overhand grip. Your arms should be straight, and your shoulders relaxed forward. This is the starting position of every stroke.
Phase 2: The Drive – Push through your feet and extend your legs. Once your legs are almost straight, pull the handle toward your lower chest. Your elbows should flare out slightly. This is where the real power comes from.
Phase 3: The Recovery – Extend your arms forward first. Then lean your torso slightly forward. Finally, bend your knees and slide the seat back toward the footplate. This phase should be smooth and controlled.
Phase 4: The Pause – Briefly hold the catch position before starting the next drive. This helps you maintain rhythm and avoid rushing through strokes.
Common Form Cues to Remember
- Drive with your legs first, then your back, then your arms.
- Keep your back straight throughout the entire stroke.
- Do not hunch your shoulders up toward your ears.
- Use a slow, controlled recovery phase.
- Breathe out during the drive and in during the recovery.
If you are new to rowing, I highly recommend checking out how to properly use a rowing machine for beginners for more detailed guidance on form fundamentals. The proper rowing form on a hydraulic machine is very similar to other rower types, so the skills transfer well.
For a more detailed walkthrough of the entire process, you can also read how to use a rowing machine step by step. It covers the same four phases with additional tips for staying balanced and efficient.
Common Mistakes to Avoid on a Hydraulic Rowing Machine
Even experienced rowers make mistakes. Knowing what to avoid will save you from bad habits and potential injuries. Here are the most common errors people make on a hydraulic rowing machine.
Mistake 1: Using Only Your Arms
This is the number one mistake beginners make. The arms should finish the stroke, not start it. If you pull with just your arms, you will tire out quickly and miss the power from your legs and core. Remember the sequence: legs, then back, then arms.
Mistake 2: Rounding Your Back
A rounded back puts unnecessary strain on your spine. Keep your torso upright and your core engaged throughout the stroke. Think of sitting tall with a straight line from your hips to your shoulders. This protects your lower back and makes each stroke more effective.
Mistake 3: Sliding Too Fast
Rushing the recovery phase throws off your rhythm. The drive should be powerful and fast, but the recovery should be slow and controlled. A good ratio is roughly 1:2 — one second for the drive, two seconds for the recovery.
Mistake 4: Setting Resistance Too High
It is tempting to crank up the resistance right away. But on a hydraulic rowing machine, too much resistance forces you to use poor form to compensate. Start low and gradually increase as your technique improves. You want to feel challenged, not strained.
Mistake 5: Neglecting the Warm-Up
Jumping straight into a hard row without warming up is a recipe for sore muscles and injury. Spend five to ten minutes rowing at a relaxed pace before increasing intensity. This gets your joints lubricated and your muscles ready for the work ahead.
Sample Workout Plan for Your Hydraulic Rowing Machine
Now that you know the technique, let us put it into practice. A structured workout plan helps you stay consistent and track your progress. Here are three workouts you can try on your hydraulic rowing machine.
Workout 1: Beginner Full Body Session
This workout is perfect for anyone just starting out with a hydraulic rowing machine.
- Warm-up: 5 minutes at a relaxed pace (stroke rate 18-22)
- Main set: 10 minutes of steady rowing at moderate resistance
- Cool-down: 5 minutes at a slow, easy pace
- Total time: 20 minutes
Focus on maintaining smooth, even strokes throughout. Do not worry about speed. Focus on feeling each part of the rowing motion — the catch, the drive, and the recovery.
Workout 2: Intermediate Interval Training
This workout adds intensity and helps build cardiovascular fitness.
- Warm up for 5 minutes at easy pace.
- Row hard for 1 minute (stroke rate 28-32).
- Recover for 2 minutes at easy pace.
- Repeat the hard/easy cycle 5 times.
- Cool down for 5 minutes.
Interval training on a hydraulic rowing machine is incredibly effective for burning calories and boosting endurance. The compact design of hydraulic rowers makes them ideal for quick, intense sessions at home.
Workout 3: Advanced Endurance Row
For more experienced users, this longer session builds serious stamina.
- Warm-up: 5 minutes easy
- Main set: 25-30 minutes at a steady, moderate pace
- Include 3 short surges of 30 seconds at high intensity
- Cool-down: 5 minutes easy
- Total time: 35-40 minutes
To learn more about getting the most from your rowing sessions, check out how to get a good workout on rowing machine. It offers additional strategies for maximizing your time on the machine.
Benefits and Limitations of Hydraulic Rowing Machines
Every piece of equipment has its strengths and weaknesses. Understanding both sides helps you make the most of your hydraulic rowing machine and set realistic expectations.
Key Benefits
- Compact design: Hydraulic rowers are smaller than air or water rowers, making them ideal for small apartments and homes.
- Quiet operation: The hydraulic piston system runs smoothly and silently, so you can row early morning or late night without disturbing others.
- Affordability: Most hydraulic models cost less than their air or water counterparts, making indoor rowing accessible to more people.
- Low impact: Rowing is gentle on your joints while still providing a challenging cardio workout.
- Full body engagement: A single stroke works your legs, back, arms, and core simultaneously.
Known Limitations
- The resistance feel is less dynamic compared to air or water rowers. The pull can feel a bit uniform.
- Some hydraulic models have a shorter rail, which may not suit taller users comfortably.
- The hydraulic cylinders require regular maintenance to prevent fluid leaks.
- Hydraulic rowers may not provide the same authentic on-water feel as water rowers.
If you are specifically interested in weight loss, rowing is one of the most efficient calorie burn machines available. For more details on how long to use a rowing machine for weight loss, check out how long should a beginner use a rowing machine. It provides clear time guidelines based on your fitness goals.
Tips for Getting the Most Out of Your Hydraulic Rowing Machine
A few extra tips can take your sessions from average to excellent. Here are some practical insights to keep in mind.
- Track your progress: Use the machine’s display to monitor stroke rate, distance, and calories. Seeing improvement keeps you motivated.
- Stay consistent: Aim for at least 3-4 rowing sessions per week. Consistency matters more than intensity when building a habit.
- Mix up your workouts: Alternate between steady rows, intervals, and technique drills to keep things interesting.
- Maintain your machine: Wipe down the rail after each session. Check hydraulic fluid levels monthly. A well-maintained hydraulic rowing machine lasts for years.
- Focus on form over speed: A slow, clean row beats a fast, sloppy one every time. Quality strokes deliver better results and fewer injuries.
Using a hydraulic rowing machine is one of the simplest and most effective ways to boost your fitness at home. The key is to start with proper setup, focus on good technique, and stay consistent with your workouts. Avoid the common mistakes we covered, and do not be afraid to adjust resistance as you grow stronger.
Remember, rowing is a skill. It takes time to feel natural and fluid. Be patient with yourself, celebrate small wins, and enjoy the process. Whether your goal is weight loss, muscle building, or simply staying active, a hydraulic rowing machine can help you get there. Start today, follow the tips in this guide, and you will be rowing with confidence in no time.
Frequently Asked Questions
How do I properly set up a hydraulic rowing machine for my first workout?
Start by placing the machine on a flat, stable surface and adjusting the seat so it slides smoothly along the rail. Attach the resistance cables securely and set the hydraulic pistons to a low resistance level if you are a beginner. This setup ensures a safe and comfortable start to your rowing session.
What is the correct rowing technique when using a hydraulic rower?
Begin with your knees bent and arms extended, then push off with your legs while keeping your back straight. As your legs extend, pull the handle toward your lower chest and lean back slightly at the finish position. Reverse the motion smoothly by extending your arms, leaning forward, and then bending your knees to return to the starting position.
How often should I use a hydraulic rowing machine to see results?
Most fitness experts recommend using a hydraulic rower three to five times per week for 20 to 30 minutes per session. Consistency is key, so aim for a regular schedule that fits your fitness level and goals. You can start with shorter sessions and gradually increase the duration as your endurance improves.
Can beginners use a hydraulic rowing machine safely without prior experience?
Yes, hydraulic rowers are one of the most beginner-friendly cardio machines because they offer smooth, low-impact resistance. Start with a low resistance setting and focus on mastering the proper form before increasing intensity. A few practice sessions will help you build confidence and reduce the risk of injury.
How do I adjust the resistance on a hydraulic rowing machine 2 for a more challenging workout?
Most models allow you to adjust the resistance by turning a dial or moving a lever on the hydraulic piston unit. Increase the tension gradually so your muscles can adapt without straining. A good rule is to choose a resistance level where you can maintain proper form while still feeling challenged.
What maintenance does a hydraulic rowing machine need to stay in good condition?
Regularly check the hydraulic cables and pistons for wear or leaks, and lubricate moving parts according to the manufacturer’s guidelines. Wipe down the seat, rail, and handle after each use to prevent sweat buildup and keep the machine running smoothly. Proper maintenance extends the life of your rower and ensures a consistent, smooth rowing experience every time.