How to Turn Bike into Stationary Bike Diy
Turning your bike into a stationary bike is one of the smartest DIY fitness moves you can make. This guide walks you through every step, from choosing the right conversion kit to setting up your indoor cycling space. You will learn how to convert a regular bike into a stationary setup safely and affordably.
Have you ever looked at your old bike gathering dust in the garage and thought, “I could really use this for indoor workouts”? You are not alone. More people are discovering the joy of indoor cycling without spending hundreds on a brand-new exercise bike. The solution? Turn your bike into a stationary bike with a simple DIY approach.
Converting a regular bicycle into a stationary bike is easier than most people think. Whether you have a road bike, a mountain bike, or a hybrid, you can repurpose it for indoor cycling workouts. This guide gives you everything you need to know. We will cover methods, tools, safety tips, and common mistakes to avoid.
By the end of this article, you will feel confident enough to start your own DIY bike conversion project. No fancy gym membership required. Just your bike, a few affordable parts, and a little bit of effort. Let us dive in.
Key Takeaways
- DIY Conversion Is Affordable: You can turn your existing bike into a stationary bike for a fraction of the cost of buying a new one.
- Multiple Methods Exist: From bike trainer stands to roller setups, there are several ways to create a stationary bike at home.
- Safety Comes First: Proper setup and stabilization prevent accidents and ensure a smooth workout.
- Indoor Cycling Saves Time: No more commuting to the gym. You can cycle at home whenever you want.
- Regular Maintenance Matters: Keeping your converted bike well-maintained extends its life and improves performance.
- Start Simple: You do not need advanced tools or skills to get started with a DIY stationary bike setup.
📑 Table of Contents
- Why Turn Your Bike Into a Stationary Bike?
- Methods to Convert a Bike Into a Stationary Bike
- Tools and Equipment You Will Need
- Step-by-Step Guide to Setting Up Your Stationary Bike
- Common Mistakes to Avoid
- Expert Tips for the Best Indoor Cycling Experience
- How to Maintain Your Converted Stationary Bike
- How to Choose the Right Conversion Kit
- Conclusion
Why Turn Your Bike Into a Stationary Bike?
There are so many reasons to convert a bicycle into a stationary bike. First, it saves you a lot of money. A quality stationary bike can cost anywhere from $300 to $1,500 or more. A bike trainer stand or conversion kit costs a fraction of that.
Second, convenience matters a lot. You do not have to drive anywhere or wait for gym hours. Your bike is right there in your living room, garage, or bedroom. You can hop on and ride whenever your schedule allows.
Third, it is better for the environment. Repurposing an existing bike means less waste. Instead of buying a brand-new piece of fitness equipment, you are giving your current bike a second life.
Health Benefits of Indoor Cycling
Indoor cycling offers amazing health benefits. It improves cardiovascular health, builds leg strength, and burns calories efficiently. A 30-minute session can burn anywhere from 200 to 600 calories depending on intensity. It is also low-impact, which means it is gentle on your joints compared to running.
Many people also find that stationary bike workouts fit better into their routine. You can watch TV, listen to music, or read while pedaling. This makes exercise feel less like a chore and more like a habit you actually enjoy.
Methods to Convert a Bike Into a Stationary Bike
Not all conversions look the same. Different methods suit different needs, budgets, and skill levels. Here are the most popular ways to convert your bike into a stationary bike.
Method 1: Bike Trainer Stand
A bike trainer stand is the most popular and easiest method. You place your bike on the stand, clamp the rear wheel, and start pedaling in place. The front wheel stays on the ground for balance.
Trainer stands come in different types:
- Fluid trainers provide smooth, realistic resistance that changes with your pedaling speed.
- Magnetic trainers offer quiet operation and adjustable resistance levels.
- Wind trainers use fan blades to create resistance. They are affordable but can be noisy.
The how to convert a bike into a stationary bike process with a trainer stand is straightforward. Set the stand on a flat surface, open the clamp, slide your rear wheel in, and tighten. That is it. You are ready to ride.
Method 2: Roller Setup
Bike rollers are a more advanced option. Instead of clamping your bike, rollers let you ride freely on three cylindrical rollers. Your bike stays upright and balanced entirely on your own.
Rollers are excellent for improving balance and pedaling technique. However, they have a steeper learning curve. Beginners might wobble and fall a few times before getting the hang of it.
If you want a more authentic riding feel, rollers are hard to beat. They also take up less space than trainer stands since the bike sits on top of them.
Method 3: DIY Floor Stand
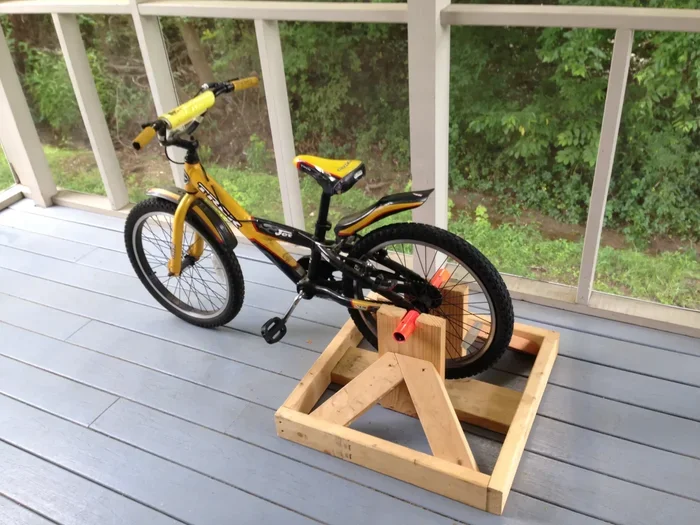
Some people prefer a fully DIY stationary bike build. This involves creating a wooden or metal frame that holds the bike off the ground. You can bolt the bike frame directly to the stand and add a resistance mechanism.
This method requires more woodworking or metalworking skills. But it can be a fun weekend project. Plus, you fully customize the setup to your needs. If you enjoy building things, this might be the perfect route for you.
Tools and Equipment You Will Need
Before you start your DIY bike conversion, gather the right tools. Having everything ready makes the process much smoother.
Essential Tools
- Bike trainer stand or roller set (the core of your setup)
- Wrench set for adjusting the quick-release or axle
- Tire pressure gauge to ensure proper inflation
- Padding or mat to protect your floor from damage
- Level to make sure your stand sits evenly
Optional Upgrades
- Power meter to track your output in watts
- Fan to keep cool during intense sessions
- Tablet or phone holder for virtual cycling classes
- Resistance bands for added workout variety
If you are wondering, “Can I turn my bike into a stationary bike without buying anything special?” The honest answer is no. You need at least a trainer stand or rollers. These are the key pieces that make converting your bike to a stationary bike possible. But they are very affordable compared to a full exercise bike.
Step-by-Step Guide to Setting Up Your Stationary Bike
Now let us walk through the actual setup process. Follow these steps carefully for a safe and effective stationary bike conversion.
Step 1: Choose the Right Location
Pick a flat, open area in your home. A garage, basement, or spare room works great. Make sure there is enough space around the bike for safe mounting and dismounting. You also want good ventilation, since you will be working up a sweat.
Step 2: Prepare Your Bike
Clean your bike thoroughly before the conversion. Check the tire pressure and tighten any loose bolts. You want your bike in good working condition before you start using it as a stationary bike. If your bike has been sitting for a while, consider a tune-up.
Remove any accessories that might get in the way, like water bottle cages or saddlebags. You want a clean, streamlined setup for your indoor cycling sessions.
Step 3: Set Up the Trainer Stand or Rollers
Place your trainer stand on a stable surface. Use a level to ensure it is even. Open the clamp and carefully slide your rear wheel into place. Tighten the clamp securely but do not overtighten, as this can damage the wheel.
For rollers, place them on the ground and position your bike on top. Start with slow, gentle pedaling to find your balance. Keep a wall or chair nearby for support during your first few sessions.
Step 4: Adjust the Seat and Handlebars
Proper bike fit is crucial for comfort and performance. Adjust the seat height so your leg has a slight bend at the bottom of each pedal stroke. Set the handlebars at a comfortable reach. This prevents strain on your back, neck, and knees.
Many people overlook this step when setting up a DIY stationary bike. But a proper fit makes a huge difference in how enjoyable and effective your workouts feel.
Step 5: Test and Fine-Tune
Start with a short, easy ride. Pedal gently for 5 to 10 minutes and check for any wobbling or instability. Listen for unusual noises from the trainer or bike. Make adjustments as needed until everything feels solid and smooth.
Common Mistakes to Avoid
Even with a simple setup, mistakes can happen. Here are the most common ones to watch out for when you turn a bicycle into a stationary bike.
Skipping the Stabilization Check
Never assume your setup is stable without checking. A wobbly trainer stand can lead to falls and injuries. Always test the setup before putting your full weight on the bike. Push down on the handlebars and saddle to confirm everything is secure.
Ignoring Floor Protection
Your bike’s rear wheel spinning against the floor can cause scratches and damage. Always use a mat or towel underneath the trainer. Some stationary bike conversion kits even come with a floor mat. If yours does not, grab one separately. It is a small investment that protects your floors.
Using the Wrong Tire Type
Some trainer stands work better with certain tire types. Smooth tires on trainer rollers, for example, can slip and cause accidents. Check the manufacturer’s recommendations for your specific setup. If you use knobby mountain bike tires on rollers, you may need to switch to a smoother tire for your indoor sessions.
Overlooking Regular Maintenance
Your converted bike still needs care. Check the trainer clamps, bolts, and axle regularly for wear and looseness. Keep the chain lubricated. A well-maintained stationary bike lasts longer and performs better.
Expert Tips for the Best Indoor Cycling Experience
Want to get the most out of your DIY stationary bike? Here are some expert tips that make a real difference.
- Start slow and build up. Do not jump into intense sessions right away. Give your body time to adapt to the new setup and riding position.
- Use a fan. Indoor cycling can get hot fast. A simple box fan keeps you cool and comfortable during longer rides.
- Mix up your workouts. Try interval training, steady-state rides, and hill simulations to keep things interesting and challenge different muscle groups.
- Stay hydrated. Keep a water bottle within arm’s reach. Dehydration can sneak up on you faster than you think when you are pedaling indoors.
- Track your progress. Use a fitness app or smart device to monitor your distance, speed, and calories burned. Seeing improvement keeps you motivated.
For more ideas on getting the most from your indoor setup, check out our guide on how to get a good workout on a stationary bike. It covers training strategies that work perfectly with any converted setup.
How to Maintain Your Converted Stationary Bike
Once you have your stationary bike setup dialed in, maintenance keeps it running smoothly. Here is a simple routine to follow.
- After every ride: Wipe down the bike and trainer with a dry cloth. Remove any sweat or dust buildup.
- Weekly: Check all bolts and clamps for tightness. Inspect the tire for wear.
- Monthly: Lubricate the chain and moving parts of the trainer. Inspect cables and brake pads.
- Seasonally: Store the bike properly if not in use. Cover it to prevent dust accumulation.
Regular maintenance not only extends the life of your bike but also ensures a safer and more comfortable ride every time you hop on. A well-cared-for converted bike feels just as good as a brand-new one.
How to Choose the Right Conversion Kit
Not all stationary bike conversion kits are created equal. Here are some factors to consider when shopping.
| Factor | What to Look For |
|---|---|
| Compatibility | Make sure the kit fits your bike’s wheel size and frame type |
| Resistance Type | Choose fluid, magnetic, or wind based on your noise preference and budget |
| Stability | Look for wide bases and sturdy clamps |
| Portability | If you need to store it away, pick a lightweight foldable design |
| Price | Set a budget and compare options within that range |
Reading reviews and comparing options helps you find the best kit for your needs. The goal is a setup that feels stable, quiet, and enjoyable to use every day.
For a deeper dive into the conversion process, you might also enjoy our article on how to convert a bike into a stationary bike. It covers additional techniques and tips for a successful setup.
Conclusion
Turning your bike into a stationary bike is one of the most rewarding DIY fitness projects you can tackle. It is affordable, practical, and incredibly satisfying to ride your own bike indoors instead of letting it collect dust. With the right tools, a little patience, and the steps outlined in this guide, you can have a fully functional stationary bike in under an hour.
Remember to prioritize safety, maintain your setup regularly, and most importantly, enjoy the process. Indoor cycling opens up a world of convenience and fitness benefits right from your home. So grab your bike, find your trainer stand, and start pedaling today. Your future self will thank you.
For more inspiration and tips on indoor cycling setups, visit our page on how to make a bike into a stationary bike for even more creative ideas and step-by-step guides.
Frequently Asked Questions
Can I turn any bike into a stationary bike?
Yes, most bikes can be converted into a stationary bike using a trainer stand or rollers. Road bikes, mountain bikes, hybrids, and even cruiser bikes work well. Just make sure the trainer stand is compatible with your wheel size and axle type for a secure fit.
How much does it cost to convert a bike into a stationary bike?
The cost varies depending on the method you choose. A basic bike trainer stand ranges from $50 to $200. Rollers typically cost between $100 and $300. A full DIY wooden frame can be even cheaper if you already have the materials. Either way, it is much more affordable than buying a new exercise bike.
Is it safe to ride a converted stationary bike?
Yes, it is safe when set up correctly. Make sure the trainer stand or rollers are on a flat, stable surface. Tighten all clamps securely. Start with slow rides to build confidence and balance. Always wear appropriate footwear and keep a wall or chair nearby for support during your first few sessions.
What is the difference between a bike trainer and bike rollers?
A bike trainer clamps the rear wheel and lifts it off the ground while the front wheel stays on the floor. Rollers let the bike sit on top of three cylinders, requiring you to balance entirely on your own. Trainers are more stable for beginners, while rollers provide a more realistic riding feel and help improve balance and technique.
Can I use my converted stationary bike for training?
Absolutely. Many cyclists use trainer stands and rollers for serious training, including endurance rides, interval workouts, and race preparation. You can adjust resistance levels and track performance metrics to create structured training programs that replicate outdoor riding conditions indoors.
How do I keep my floor from getting damaged during indoor cycling?
Place a thick mat, rubber mat, or old towel under your trainer stand. This absorbs sweat, prevents scratches, and reduces noise. Some trainer stands come with included floor mats, but you can also purchase them separately. This simple step protects your floors and keeps your indoor cycling area clean and tidy.