How to Set Up a Spin Class Bike
Setting up a spin class bike correctly is the foundation of every great indoor cycling session. This guide walks you through seat height, handlebar position, resistance settings, and tech additions so your bike fits your body perfectly. Follow these steps to ride smarter, train harder, and avoid common setup mistakes.
A spin class bike is one of the most effective pieces of fitness gear you can own. Whether you train at home or follow along with a class, the way you set up your bike changes everything. A proper setup protects your joints, boosts your power, and makes every session feel better.
Many people jump on a stationary bike and start pedaling without thinking about fit. That is a mistake. Even small misalignments can cause discomfort, reduce your output, and lead to long-term issues. This guide breaks down every step you need to get your bike dialed in perfectly.
You do not need expensive tools or a professional mechanic. With a few simple adjustments and some basic know-how, you can transform your ride. Let us walk through the entire process together, step by step.
Key Takeaways
- Correct seat height prevents knee pain and maximizes pedal power during every spin class.
- Handlebar position affects your posture and comfort, so take time to dial it in before riding.
- Resistance settings let you simulate hills and build strength without leaving your home.
- Adding tech like sensors and monitors tracks your progress and keeps workouts engaging.
- Avoiding common setup mistakes saves you from injury and ensures every ride counts.
- A proper spin bike fit improves performance whether you are a beginner or seasoned cyclist.
📑 Table of Contents
What Is a Spin Class Bike and Why Does Setup Matter?
A spin bike is a heavy-duty stationary bike built for intense indoor cycling workouts. Unlike a regular exercise bike, a spin bike features a weighted flywheel, adjustable resistance, and a design that mimics outdoor road cycling. Brands like Peloton, Schwinn, and Keiser all fall into this category.
But here is the thing most people overlook. The bike itself only does half the work. How you set it up determines how effective and safe your workout really is. A bike that is too high, too low, or tilted wrong puts stress on your knees, back, and wrists.
Think of it like tying your shoes before a run. It seems small, but it makes a huge difference. A proper indoor cycling bike setup aligns your body so your muscles work efficiently and your joints stay protected.
Who Is This Guide For?
This guide works for complete beginners and experienced riders alike. If you have a workout bike sitting in your garage or living room, these steps apply to you. You do not need prior cycling experience. Just follow along and take your time with each adjustment.
Adjusting the Seat Height and Position
The seat is the most important part of your bike setup. Get this wrong, and your knees will hurt within minutes. Get it right, and you can ride for hours with perfect comfort.
Finding the Right Seat Height
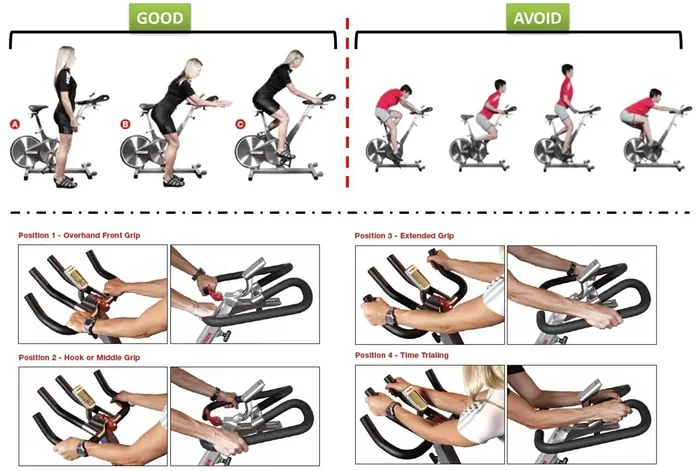
Start by standing next to your bike. The seat should sit at the same height as your hip bone. This is your starting point. Next, sit on the bike and place your heel on the pedal at its lowest point.
Your leg should be completely straight when your heel is on the pedal. If your knee bends even slightly, the seat is too low. If your hip rocks side to side, the seat is too high. Once you find the right height with your heel, switch to the ball of your foot for normal pedaling.
Many people also wonder about how to set up a stationary bike for your height. The answer is simple. Your inseam measurement gives you a reliable number to work from. Multiply your inseam by 0.883, and you get a solid seat height estimate in centimeters.
Moving the Seat Forward and Back
Seat height is only half the equation. The forward and backward position matters just as much. Sit on the bike and look down at your front knee. When the pedal is at the 3 o’clock position, your knee should be directly over the ball of your foot.
If your knee is too far forward, slide the seat back. If it is too far back, slide it forward. This adjustment keeps your cycling posture in line and prevents unnecessary strain on your joints.
For extra comfort during long rides, check out our guide on how to make your spin bike seat more comfortable. Small tweaks like a gel cover or proper shorts can make a world of difference.
Setting the Handlebar Height and Reach
Your handlebars control your upper body position. Set them wrong, and you will feel it in your neck, shoulders, and lower back within minutes. The good news is that handlebar adjustment is straightforward.
Height Adjustment
For beginners, start with the handlebars at the same height as the seat or slightly higher. This puts less strain on your back and shoulders. As you get more comfortable, you can lower the handlebars to simulate a more aggressive riding position.
Experienced riders often prefer lower handlebars because it opens up the hips and allows for greater power output. But if you are new to indoor cycling, keep them higher until your flexibility and strength improve.
Reach and Tilt
Reach refers to how far you have to lean forward to grab the handlebars. You should be able to rest your hands on the bars with a slight bend in your elbows. If you feel like you are reaching too far, move the handlebars closer.
Some bikes also allow you to tilt the handlebars forward or backward. A slight backward tilt feels more comfortable for most riders. If your wrists or shoulders feel sore, try adjusting the tilt a few degrees.
Want a deeper dive into handlebar and seat alignment? Our article on how to set up spin bike seat and handlebars covers this topic in full detail.
Configuring Resistance and Pedal Systems
Resistance is what makes a spin bike feel like a real road bike. Without it, you are just spinning with no challenge. With the right resistance, you can simulate flat roads, steep climbs, and sprint intervals.
Understanding Resistance Knobs and Systems
Most spin bikes use a knob or lever to adjust resistance. Turning it up makes the flywheel harder to spin. Turning it down makes it easier. The key is to use resistance intentionally, not just crank it to the maximum.
During a spin class, you will alternate between light resistance for recovery and heavy resistance for strength-building climbs. Learning to transition smoothly between these levels is a core skill.
Here are some quick tips for using resistance effectively:
- Light resistance works for fast pedaling and warm-ups.
- Medium resistance is great for steady-state endurance rides.
- Heavy resistance builds leg strength and simulates uphill riding.
- Never spin with zero resistance at high speed, as it can strain your knees.
Pedal Straps and Cycling Shoes
Most spin bikes come with toe cages or straps that hold your feet on the pedals. These straps keep your feet from sliding, especially during standing climbs. Pull the strap tight enough so your foot stays secure but not so tight that it cuts off circulation.
If you want to take your rides to the next level, consider investing in cycling shoes with clipless pedals. These shoes lock into the pedals and allow you to pull up as well as push down, which boosts your power output significantly.
Adding Tech and Accessories
One of the best things about modern spin bikes is how much technology they support. Adding sensors, monitors, and apps turns a basic bike into a smart training machine.
Speed and Heart Rate Sensors
A speed sensor tracks how fast your wheels are turning. Many riders pair this with a heart rate monitor to keep their heart rate zone in check. Training in specific zones helps you burn fat, build endurance, or improve your cardiovascular fitness.
If you use a Wahoo sensor, you can attach a Wahoo speed sensor to your spin bike in just a few minutes. It connects wirelessly to your phone or bike computer and gives you real-time feedback on every ride.
Bike Computers and Apps
Bike computers display your speed, distance, cadence, and calories burned in real time. Some riders prefer using apps like Zwift or Peloton for guided classes and virtual rides. These platforms add a social and competitive element that keeps you motivated.
If you are interested in virtual training, you might also want to learn how to set up Zwift on a spin bike. It opens up a whole world of virtual routes and group rides from your living room.
Common Setup Mistakes to Avoid
Even with the best intentions, people make setup errors that hold them back. Here are the most common mistakes and how to fix them.
Skipping the Break-In Period
New bikes need a break-in period. The flywheel and bearings need a few rides to settle in. During the first week, keep your resistance moderate and your sessions shorter than usual. This protects your bike and lets you fine-tune your fit gradually.
Ignoring Floor Stability
Spin bikes are heavy, but they can still vibrate and shift during intense workouts. Place your bike on a flat, hard surface. If your floors are uneven, consider a mat or platform designed for indoor cycling. A stable base keeps your ride smooth and safe.
Overlooking Regular Maintenance
Your bike needs care just like any other piece of fitness equipment. Check your tire pressure if your bike has wheels, lubricate the chain, and tighten bolts periodically. A well-maintained bike performs better and lasts longer.
Need help with tire pressure? Check out our guide on how much air to put in a bike tire to make sure everything is dialed in.
Setting Up Too Fast
One of the biggest mistakes riders make is rushing through the setup process. They hop on, start pedaling, and assume everything feels fine. But subtle misalignments do not show up until after a few weeks of riding. Take the time to make each adjustment slowly and deliberately.
Think of it as building a foundation. A house built on a shaky foundation will always have problems. The same goes for your bike setup. Get it right from the start, and every ride will feel better.
Final Tips for a Perfect Spin Bike Setup
By now, you have all the core knowledge to set up your bike like a pro. Here are a few final reminders to keep in mind.
- Reassess your fit every few months. Your body changes, and so should your bike settings.
- Take photos of your setup. This makes it easy to replicate your perfect position on different bikes.
- Listen to your body. Any pain or discomfort during a ride usually means something needs adjusting.
- Experiment with positions. Try slightly different seat heights and handlebar placements to find what feels best for you.
- Keep a setup log. Write down your settings so you can return to them after cleaning or moving your bike.
Setting up a spin class bike does not have to be complicated. Follow these steps, trust the process, and you will notice the difference in every single ride. Your body will thank you, your performance will improve, and you will actually look forward to hopping on the bike.
The best part is that once your bike is set up correctly, you barely have to think about it again. You just climb on, adjust your resistance, and start riding. That is the beauty of a proper setup. It removes the friction and lets you focus on what really matters, which is the workout itself.
So grab a water bottle, set your bike up the right way, and get ready to crush your next session. Every great ride starts with a great setup.
Frequently Asked Questions
How do I know if my spin bike seat is at the right height?
Sit on the bike and place your heel on the pedal at its lowest point. Your leg should be completely straight. If your knee bends, the seat is too low. If your hip rocks, it is too high. Once you find the right height with your heel, switch to the ball of your foot for normal riding.
Can I use a regular bike for spin classes?
You can convert a regular bike into a stationary setup using a trainer stand. However, a dedicated spin bike offers better resistance control, a heavier flywheel, and a frame built specifically for intense indoor cycling workouts.
What is the best resistance setting for beginners?
Start with light to medium resistance. Focus on maintaining a steady cadence of 80 to 100 RPM. As you build strength and endurance, gradually increase the resistance to simulate climbs and build more power.
How often should I recheck my spin bike setup?
Check your setup every few months or whenever you notice discomfort during rides. Your body changes over time, and small adjustments can make a big difference in comfort and performance.
Do I need cycling shoes for a spin bike?
Cycling shoes are not required, but they do help. Regular athletic shoes work fine with toe cages or straps. Clipless cycling shoes provide a more secure connection to the pedals and improve your power output during intense rides.
What accessories should I add to my spin bike?
Consider adding a heart rate monitor, speed sensor, fan, water bottle holder, and a mat underneath the bike. These accessories enhance your comfort, track your progress, and protect your floors during vigorous workouts.