How to Make a Homemade Rowing Machine 2
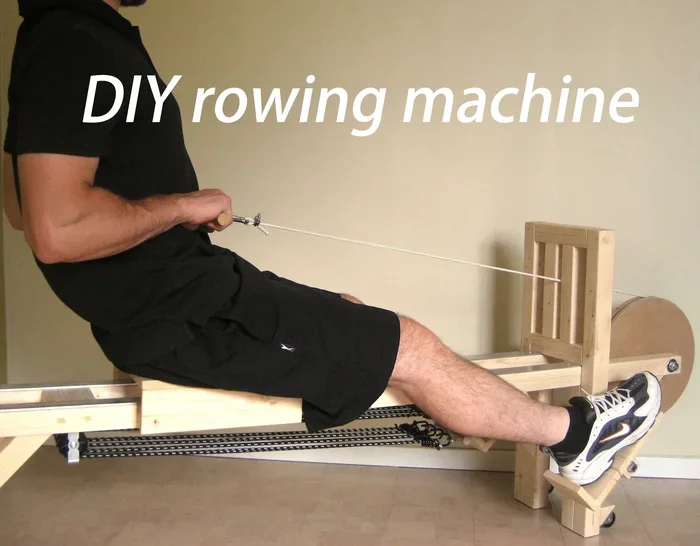
Building a homemade rowing machine is easier than you think, and it can save you serious money while giving you a full-body workout at home. This guide walks you through everything from choosing materials and assembling the frame to adjusting resistance and fine-tuning your form. Whether you are a fitness enthusiast or a curious DIYer, you will have a working rowing machine ready to train on in no time.
Have you ever thought about building your own homemade rowing machine? It might sound like a big project, but it is actually something you can tackle over a weekend. A DIY rowing machine gives you the freedom to work out at home without paying for a pricey gym membership or fancy equipment.
Rowing is one of the best full-body exercises you can do. It works your legs, back, arms, and core all at the same time. Whether you want to get a good workout on a rowing machine or just stay active at home, building your own rower is a smart move. In this guide, we will walk you through every step of the process so you can build a safe and effective machine from scratch.
Before you start, keep in mind that you do not need advanced carpentry skills. Basic tools, some spare parts, and a little patience are all you need. Let us dive into how to make a homemade rowing machine that actually works.
Key Takeaways
- Affordable DIY Project: You can build a functional rowing machine using common materials and basic tools without breaking the bank.
- Full-Body Workout: A homemade rowing machine targets your legs, arms, back, and core all at once.
- Customizable Resistance: You can adjust the resistance level to match your fitness level and goals.
- Step-by-Step Building Process: Clear instructions make it easy for beginners to follow along and succeed.
- Safety First: Proper assembly and regular checks keep your homemade machine safe and durable.
- Indoor Fitness Solution: A DIY rower lets you train at home regardless of weather or gym hours.
📑 Table of Contents
Why Build a Homemade Rowing Machine?
There are many reasons people choose to build their own rowing machine instead of buying one. Commercial rowers can cost hundreds or even thousands of dollars. A DIY version can be built for a fraction of that price.
Save Money
The biggest advantage of a DIY rowing machine is cost savings. You can often build one for under $100 using materials from a hardware store. Even if you need to buy a few specialty parts, the total cost stays much lower than a store-bought rower.
Customize Your Build
When you build your own machine, you get to choose every part. Want a longer rail? No problem. Prefer a certain type of resistance? You pick. This level of customization means your rower fits your body and your goals perfectly.
Learn Something New
Building a homemade rowing machine teaches you valuable skills. You will learn about mechanical systems, resistance training, and basic engineering. These skills carry over into other DIY projects around the house.
Work Out at Home
Having a rowing machine at home means you never have to worry about gym hours or crowded equipment. You can row anytime that fits your schedule. This convenience makes it much easier to stay consistent with your training.
Materials You Will Need
Gathering the right materials is the first real step in building your homemade rowing machine. Below is a list of everything you typically need. You can swap some items based on what you have available or prefer.
Frame Materials
- Steel or aluminum tubing: This forms the main frame and rail. Look for sturdy, straight pieces that can handle repeated use.
- Wooden base board: A thick plywood or hardwood board provides a stable foundation for the machine.
- Bolts, nuts, and screws: You will need a variety of sizes to connect all the parts securely.
Moving Parts
- Sliding rail: A smooth, straight rail allows the seat to glide back and forth. Aluminum or steel rails work best.
- Seat: A rolling seat or a padded platform that moves freely along the rail.
- Handle and chain or belt: The handle connects to a drive mechanism. A bicycle chain or resistance belt works well.
- Flywheel or resistance mechanism: This creates the pulling resistance. You can use a bicycle wheel, a fan blade, or a weight system.
Resistance Options
- Air resistance: Uses a spinning fan blade to create drag. This mimics the feel of a water rower.
- Magnetic resistance: Uses magnets near a metal wheel for smooth, quiet resistance.
- Friction-based resistance: Uses a brake pad or cloth against a spinning wheel. Simple and affordable.
- Water resistance: A paddled wheel in a water tank. This gives a very realistic rowing feel but is harder to build at home.
Tools Required
- Wrench set
- Screwdriver set
- Drill with bits
- Measuring tape
- Level
- Saw (if cutting wood or metal)
- Welding equipment (optional, for stronger joints)
Step-by-Step Building Process
Now comes the fun part. Follow these steps to build your own homemade rowing machine. Take your time and double-check each step before moving on.
Step 1: Build the Base Frame
Start by cutting your wooden base board to the desired length. A good length is about 7 to 8 feet. This gives you enough room for a full rowing stroke. Attach the steel or aluminum tubing to the base board using bolts and screws. Make sure the frame is level and stable. A wobbly frame will make your workouts unsafe.
Step 2: Install the Rail
Mount the sliding rail on top of the frame. The rail needs to be perfectly straight and securely fastened. Use a level to check. The seat will slide along this rail, so any bumps or bends will affect your experience. Sand down any rough edges to keep the seat moving smoothly.
Step 3: Attach the Drive Mechanism
This is the heart of your DIY rowing machine. Connect the chain or belt from the handle to the flywheel or resistance unit. Make sure the chain is tight enough to transfer power but loose enough to move freely. If you are using a bicycle chain, you may need a chain tensioner to keep it properly aligned.
Step 4: Build the Seat
The seat should roll smoothly on the rail. You can use a rolling caster wheel base or build a simple slider with nylon pads. Add padding to the seat for comfort during longer workouts. Make sure the seat moves easily without getting stuck.
Step 5: Add the Handle
Attach a sturdy handle to the end of the chain or belt. A bicycle handlebar grip works great. The handle should be comfortable to hold and easy to grip with both hands. Make sure it is securely attached so it does not slip during your strokes.
Step 6: Install Foot Straps or Footrests
You need something to keep your feet in place while rowing. Simple footrests with adjustable straps work well. Attach them near the front of the machine. Make sure they are sturdy enough to support your body weight during powerful leg drives.
Step 7: Test and Adjust
Once everything is assembled, do a few test strokes. Check for any loose parts, unusual noises, or rough movement. Tighten bolts as needed. Adjust the resistance to a comfortable level. It is much better to find and fix problems now than during an intense workout.
If you want a more detailed walkthrough of the assembly process, you can refer to a step-by-step guide on using a rowing machine for additional tips on form and setup.
Adding Resistance to Your Homemade Rower
Resistance is what makes your rowing machine challenging and effective. Without it, you are just sliding back and forth with no real workout. Choosing the right resistance type is one of the most important decisions you will make during the build.
Air Resistance
Air resistance is the most common type in commercial rowers. It works by spinning a fan blade as you pull. The faster you row, the more air resistance you feel. To build an air resistance system, attach a bicycle wheel or a custom fan blade to the flywheel. As the wheel spins, it pushes against the air and creates drag.
Magnetic Resistance
Magnetic resistance uses magnets positioned near a metal flywheel. The closer the magnets get, the stronger the resistance. This type is very quiet and smooth. It is a great choice if you plan to row early in the morning or late at night without disturbing others.
Friction Resistance
Friction resistance is the simplest to build. It uses a brake pad or a piece of felt pressed against a spinning wheel. You can adjust the pressure to increase or decrease resistance. This method is affordable and easy to set up, making it perfect for beginners.
Water Resistance
Water resistance gives the most authentic rowing feel. A paddled wheel spins inside a water tank, and the water creates the drag. Building a water rower is more complex and requires a watertight container. However, the smooth, quiet feel of water resistance is hard to beat.
| Resistance Type | Cost | Noise Level | Build Difficulty | Realism |
|---|---|---|---|---|
| Air | Low to Medium | Moderate | Medium | High |
| Magnetic | Medium | Very Low | Medium | Medium |
| Friction | Very Low | Low | Easy | Low |
| Water | Medium to High | Very Low | Hard | Very High |
Safety Tips and Common Mistakes
Building a rowing machine is a rewarding project, but safety should always come first. A poorly built machine can cause injuries or break during use. Here are some important tips to keep in mind.
Always Check Your Connections
Before every workout, give your machine a quick visual inspection. Look for loose bolts, worn chains, or cracks in the frame. Tighten anything that has loosened over time. A properly maintained rowing machine lasts much longer and stays safe to use.
Do Not Overload the Frame
Make sure your frame can support your body weight plus the force of your strokes. Use thick, sturdy materials and reinforce joints where needed. If the frame flexes or bends during use, add additional support brackets.
Use Proper Form
Even the best-built machine will not help if you use bad form. Keep your back straight, drive with your legs first, and pull the handle to your lower chest. Avoid rounding your shoulders or jerking the handle. Proper form prevents injuries and gets you better results.
Common Mistakes to Avoid
- Using weak materials: Do not skimp on the frame or rail. Weak materials bend and break under pressure.
- Skipping the base: A stable base prevents the machine from sliding during intense workouts.
- Ignoring lubrication: Keep the rail and chain lubricated for smooth movement and longer life.
- Rushing the build: Take your time. A rushed assembly leads to mistakes and safety issues.
- Forgetting foot restraints: Without secure foot straps, your feet can slip during powerful strokes.
How to Use Your Homemade Rowing Machine
Once your machine is built, it is time to start rowing. But knowing how to use it correctly makes a huge difference in the quality of your workout. Here are some quick tips to get started.
Start with a warm-up. Row at a slow, easy pace for about 5 minutes. This gets your joints warmed up and your muscles ready. After the warm-up, increase your pace gradually. Focus on smooth, controlled strokes rather than fast, jerky movements.
Keep your strokes consistent. A steady rhythm helps you maintain good form and get the most out of each rep. If you are new to rowing, aim for 20 to 30 minutes of continuous rowing. As you build fitness, you can increase the duration or add intervals of higher intensity.
If you are wondering how long you should spend on your new rower, a good starting point is 15 to 20 minutes per session, three to four times per week. You can learn more about how long you should row based on your fitness goals and experience level.
Track your progress over time. Note your distance, stroke rate, and how you feel after each session. This helps you see improvements and stay motivated. You can also mix in other exercises to complement your rowing workouts. For example, adding strength training on non-rowing days builds the muscle groups you use during each stroke.
Remember that consistency is key. The more you use your homemade rowing machine, the better your results will be. Even short sessions add up over time. The beauty of having a rower at home is that you can fit a workout into your schedule whenever it is convenient.
Building a rowing machine at home is a project that pays off in many ways. You get a custom-built machine, a great workout, and the satisfaction of creating something with your own hands. Whether you are looking to build muscle, lose weight, or simply stay active, your DIY rower is ready to help you reach your goals.
For those interested in using their homemade rower for specific fitness goals, check out our guide on using a rowing machine to build muscle for targeted workout strategies and tips.
Maintenance and Long-Term Care
Your homemade rowing machine will last longer with regular care. Simple maintenance habits keep everything running smoothly and prevent costly repairs.
- Lubricate the rail: Apply a light lubricant to the sliding rail after every few workouts. This keeps the seat gliding smoothly and prevents wear.
- Check the chain or belt: Inspect the drive chain or belt regularly for signs of stretching or wear. Replace it if it looks frayed or loose.
- Tighten bolts: Vibration from rowing can loosen bolts over time. Do a quick tightening check once a week.
- Clean the machine: Wipe down the frame and rail after each session. Sweat and dust can cause corrosion if left unchecked.
- Store indoors: If possible, keep your rower indoors. Exposure to moisture and direct sunlight can damage the materials over time.
Taking care of your DIY rowing machine ensures it stays safe and effective for years. A well-maintained rower performs just as well as a brand-new commercial machine.
Final Thoughts on Building Your Own Rower
Building a homemade rowing machine is one of the most rewarding DIY fitness projects you can take on. It combines practical skills, creative problem-solving, and the reward of a working exercise machine that you built with your own hands. The process might seem intimidating at first, but breaking it down into manageable steps makes it totally achievable.
You do not need to be a professional builder or a fitness expert. With the right materials, some basic tools, and a willingness to learn, anyone can build a functional rowing machine at home. Start simple, focus on safety, and refine your build as you go. The beauty of a DIY project is that you can always improve and customize it over time.
Once your rower is built and ready, you will have a powerful tool for staying fit. Rowing works your entire body, burns calories efficiently, and builds endurance. It is one of the best investments you can make for your long-term health. And knowing that you built it yourself makes every stroke feel even more rewarding.
So gather your materials, roll up your sleeves, and start building. Your homemade rowing machine is waiting to help you reach your fitness goals. The journey from a pile of parts to a fully functional rower is one you will remember and be proud of.
Frequently Asked Questions
Can I really build a rowing machine at home?
Yes, absolutely. Building a homemade rowing machine is a very doable DIY project. You do not need advanced skills or expensive tools. With basic materials from a hardware store and some patience, you can have a working rower in one or two weekends.
How much does it cost to build a DIY rowing machine?
The cost varies depending on the materials you choose, but most people spend between $50 and $150. Using recycled or repurposed parts can bring the cost even lower. Compared to a commercial rower that costs $500 or more, the savings are significant.
What is the best resistance type for a homemade rower?
Air resistance is the most popular choice because it closely mimics the feel of a real rowing machine. However, friction resistance is the easiest to build and is perfect for beginners. Choose based on your budget, skill level, and how realistic you want the feel to be.
Is a homemade rowing machine safe to use?
Yes, as long as you build it correctly and check it regularly. Make sure all connections are tight, the frame is stable, and the rail is smooth. Following the safety tips in this guide will keep your machine safe for every workout session.
How long does it take to build a homemade rowing machine?
Most people complete the build in one to two weekends. If you are new to DIY projects, it might take a bit longer. The key is to take your time and not rush the assembly. A well-built machine is worth the extra effort.
Can I adjust the resistance on my homemade rower?
Yes. Most homemade rowing machines allow you to adjust resistance. For air resistance, you can change the size or angle of the fan blade. For friction resistance, you simply adjust how hard the brake pad presses against the wheel. This lets you customize your workout intensity.