How to Know What Size Jump Rope You Need
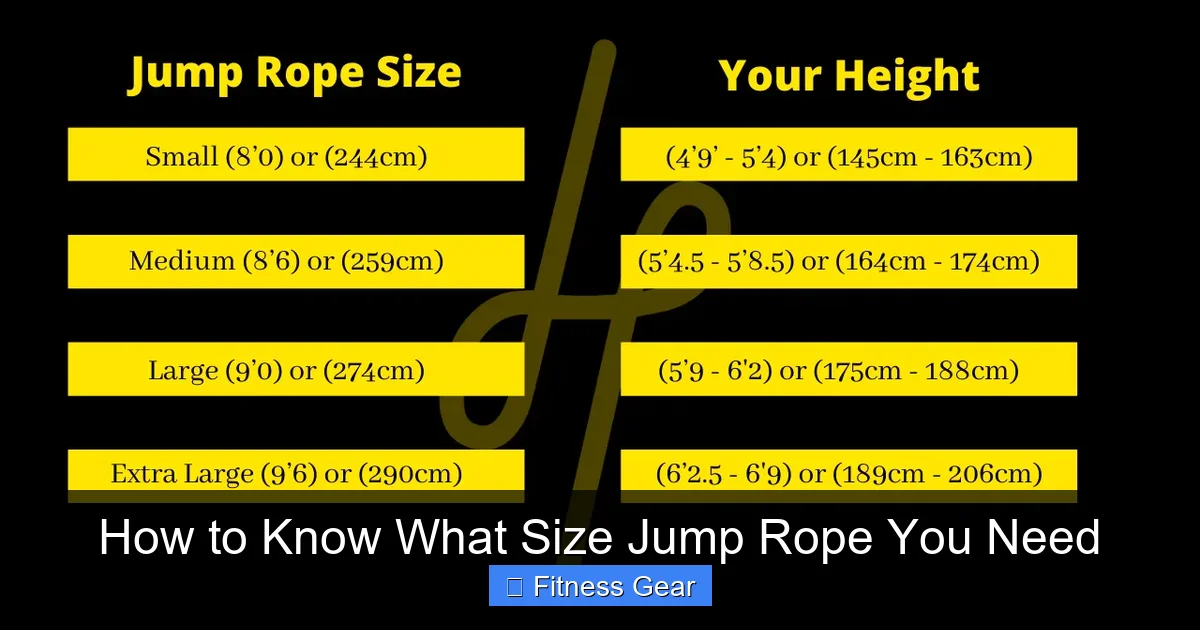
Choosing the right jump rope length is the secret to smoother swings, better timing, and fewer tripping mishaps. This guide walks you through quick measurements, height‑based formulas, and personal tweaks so you can pick a rope that feels natural from the first jump.
Key Takeaways
- Measure your height first: Your standing height gives the baseline rope length for most users.
- Use the “handle‑to‑ground” test: When you stand on the rope, the handles should reach roughly your armpits.
- Adjust for skill level: Beginners need a slightly longer rope; advanced athletes can go shorter for speed.
- Consider rope type: Weighted, speed, and beaded ropes each have unique length tolerances.
- Account for footwear: Shoes add 1‑2 inches; jump barefoot means a shorter rope.
- Trim or add length safely: Most quality ropes let you cut excess or add extensions without losing performance.
- Re‑measure after wear: Stretching over time may require a small length adjustment.
📑 Table of Contents
- Introduction: Why Rope Length Matters More Than You Think
- 1. The Basics: Height as Your Starting Point
- 2. Adjusting for Skill Level and Workout Type
- 3. Rope Material Matters: Does the Type Change the Size?
- 4. Real‑World Testing: The “Handle‑to‑Ground” Method
- 5. Fine‑Tuning: Footwear, Surface, and Personal Preference
- 6. Maintaining the Right Length Over Time
- Conclusion: Your Perfect Rope Awaits
Introduction: Why Rope Length Matters More Than You Think
When you first pick up a jump rope, the excitement is real. You picture yourself mastering double‑unders, torch‑burning cardio, or just having fun with a friend. But the moment you start swinging, the rope catches your feet, you feel cramped, or you have to constantly readjust. All of those frustrations usually point to one simple issue: the rope is the wrong size.
Just like a shoe that’s too big or too small, a jump rope that’s the wrong length throws off your rhythm, wastes energy, and can even lead to injury. The good news? Figuring out the perfect length is quick, inexpensive, and can be done with tools you already have at home.
In this article we’ll answer the question How to Know What Size Jump Rope You Need from every angle—height, skill level, rope material, and personal preferences. By the end, you’ll be able to measure, adjust, and choose a rope that feels like an extension of your body.
1. The Basics: Height as Your Starting Point
Why height works as a reliable baseline
Most manufacturers base rope length on the user’s standing height because the distance from the floor to the armpit (or just below the chin) is a natural swing arc. When the rope’s handles reach that spot while you stand on the rope, the rope will have enough slack for a full rotation without hitting the ground.

Visual guide about How to Know What Size Jump Rope You Need
Image source: i.pinimg.com
Step‑by‑step height measurement
- Stand barefoot on a flat surface.
- Ask a friend to hold the rope vertically behind you, with the rope’s midpoint under the ball of your foot.
- Pull the handles up along the sides of your body.
- Note where the handles stop: ideally they should be at the level of your armpits (or just below your chin for speed ropes).
If you don’t have a partner, you can use a wall: place the rope’s midpoint against the wall, step on it, and pull the handles up the wall.
Height‑to‑rope conversion chart
- 4’6″ – 5’0″ (137‑152 cm): 7‑8 ft rope
- 5’0″ – 5’6″ (152‑168 cm): 8‑9 ft rope
- 5’6″ – 6’0″ (168‑183 cm): 9‑10 ft rope
- 6’0″ – 6’4″ (183‑193 cm): 10‑11 ft rope
- 6’4″ + (193 cm+): 11‑12 ft rope
These ranges are a solid starting point, but they’re not the final word. Your next steps will fine‑tune the length for your specific workout style.
2. Adjusting for Skill Level and Workout Type
Beginners need a little extra room
If you’re just learning the basic two‑foot hop, a longer rope gives you a forgiving margin of error. Aim for the top of the armpit range in the chart above. The extra slack means you won’t constantly hit the rope on your feet while you’re still mastering timing.

Visual guide about How to Know What Size Jump Rope You Need
Image source: duracordix.com
Advanced athletes and speed work
Speed athletes and those who practice double‑unders benefit from a shorter rope. When the rope is slightly tighter, it rotates faster with less effort, letting you achieve higher RPMs. For these users, trim the rope so the handles sit just below the chin or even at the sternum.
Specific training goals
- Cardio endurance: 8‑10 ft rope, moderate length, comfortable swing.
- Cross‑training (HIIT, boxing): 9‑10 ft rope, balanced for speed and power.
- Trick jumping (cross‑overs, side swings): Slightly longer (10‑11 ft) for extra clearance.
3. Rope Material Matters: Does the Type Change the Size?
Speed ropes (PVC or beaded)
These ropes are thin and lightweight. Because they have less mass, they tend to sit lower when you stand on them. Many speed‑rope users prefer the “chin level” rule: handles should reach the chin when you stand on the rope.

Visual guide about How to Know What Size Jump Rope You Need
Image source: m.media-amazon.com
Weighted ropes (steel cable, rope with weighted handles)
Weighted ropes are heavier and naturally sag more. For them, the “armpit level” rule still applies, but add an extra foot to the chart length if you feel the rope is too tight.
Beaded ropes (plastic beads)
Beaded ropes are bulkier and create more drag. They work best a few inches longer than a PVC rope of the same height. Use the armpit rule, then add 2‑3 inches for comfort.
4. Real‑World Testing: The “Handle‑to‑Ground” Method
How to perform the test at home
- Place the rope on the floor and stand in the middle.
- Pull the handles straight up along your sides.
- Observe where the handles stop:
- Armpit height → perfect for beginners or weighted ropes.
- Chest height → good for intermediate skill.
- Chin height → ideal for speed work.
What to do if the rope is too long or short
If the handles are below the armpits, trim the rope. Most quality ropes have a zip‑tied loop at the end; cut the excess, then re‑tie or use a heat‑shrink sleeve. If the rope is too short, purchase an extension cord (usually sold separately) or buy a longer rope model.
5. Fine‑Tuning: Footwear, Surface, and Personal Preference
Footwear adds height
Running shoes can add 1‑2 inches to your effective height. If you always jump in thick trainers, add that amount to your measured rope length. Conversely, if you jump barefoot or in minimalist shoes, you can go a bit shorter.
Surface type influences rope swing
Hard surfaces (gym floors, wood) give a clean bounce, allowing a slightly shorter rope. Soft surfaces (grass, carpet) absorb some energy, so a few extra inches help maintain a smooth arc.
Personal comfort and style
Some athletes love a “tight” feel; others enjoy a relaxed swing. After you’ve found the height‑based length, do a 30‑second trial jump. If you feel cramped, add 2‑4 inches; if you feel like you’re flailing, shave a little off.
6. Maintaining the Right Length Over Time
Why rope length changes
All ropes stretch a bit with use, especially PVC and speed ropes. Weighted ropes can lose tension in the cable. Temperature changes also affect material elasticity.
Regular check‑ups
- Every 4‑6 weeks, repeat the “handle‑to‑ground” test.
- If the rope feels looser, tighten the cable (many have a screw‑adjustable knob).
- If it’s too tight, trim a small segment and re‑test.
Storing your rope properly
Keep the rope coiled loosely in a dry place. Avoid hanging it by the handles for long periods, as that can stretch the cable unevenly.
Conclusion: Your Perfect Rope Awaits
Finding the right rope length isn’t a mystery—it’s a simple series of measurements, adjustments, and personal tweaks. Start with your height, apply the armpit or chin rule, consider your skill level and rope type, and then test it out with the handle‑to‑ground method. Remember to factor in shoes, surface, and how you feel during a short trial. Finally, keep an eye on wear and re‑measure every few weeks.
When you finally land on a rope that feels just right, you’ll notice smoother swings, better timing, and more confidence to try advanced moves. So grab a rope, measure, adjust, and get ready to jump into your best workout yet.
Frequently Asked Questions
How do I know if my jump rope is too long?
If the handles reach below your armpits when you stand on the rope, it’s likely too long. You may experience excess slack and frequent tripping.
Can I use the same rope length for both speed work and cardio?
Yes, but you may need a compromise length. Many athletes keep a slightly longer rope for cardio and a shorter, trimmed rope dedicated to speed training.
Is it okay to cut a jump rope myself?
Absolutely—most PVC and beaded ropes are designed to be trimmed. Cut a small amount, then re‑tie the ends or use the built‑in zip‑tie loops.
What if I can’t find a rope that matches my exact height?
Choose the next size up and adjust by trimming a few inches. It’s easier to shorten a rope than to add length.
Do weighted ropes require a different length than regular ropes?
Weighted ropes tend to sag more, so you might add an extra inch or two to the standard height‑based length for comfort.
How often should I re‑measure my jump rope?
Every 4‑6 weeks, or whenever you notice a change in feel, re‑check the handle height to ensure optimal performance.