How to Do the Rowing Machine at the Gym

Want a full‑body workout that burns calories fast? Here’s a friendly guide on how to do the rowing machine at the gym, from proper setup to effective intervals. Follow these simple steps, avoid common mistakes, and watch your strength and stamina improve in weeks.
Key Takeaways
- Perfect posture matters: Keep a neutral spine, engage core, and avoid hunching.
- Master the stroke sequence: Catch, drive, finish, and recovery—repeat smoothly.
- Adjust resistance wisely: Start light, then increase gradually as strength builds.
- Use interval training: Short bursts of high intensity boost calorie burn.
- Track metrics: Monitor split time, distance, and strokes per minute for progress.
- Warm‑up & cool‑down: A 5‑minute easy row before and after prevents injury.
- Consistency wins: Row 2‑3 times a week and pair with strength work for balanced fitness.
📑 Table of Contents
Introduction: Why the Rowing Machine Is a Gym Gem
When you walk into a gym, the rowing machine often sits in the corner, looking a bit like a piece of fancy equipment you’d see on a TV commercial. In reality, it’s one of the most efficient tools for a total‑body workout. It works your legs, back, arms, and core all at once, while giving you a low‑impact cardio session that’s easy on the joints.
If you’ve ever wondered how to do the rowing machine at the gym without looking like a beginner, you’re in the right place. This guide breaks everything down into bite‑size steps, real‑world tips, and sample workouts you can start today. Think of it as a conversation with a friend who’s already mastered the row and wants to help you get there.
1. Getting Started: Setting Up the Machine
1.1 Choose the Right Seat Position
Slide the seat forward until your shins are almost vertical when your knees are bent at the catch (the beginning of the stroke). Your feet should rest flat on the foot‑rests with the straps snug but not too tight. When you press the handle toward your chest, the seat should slide smoothly without hitting the rail.

Visual guide about How to Do the Rowing Machine at the Gym
Image source: 1.bp.blogspot.com
1.2 Adjust the Foot‑Straps
Place the strap over the ball of your foot, then tighten it so you can still wiggle your toes. This keeps your feet stable during the powerful drive phase and prevents slipping.
1.3 Set the Resistance
Most gyms have either a damper (air rowers) or a magnetic resistance knob. Begin with a setting of 3–4 on a scale of 1‑10. This feels light enough to let you focus on form, yet heavy enough to give a real workout. As you get stronger, increase the resistance in small increments.
1.4 Test the Monitor
Make sure the display shows your name (if you have a membership login), distance, time, split (pace per 500 m), and strokes per minute (SPM). If any of these don’t work, ask a gym staff member for help before you start.
2. Mastering the Rowing Stroke
2.1 The Four Phases Explained
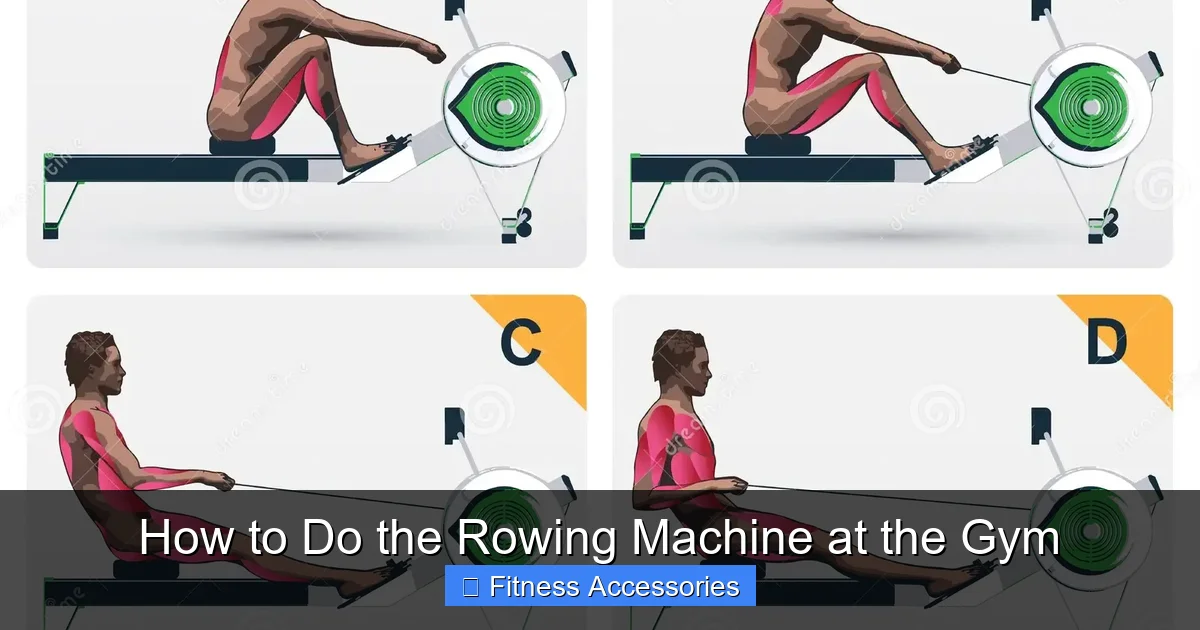
The rowing stroke is a smooth, repeating cycle with four distinct parts:
Visual guide about How to Do the Rowing Machine at the Gym
Image source: thumbs.dreamstime.com
- Catch: Knees bent, shins vertical, torso leaning slightly forward, arms fully extended, handle near the floor.
- Drive: Push through the heels, straighten legs, lean back slightly, then pull the handle to your chest.
- Finish: Legs straight, torso slightly leaned back, elbows drawn past the ribs, handle at the lower ribs.
- Recovery: Extend arms, hinge at the hips forward, then bend knees to slide back to the catch.
2.2 Step‑by‑Step Breakdown
Catch: Sit tall, engage your core, and keep your shoulders relaxed. Your grip should be light—think “hold a bird, don’t crush it.”
Drive: Start the motion with your legs. Imagine you’re pushing a wall away with your feet. As your legs straighten, lean back from the hips (not the lower back) and finally pull the handle to your lower ribs. The power comes mostly from the legs; the arms are just the finish.
Finish: Your legs are now straight, torso slightly leaned back, and the handle close to your body. Keep your shoulders down and relaxed.
Recovery: Reverse the order—extend your arms first, hinge forward from the hips, then bend the knees to slide the seat forward. This sets you up for the next catch.
2.3 Common Form Mistakes (And How to Fix Them)
- Hunching the back: Keep a neutral spine. Imagine a string pulling the top of your head toward the ceiling.
- Using the arms too early: Start the drive with your legs; only add the pull once the legs are nearly straight.
- Rushing the recovery: The recovery should be slower than the drive—about twice as long. This maintains rhythm and reduces fatigue.
- Foot strap too tight: If you feel pressure on the top of your foot, loosen the strap slightly.
3. Building Your First Rowing Workout
3.1 The Beginner 20‑Minute Session
Use this simple routine to get comfortable with the machine while burning calories.
- Warm‑up: 5 minutes easy rowing (light resistance, 18‑20 SPM).
- Main set: 4 × 3‑minute intervals. Row hard for 3 minutes (22‑24 SPM), then rest 1 minute easy.
- Cool‑down: 5 minutes relaxed rowing, focusing on smooth recovery.
Track your total distance and split time. Aim to improve by a small margin each session.
3.2 Adding Variety: Pyramid Intervals
If you want a challenge, try a pyramid:
- 1 minute hard, 1 minute easy
- 2 minutes hard, 1 minute easy
- 3 minutes hard, 1 minute easy
- 2 minutes hard, 1 minute easy
- 1 minute hard, finish with 3 minutes easy
This pattern trains both speed and endurance while keeping the workout interesting.
3.3 Incorporating Strength Work
Rowing pairs nicely with bodyweight moves. After your rowing session, perform a quick circuit:
- 10 push‑ups
- 15 bodyweight squats
- 20 seconds plank
- Repeat 3 times
The core work you do after rowing reinforces the stability you need for a strong stroke.
4. Tracking Progress and Setting Goals
4.1 Key Metrics to Watch
- Split time (500 m): Lower split = faster pace.
- Strokes per minute (SPM): 22‑30 SPM is typical for most workouts.
- Total distance: Aim for a gradual increase each week.
- Calories burned: Helpful for weight‑loss tracking, but focus on form first.
4.2 Using a Training Log
Write down the date, workout type, resistance level, total meters, split, and how you felt. Over time you’ll see patterns—maybe you row faster on days you’ve slept well, or you need more rest after a heavy leg day.
4.3 Goal‑Setting Examples
Beginner: Row 2,000 m in 10 minutes within 4 weeks.
Intermediate: Reduce 500 m split from 2:20 to 2:00 in 8 weeks.
Advanced: Complete a 5,000 m row under 20 minutes while maintaining 24 SPM.
5. Safety, Maintenance, and Common Questions
5.1 Warm‑Up & Cool‑Down Essentials
A proper warm‑up raises heart rate and lubricates joints. Spend at least 5 minutes at a light resistance, focusing on smooth recovery. Cool‑down is just as important—slow your pace, stretch the hamstrings, hip flexors, and shoulders.
5.2 Preventing Overuse Injuries
Because rowing uses many muscle groups, it’s easy to overdo it. Follow the 10‑percent rule: increase distance or intensity by no more than 10 % each week. Listen to your body; sharp lower‑back pain is a sign to stop and reassess form.
5.3 Machine Maintenance Tips
- Wipe down the seat and handles after each use.
- Check the foot‑straps for wear.
- If the flywheel makes unusual noises, notify gym staff.
5.4 When to Switch to Other Cardio
Rowing is fantastic, but variety prevents boredom. Alternate with treadmill, elliptical, or bike 1‑2 times a week to keep muscles guessing and reduce repetitive strain.
Conclusion: Row Your Way to Better Fitness
Learning how to do the rowing machine at the gym doesn’t have to be intimidating. Start with the right setup, master the four‑phase stroke, and follow a simple workout plan. Track your progress, stay consistent, and you’ll notice stronger legs, a tighter core, and a healthier heart—all while burning calories efficiently.
Remember, the key is quality over quantity. Perfect your form first, then gradually increase resistance and interval length. In a few weeks, you’ll look back and see how far you’ve come, and you’ll probably be the person who confidently shows newcomers the best way to row.
Frequently Asked Questions
What should my seat position be for a proper rowing stroke?
Slide the seat forward until your shins are nearly vertical at the catch, and keep the seat moving smoothly without hitting the rail.
How many strokes per minute (SPM) are ideal for a beginner?
Aim for 18‑22 SPM during warm‑up and 22‑24 SPM during the main workout. This pace lets you focus on technique without over‑exerting.
Can I lose weight by rowing only?
Yes, rowing burns 400‑600 calories per hour depending on intensity. Pair it with a balanced diet and occasional strength training for optimal weight loss.
Is rowing hard on the lower back?
When you keep a neutral spine and drive with your legs first, rowing is low‑impact on the back. If you feel pain, reduce resistance and re‑check your form.
How often should I row each week?
Two to three sessions of 20‑30 minutes each is a solid start. As you progress, add a fourth day or incorporate longer endurance rows.
Do I need to wear special shoes on the rowing machine?
Flat, snug shoes with a good grip work best. Avoid running shoes with thick, cushioned soles, as they can reduce power transfer.