How Much Air Pressure in Mountain Bike Tires
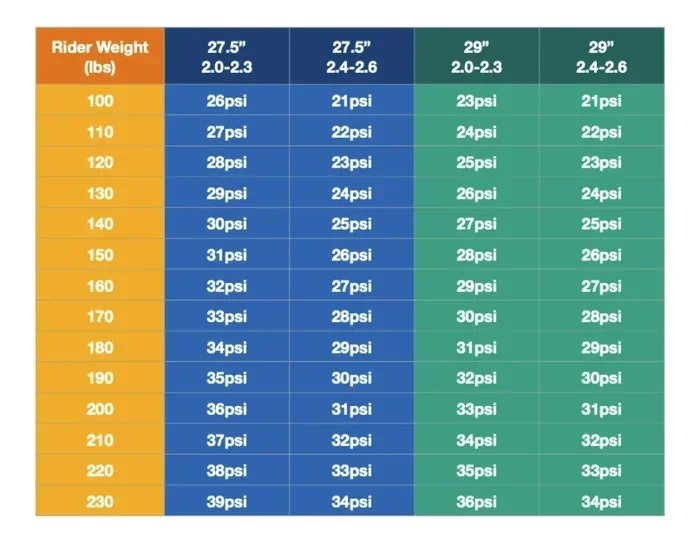
Getting the right air pressure in mountain bike tires is one of the simplest ways to boost your ride quality, traction, and speed. Most mountain bike tires perform best between 22 and 35 PSI, but your ideal pressure depends on tire width, rider weight, trail conditions, and personal preference. This guide breaks down everything you need to know so you can dial in your setup with confidence.
There is a sweet spot for air pressure in mountain bike tires, and finding it can transform your entire riding experience. Too much air, and your tires bounce off the trail like a basketball. Too little, and you risk pinch flats, sluggish handling, and wasted energy.
The good news is that dialing in your tire pressure is not rocket science. With a little knowledge and some trial and error, you can find the perfect PSI for mountain bike tires that matches your weight, your bike, and the trails you ride most. Let us walk through everything you need to know.
Key Takeaways
- Ideal PSI Range: Most mountain bike tires work best between 22 and 35 PSI, depending on several factors.
- Tire Width Matters: Wider tires need less air pressure for better grip and comfort.
- Rider Weight Plays a Role: Heavier riders generally need higher tire pressure to avoid pinch flats.
- Trail Conditions Change Everything: Wet, loose, or technical trails call for lower pressure.
- Check Pressure Before Every Ride: Tires lose air over time, so regular checks keep your ride consistent.
- Use a Digital Gauge: A quality tire gauge gives you accurate readings every time.
- Experiment Freely: Small adjustments in PSI can dramatically change how your bike feels on the trail.
📑 Table of Contents
Why Tire Pressure Matters So Much
Your mountain bike tire pressure directly affects how the tire interacts with the ground. It shapes your grip, comfort, speed, and even how well your suspension works. Getting this right is one of the easiest performance upgrades you can make.
Grip and Traction
When your tires have the right amount of air, the rubber hugs the trail surface. This gives you maximum tire grip on rocks, roots, and loose dirt. Underinflated tires squirm and feel vague. Overinflated tires skip across rough surfaces and lose contact.
Think of it this way. A tire with proper PSI for mountain bike tires acts like a suction cup. It conforms to the terrain and holds on. Too much air and it skates right over obstacles.
Rolling Resistance and Speed
Rolling resistance is the friction between your tire and the ground. Lower pressure generally reduces rolling resistance because the tire absorbs bumps instead of bouncing over them. This means less effort and more speed with the same energy output.
However, there is a limit. Too little air creates what is called tire squirm. The tire deforms too much and actually slows you down. Finding the balance is the key to fast, efficient riding.
Comfort and Impact Protection
Lower air pressure in mountain bike tires acts as a natural suspension system. The tire absorbs small bumps and roots that would otherwise rattle your body. This is especially important on long rides where fatigue sets in fast.
Many riders run slightly lower pressure in the rear tire because it carries more of your weight. This simple adjustment can make a surprisingly big difference in comfort over rough terrain.
Recommended PSI Ranges by Tire Width
Tire width is one of the biggest factors that determines your ideal pressure. Wider tires need less air because they have a larger air volume. Here is a general breakdown to get you started.
Narrow Trail Tires (2.0 to 2.2 Inches)
These tires are common on cross-country bikes and lighter trail rigs. They typically perform best between 28 and 35 PSI. The smaller air volume needs more pressure to support your weight and prevent bottoming out.
If you are a lighter rider, start at the lower end of that range. Heavier riders should aim closer to 35 PSI and adjust from there.
Mid-Width Trail Tires (2.3 to 2.4 Inches)
This is the most popular tire width for all-mountain and trail riding. The sweet spot usually falls between 24 and 32 PSI. These tires offer a great balance of grip, comfort, and speed.
Many riders find that 28 PSI is a solid starting point for this width. From there, you can experiment with small adjustments of 1 to 2 PSI to fine-tune the feel.
Wide Trail and Downhill Tires (2.5 Inches and Above)
Wider tires are all about traction and comfort. They work great at 20 to 28 PSI. The large air volume lets you run low pressure without the risk of pinch flats.
Downhill and enduro riders often run the lowest pressures. This gives them maximum grip on steep, technical terrain. Just make sure your tire sidewall can handle the pressure range you choose.
Factors That Change Your Ideal Pressure
There is no single magic number for every rider. Several factors shift your ideal PSI for mountain bike tires. Understanding these helps you make smarter decisions on the trail.
Rider Weight
Heavier riders need more air to support their weight and avoid bottoming out. A 200-pound rider will need noticeably higher pressure than a 130-pound rider on the same tire.
A simple trick is to add or subtract 1 PSI for every 10 pounds of body weight above or below 170 pounds. This gives you a solid baseline to start from.
Trail Conditions
Wet and muddy trails demand lower pressure for better grip. Loose, sandy trails also benefit from slightly lower PSI because the tire can conform and float over the surface.
Hard-packed, dry trails can handle higher pressure. The tire bites into the surface better when there is less give. Always consider what the trail looks like before you adjust your tire pressure.
Tire Type: Tubeless vs. Tubed
Tubeless tires allow you to run lower pressures safely because there is no inner tube to pinch. This is one of the biggest advantages of going tubeless on a mountain bike.
With tubed setups, you need slightly higher pressure to prevent pinch flats. If you are running tubes, add 2 to 3 PSI to your usual pressure as a safety margin.
Want to learn more about setting up tubeless tires? Check out our guide on how to put air in tubeless mountain bike tires for a step-by-step walkthrough.
Rear Shock Setup
Your rear air suspension and tire pressure work together. The tire handles small bumps while the shock absorbs larger impacts. If your shock is set too firm, you might want to lower your tire pressure slightly to compensate.
For more on tuning your rear suspension, see our article on how to adjust rear air suspension on a mountain bike.
How to Measure and Adjust Tire Pressure
Knowing your target PSI is only half the battle. You also need to measure and adjust correctly. A digital tire gauge is the best tool for this job. Floor pumps with built-in gauges are convenient and accurate.
Step-by-Step: Checking Your Pressure
- Remove the valve cap from your tire.
- Press the gauge firmly onto the valve stem.
- Read the PSI number on the gauge.
- Compare it to your target pressure.
- Add or release air as needed.
- Replace the valve cap to keep dirt out.
Using an Air Compressor
If you have access to an air compressor, inflating your tires is fast and easy. Just be careful not to overinflate. Compressors can add pressure quickly, so check frequently.
For a detailed guide on using one safely, read our article on how to inflate mountain bike tires with an air compressor.
Using a Hand Pump
A good hand pump works just as well if you take your time. Floor pumps are the most efficient option. They deliver more air per stroke and usually have accurate gauges built in.
If you ride without a pump, a mini pump or a CO2 inflator is a great backup. These are compact enough to carry on rides and handle emergency situations.
Common Mistakes With Tire Pressure
Even experienced riders make mistakes with their mountain bike tire pressure. Here are the most common errors and how to avoid them.
Relying Only on the Sidewall Max PSI
The number printed on your tire sidewall is the maximum pressure, not the recommended pressure. Running at max PSI almost always feels harsh and reduces traction. Start well below that number and adjust from there.
Never Changing Pressure
Many riders set their pressure once and forget about it. But conditions change. Different trails, different weather, and even different tire wear all affect your ideal PSI. Make it a habit to check your tire pressure before every ride.
Ignoring Temperature Changes
Air pressure changes with temperature. Cold mornings can lower your PSI by 1 to 2 points. Hot afternoons can raise it slightly. If you ride in varying conditions, keep this in mind and adjust accordingly.
Using the Same Pressure for Front and Rear
Your rear tire carries more weight, so it often needs slightly more pressure. A common setup is 2 PSI higher in the rear than in the front. This small difference improves handling and prevents the rear tire from squirming under hard cornering.
Expert Tips for Finding Your Perfect Pressure
Here are some pro tips that help experienced riders fine-tune their air pressure in mountain bike tires with precision.
- Start in the middle: Pick a PSI in the middle of the recommended range for your tire width. Ride a few trails and note how it feels.
- Adjust by 1 PSI at a time: Small changes make a big difference. Do not jump by 5 PSI at once.
- Keep a log: Write down your PSI settings and the trail conditions. Over time, you will build a personal reference guide.
- Feel the trail: Your body is the best gauge. If the bike feels bouncy, add air. If it feels harsh or slides, let some out.
- Check for leaks: If you are losing air fast, inspect your valve stem and rim bed for leaks. Tubeless setups sometimes need sealant top-ups.
For more hands-on guidance, our article on how to put air in a mountain bike tire covers the basics in detail and helps you build confidence with your setup.
How Much Air Pressure in Mountain Bike Tires: Final Thoughts
Finding the right air pressure in mountain bike tires is one of the most impactful things you can do for your riding. It affects every single aspect of your experience, from grip and speed to comfort and safety.
Start with the recommended PSI range for your tire width. Adjust based on your weight, the trail conditions, and whether you run tubeless or tubed. Check your pressure regularly. And never be afraid to experiment.
The perfect pressure is not a fixed number. It changes with every ride, every trail, and every season. The more you pay attention, the better your bike will feel. So grab your tire gauge, head out to the trail, and start dialing in your setup today.
Remember, the difference between a frustrating ride and an incredible one can be as simple as a few PSI. Take the time to get it right. Your tires and your body will thank you on every singletrack.
Frequently Asked Questions
What is the best PSI for mountain bike tires?
Most mountain bike tires perform best between 22 and 35 PSI. The exact number depends on your tire width, rider weight, and trail conditions. Start in the middle of the recommended range for your tire and adjust from there.
Can I use a car tire pump to inflate my mountain bike tires?
Yes, you can, but it is not ideal. Car pumps often lack the precision needed for low PSI ranges. A dedicated bike floor pump with a built-in digital tire gauge gives you much better accuracy and faster results.
How often should I check my mountain bike tire pressure?
You should check your tire pressure before every ride. Tires lose air gradually, and even a small drop can change how your bike handles. A quick check takes seconds and keeps your ride consistent.
Should I run the same pressure in my front and rear tires?
No, your rear tire usually needs 1 to 3 PSI more than the front because it carries more weight. This small adjustment improves traction and stability, especially when cornering hard on technical trails.
Do tubeless tires need more or less air than tubed tires?
Tubeless tires need less air because they can safely run lower pressures without the risk of pinch flats. If you switch from tubes to tubeless, try reducing your PSI for mountain bike tires by 2 to 5 PSI and see how it feels.
What happens if my tire pressure is too low?
Underinflated tires can cause pinch flats, sluggish handling, and increased rolling resistance. The tire squirms on hard corners and feels vague over rough terrain. If you notice these symptoms, add a little air and test again.