How Do You Use a Rowing Machine Properly
Learning how to use a rowing machine properly is the fastest way to turn a confusing gym tool into your favorite full-body workout. This guide breaks down every step of the rowing stroke, from setup to recovery, so you can train safely and effectively. Whether you are a complete beginner or returning to the rower machine after a break, you will find clear tips, practical examples, and expert advice that actually work.
You walk up to the rowing machine at the gym. The seat slides back and forth. The handle feels smooth in your hands. But then you start rowing and something feels off. Your lower back aches. Your arms burn out too fast. You wonder if you are doing it right.
You are not alone. Thousands of people hop on a rower machine every day with little or no guidance on proper rowing form. The good news is that how to use a rowing machine properly is not complicated. Once you understand the basic movement and a few key principles, everything clicks into place.
This guide walks you through every part of the stroke. You will learn the correct setup, the four phases of each pull, common errors to avoid, and practical tips to get the most from every session. By the end, you will feel confident and ready to row with purpose.
Key Takeaways
- Proper form matters more than speed: A slow, controlled stroke with good technique builds more strength and burns more rowing machine calories than rushing through reps.
- Master the four phases of the rowing stroke: Catch, drive, finish, and recovery — each one targets different muscle groups and keeps your rowing machine workout balanced.
- Avoid the top 3 common mistakes: Rounding your back, pulling with your arms too early, and rushing the recovery can lead to injury and poor results.
- Start with the right settings: Adjusting rowing machine resistance and foot strap position makes a huge difference in comfort and effectiveness.
- Consistency beats intensity: A steady rowing machine routine of 3 to 4 sessions per week delivers better long-term results than occasional extreme sessions.
📑 Table of Contents
Why Proper Rowing Machine Technique Matters
Many people treat the rowing machine like a simple back-and-forth motion. But a rowing exercise is actually a coordinated sequence that involves about 86 percent of your muscles. When you use the right rowing machine technique, you get more benefit and far less risk of injury.
Here is why proper form makes such a big difference.
- It protects your lower back. The rowing machine back pain many people experience comes from rounding the spine during the stroke. Good form keeps your back straight and strong.
- It works the right muscles. A proper stroke engages your legs, core, and arms in the right order. This creates a balanced full body workout that builds real functional strength.
- It boosts efficiency. When every part of the stroke flows smoothly, you pull more power with less effort. You go farther and burn more rowing machine calories without working harder.
- It builds consistency. Good technique means you can row longer without fatigue taking over. That means better results over time.
Think of it this way. A painter who uses the right brush and the right motion creates a beautiful picture with ease. A painter who grips the brush wrong struggles and produces uneven work. The same idea applies to your rowing machine workout.
The Four Phases of the Rowing Stroke
Every proper stroke on a rower machine has four distinct phases. Learning to move smoothly through each one is the foundation of great rowing machine technique. Let us break them down.
1. The Catch
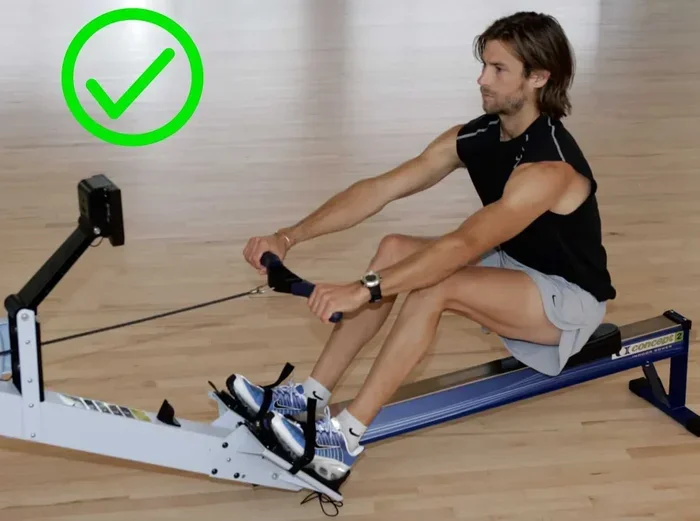
The catch is the starting position. You sit forward on the seat with your knees bent and your shins nearly vertical. Your arms are extended straight forward. Your shoulders are relaxed and slightly hunched forward. Your back stays tall and neutral — not rounded.
This is where the power begins. Your legs are loaded like a coiled spring, ready to push. Your core is engaged. Your grip on the rowing machine handle is firm but not tight.
2. The Drive
The drive is the power phase. It happens in a specific sequence:
- Push with your legs first. Straighten your legs and press through your feet. This generates about 60 percent of your power.
- Lean back slightly. Once your legs are mostly straight, lean your torso back from the hips to about 11 o’clock position.
- Pull with your arms last. Draw the rowing machine handle toward your lower chest. Keep your elbows close to your body.
The order matters a lot. If you pull with your arms too early, your back takes the strain. If you skip the leg push, you lose most of your power.
3. The Finish
At the finish, your legs are fully extended, your torso is leaning slightly back, and the handle is pulled into your lower chest. Your shoulders are down and back. Your core is braced. This is a strong, stable position — not a time to relax.
Hold this position for just a brief moment. Then begin the recovery.
4. The Recovery
The recovery is the return to the catch. It happens in the reverse order of the drive:
- Extend your arms forward. Push the handle away from your body.
- Lean your torso forward. Rotate from the hips back to the 1 o’clock position.
- Bend your knees. Slide the seat forward smoothly toward the footplate.
The recovery should feel slow and controlled. Many beginners rush through it. Resist that urge. A smooth recovery sets you up perfectly for the next powerful drive.
Setting Up Your Rowing Machine Correctly
Even perfect technique falls flat if your machine is not set up right. A few small adjustments make a huge impact on your indoor rowing experience.
Foot Strap Position
Adjust the foot straps so they cross the widest part of your foot — just above the ball of your foot. This gives you a solid base to push against during the drive. If the straps are too loose, your feet slip. If they are too tight, they cut off circulation.
Resistance Settings
Most rowing machines have a damper setting that controls how much air flows into the flywheel. A setting of 3 to 5 works well for most beginners. Higher settings feel heavier but do not necessarily mean a better workout. Focus on smooth, consistent strokes rather than max resistance.
Seat and Handle Check
Before you start rowing, make sure the seat slides freely and the handle moves without catching. A quick visual check takes five seconds and prevents frustration mid-workout.
Common Rowing Machine Mistakes to Avoid
Knowing what not to do is just as important as knowing the right way. Here are the most common mistakes people make on the rower machine.
Mistake 1: Rounding Your Back
Rounding the spine during the drive puts dangerous pressure on your lower back. Keep your chest lifted and your core engaged throughout the entire stroke. Think of a string pulling the crown of your head toward the ceiling.
Mistake 2: Pulling with Arms Too Early
Your arms should be the last thing that moves during the drive. If you yank the handle with your arms right away, your shoulders and back take all the stress. Remember the sequence: legs, then torso, then arms.
Mistake 3: Rushing the Recovery
The recovery should take about twice as long as the drive. A fast recovery means you are losing control and resetting poorly for the next stroke. Slow it down. Let the rhythm work for you.
Mistake 4: Using Only Your Arms
The rowing machine is not an arm workout. Your legs generate the majority of the power. If your arms are burning before your legs, you are using the wrong muscles. Focus on driving through your feet.
Tips to Improve Your Rowing Form Fast
You do not need months of practice to see improvement. A few focused adjustments can transform your rowing machine workout right away.
- Film yourself. Set your phone to record from the side. Watch your form and compare it to the four phases described above. You will spot issues instantly.
- Practice at low intensity first. Before chasing speed or high resistance, row at a comfortable pace for 10 minutes. Focus only on smooth, sequenced strokes.
- Use the 1:2 rhythm. For every one count of the drive, take two counts on the recovery. This natural tempo keeps your form controlled and your breathing steady.
- Engage your core. Think about bracing your stomach as if someone were about to poke you. This simple cue protects your back and connects your upper and lower body.
- Keep your grip relaxed. A death grip on the rowing machine handle wastes energy and tires your forearms too quickly. Hold it firmly but loosely.
If you want more detailed guidance for your first sessions, check out our how to properly use a rowing machine for beginners article for a step-by-step walkthrough.
Building a Rowing Machine Routine That Works
Knowing how to row correctly is only half the battle. The other half is putting it into a routine that delivers results. A solid rowing machine routine balances intensity, duration, and recovery.
Start with 20 to 30 minutes per session, 3 to 4 times per week. Warm up with 5 minutes of easy rowing. Then alternate between 2 minutes of steady rowing and 1 minute of harder effort. Cool down with 5 minutes of gentle strokes.
As you build confidence and strength, you can increase duration or add intervals. The key is to maintain proper rowing form at every intensity level. Speed means nothing if your technique falls apart.
For those who want to use the rower machine as part of a weight loss plan, this guide on using a rowing machine to lose weight offers targeted strategies and calorie-burning workouts.
Also, understanding which muscles you are actually working helps you stay motivated and track progress. Our article on what muscles you use on a rowing machine breaks down every muscle group involved in each phase of the stroke.
How to Know If You Are Rowing Correctly
Sometimes you need a quick self-check to confirm your rowing machine technique is on track. Here are three simple signs that you are rowing properly.
- Your lower back feels neutral, not strained. Any sharp or persistent pain in the lower back means your form needs adjustment.
- Your legs feel the most work. If your arms and shoulders are fatigued before your legs, you are sequencing the stroke incorrectly.
- Your stroke feels smooth and rhythmic. A fluid, connected motion means all the parts are working together. A jerky, disconnected motion means you need to slow down and refocus.
Recording a short video of yourself every couple of weeks is one of the best ways to track improvement. Compare clips over time and you will see your form get cleaner and more confident.
Conclusion
Learning how to use a rowing machine properly is one of the best investments you can make in your fitness journey. The rowing machine delivers an incredible full body workout, burns serious rowing machine calories, and builds real-world functional strength — but only when you use it the right way.
Start with the setup. Master the four phases of the stroke. Avoid the common mistakes. Build a routine you can stick with. And always remember that smooth, controlled movement beats speed every single time. Your back, your muscles, and your results will all thank you.
Now that you have the knowledge, it is time to hop on the rower machine and put it all into practice. Every great rower started exactly where you are right now — with the decision to do it properly.
Frequently Asked Questions
Is a rowing machine good for beginners?
Absolutely. The rowing machine is one of the most beginner-friendly pieces of gym equipment because it is low-impact and easy to learn. Start with short sessions at low resistance and focus on mastering your form before increasing intensity.
How long should a beginner row on a rowing machine?
Beginners should aim for 15 to 20 minutes per session, 3 times per week. Focus on maintaining proper rowing machine technique rather than going for distance or speed. As your endurance improves, you can gradually increase your session length.
Can I use a rowing machine every day?
Light rowing every day can be fine, but your muscles need recovery time to grow stronger. Most people benefit from rowing 3 to 5 days per week with at least one rest day between intense sessions.
Does rowing help with weight loss?
Yes. Rowing is a highly effective full body workout that burns a large number of calories in a short time. Combined with a balanced diet, regular indoor rowing sessions can support steady and sustainable weight loss.
Why does my lower back hurt when I row?
Lower back pain usually comes from rounding your spine or pulling with your back instead of your legs. Focus on keeping your back straight, engaging your core, and following the correct leg-torso-arm sequence during each stroke.
What is the right resistance level on a rowing machine?
A damper setting between 3 and 5 is ideal for most people. Higher resistance is not always better. The goal is to maintain smooth, consistent strokes with good form rather than fighting against heavy resistance.