How to Bake Crispy Chicken Wings with Perfect Crunch
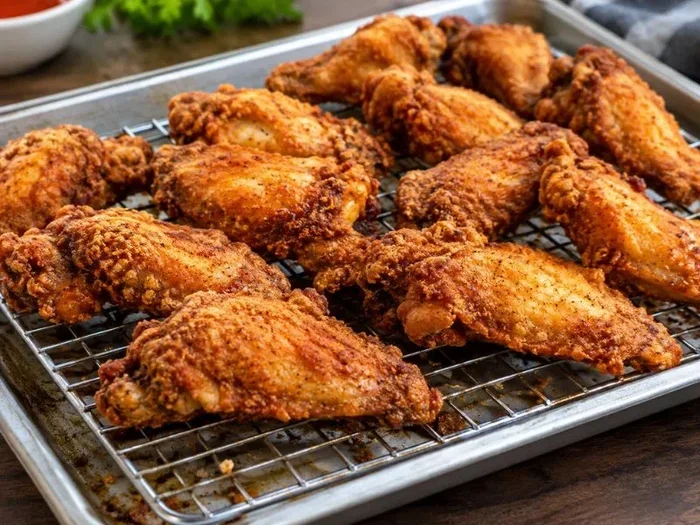
Baking crispy chicken wings at home is easier than you think. This guide walks you through every step — from choosing the right wings to nailing that golden, crunchy skin. You will learn the best techniques, seasonings, and timing to make perfect crispy chicken wings without a deep fryer.
Key Takeaways
- Pat your wings dry: Removing moisture is the single biggest secret to crispy skin.
- Use a wire rack: It lets hot air circulate evenly for a consistent crunch.
- Bake at high heat: A hot oven (425°F or higher) creates that golden crispy finish.
- Season generously: The right blend of spices transforms simple wings into flavor-packed treats.
- Rest before saucing: Let baked wings cool slightly before adding sauce for maximum crunch.
- Pair with exercise: Enjoy your wings guilt-free by staying active, like how to get rid of bat wings with dumbbells — a great way to balance indulgence with fitness.
📑 Table of Contents
- Why Baked Crispy Chicken Wings Are a Game-Changer
- Choosing the Right Chicken Wings
- The Secret to Perfectly Crispy Skin
- Best Seasonings and Flavor Combinations
- Step-by-Step Baking Instructions
- Common Mistakes That Ruin Crispy Wings
- Serving Suggestions and Pairings
- Storage and Reheating Tips
- Conclusion
Why Baked Crispy Chicken Wings Are a Game-Changer
There is something magical about biting into a perfectly baked crispy chicken wing. The crunch gives way to juicy, tender meat inside. It is comfort food at its finest.
Many people think you need a deep fryer to get that satisfying crunch. That is simply not true. A regular oven, a wire rack, and a little know-how are all you need. This method is healthier, easier, and just as delicious.
Whether you are cooking for a game day party or a quiet weeknight dinner, crispy chicken wings always hit the spot. They are crispy on the outside, juicy on the inside, and endlessly customizable with different flavors.
In this guide, we will cover everything you need to know. From picking the best wings to nailing the perfect bake time, you will find practical tips that work every single time. Let us get started.
Choosing the Right Chicken Wings
The foundation of great crispy chicken wings starts at the store. Not all wings are created equal, and choosing the right ones makes a big difference in your final result.
Fresh vs. Frozen Wings
Fresh wings tend to have better texture and moisture. However, frozen wings work perfectly fine if you thaw them properly. The key is to pat them completely dry before seasoning. Excess moisture is the enemy of crispy skin.
Whole Wings vs. Separated Pieces
Whole wings include the drumette, the flat, and the tip. Most recipes call for separating the tip and cooking only the drumette and flat. These two pieces have the best meat-to-surface ratio for even cooking and maximum crunch.
What to Look for at the Store
- Color: Look for wings with a pale pink hue. Avoid any that look gray or discolored.
- Smell: Fresh wings should have a mild, clean smell. Anything sour or strong means they are not fresh.
- Size: Choose wings that are roughly the same size so they cook evenly.
- Packaging: Check the sell-by date. Fresher is always better for crispy results.
The Secret to Perfectly Crispy Skin
Everyone wants that shatteringly crispy skin on their baked chicken wings. The secret lies in a few simple steps that most people skip. Let us break them down.
Step 1: Dry Your Wings Thoroughly
This is the most important step. Use paper towels and press firmly on every piece. Do this multiple times until the surface feels completely dry to the touch. The drier the skin, the crispier it gets.
For even better results, place your dried wings on a wire rack over a baking sheet and let them sit in the refrigerator uncovered for a few hours or overnight. This air-drying step removes even more surface moisture. It is a game-changer.
Step 2: Lightly Coat with Oil and Baking Powder
A thin layer of oil helps the seasoning stick and promotes browning. Baking powder raises the skin’s pH level, which accelerates the Maillard reaction. That is the chemical process responsible for golden, crispy color and flavor.
Use aluminum-free baking powder for the best results. Mix it with a small amount of salt and oil, then toss your wings gently. Make sure every piece is lightly coated but not dripping.
Step 3: Space Them Out on a Wire Rack
Never place wings directly on a baking sheet. The wire rack allows hot air to flow around every piece. This means evenly cooked, crispy chicken wings with no soggy bottoms.
Leave a little space between each wing. Overcrowding traps steam and creates rubbery skin. Give them room to breathe.
Best Seasonings and Flavor Combinations
The beauty of oven-baked wings is that you can experiment with flavors endlessly. Here are some tried-and-true combinations that deliver amazing taste and crunch.
Classic Salt and Pepper
Sometimes simple is best. A generous coating of coarse salt, freshly cracked black pepper, and a touch of garlic powder creates a timeless flavor. This lets the natural taste of the chicken shine through.
Buffalo Style
Mix hot sauce with melted butter and a splash of vinegar. Toss your baked wings in this sauce right after they come out of the oven. The heat pairs perfectly with the crunchy exterior.
Asian-Inspired
Combine soy sauce, sesame oil, rice vinegar, honey, and a dash of ginger. This glaze adds a sweet and savory kick that complements the crispy skin beautifully.
Smoky BBQ
Smoked paprika, brown sugar, cumin, and a splash of apple cider vinegar create a rich, smoky flavor. Brush this on during the last few minutes of baking for a caramelized finish.
Step-by-Step Baking Instructions
Now that you know the secrets, here is the full process to make crispy chicken wings in your own kitchen.
Preheat and Prep
Start by preheating your oven to 425°F (220°C). While the oven heats up, line a baking sheet with foil and place a wire rack on top. This makes cleanup a breeze.
Season and Toss
In a large bowl, combine your dry seasonings. Add the dried wings and toss until every piece is evenly coated. Make sure you do not skip the drying step — it is the foundation of crunch.
Bake and Flip
Arrange the wings on the wire rack in a single layer. Bake for about 40 to 45 minutes. At the 20-minute mark, flip each wing carefully. This ensures both sides get golden and crispy.
Rest and Sauce
Once the wings are done, remove them from the oven. Let them rest for about 5 minutes. This resting period keeps the juices inside. If you are using a sauce, toss the wings gently now so the crispy skin stays intact.
Common Mistakes That Ruin Crispy Wings
Even experienced cooks make mistakes. Here are the most common ones and how to avoid them.
Skipping the Drying Step
This is the number one reason wings come out soggy. Wet skin steams instead of crisping. Always dry your wings thoroughly, and consider the overnight refrigerator method for the best results.
Overcrowding the Pan
Cramming too many wings onto one tray traps steam. Steam is the direct opposite of crunch. Use two baking sheets if you need to cook a large batch.
Opening the Oven Too Often
Every time you open the oven door, the temperature drops. This slows down the cooking process and affects crispiness. Trust the timer and resist the urge to peek.
Saucing Too Early
Adding sauce before the wings are fully baked makes the skin soft and chewy. Always sauce the wings after they come out of the oven. The residual heat will gently warm the sauce without softening the crunch.
Staying active and maintaining a balanced lifestyle helps you enjoy treats like crispy chicken wings without guilt. Pairing your cooking with regular exercise is a great approach. For example, check out how to get rid of bingo wings with dumbbells for a quick arm-toning routine you can do at home.
Serving Suggestions and Pairings
Crispy baked wings shine on their own, but the right sides take the meal to the next level. Here are some ideas to round out your spread.
- Celery and carrot sticks: The classic pairing that adds freshness and crunch.
- Blue cheese or ranch dip: Creamy and tangy, it balances the heat perfectly.
- Coleslaw: A light, crunchy slaw cuts through the richness of the wings.
- Corn on the cob: Sweet and smoky, it complements almost any wing flavor.
- Garlic bread: Soak up every last drop of sauce with warm, crusty bread.
For a complete game day spread, serve your crispy chicken wings alongside sliders, nachos, and a refreshing drink. The variety keeps things fun and lets everyone customize their plate.
Storage and Reheating Tips
Leftover wings are never a bad thing, but storing them correctly is key to keeping that crunch. Here is how to do it right.
Storing Leftover Wings
Let the wings cool completely before storing. Place them in an airtight container and refrigerate within two hours. Properly stored wings stay fresh for up to three days.
Reheating Without Losing Crunch
The oven is your best friend for reheating. Spread the wings on a wire rack and bake at 375°F for about 10 minutes. Avoid using the microwave, as it turns crispy skin soft and chewy.
If you want to stay on top of your health goals while enjoying delicious food, consider adding arm exercises to your routine. You can explore how to get rid of bat wings with dumbbells for a targeted workout that complements a balanced diet.
Conclusion
Baking crispy chicken wings at home is simpler than most people think. With the right technique, quality ingredients, and a hot oven, you can achieve restaurant-quality results in your own kitchen. The key is drying the skin, using a wire rack, and baking at high heat.
Do not be afraid to experiment with flavors. From classic buffalo to smoky BBQ, the possibilities are endless. And remember, the little details — like not overcrowding the pan and saucing after baking — make all the difference.
So next time you are craving wings, skip the deep fryer. Your oven will deliver perfectly crispy chicken wings that are juicy inside, golden outside, and absolutely delicious. Your family and friends will be asking for this recipe again and again.
Frequently Asked Questions
Can I use frozen chicken wings for this recipe?
Yes, you absolutely can. Just make sure to thaw them completely in the refrigerator first. Once thawed, pat them dry very thoroughly. Removing as much moisture as possible is essential for achieving that perfect crispy skin.
What temperature should I bake crispy chicken wings at?
Bake your wings at 425°F (220°C) for the best results. This high temperature helps render the fat and crisp the skin quickly. Avoid lowering the temperature, as it will steam the wings instead of crisping them.
How long do baked wings take in the oven?
Most wings need about 40 to 45 minutes at 425°F. Flip them halfway through for even browning. Larger wings may need a few extra minutes, so always check that the internal temperature reaches 165°F.
Can I make crispy wings without baking powder?
Baking powder is the secret weapon for extra crunch, but you can skip it. The wings will still be tasty and somewhat crispy. Just make sure your skin is very dry and the oven is hot. The results will be good, though not quite as shatteringly crunchy.
What is the best way to keep wings crispy after saucing?
Always sauce the wings after they come out of the oven. Toss them gently in a bowl with warm sauce rather than pouring sauce over them. This coats the wings without soaking the crispy skin and softening it.
How do I store leftover crispy wings?
Store leftover wings in an airtight container in the refrigerator for up to three days. Reheat them in the oven on a wire rack at 375°F for about 10 minutes. This method preserves the crunch far better than using a microwave.