Beef Tenderloin Roast Time Chart for Juicy Perfection
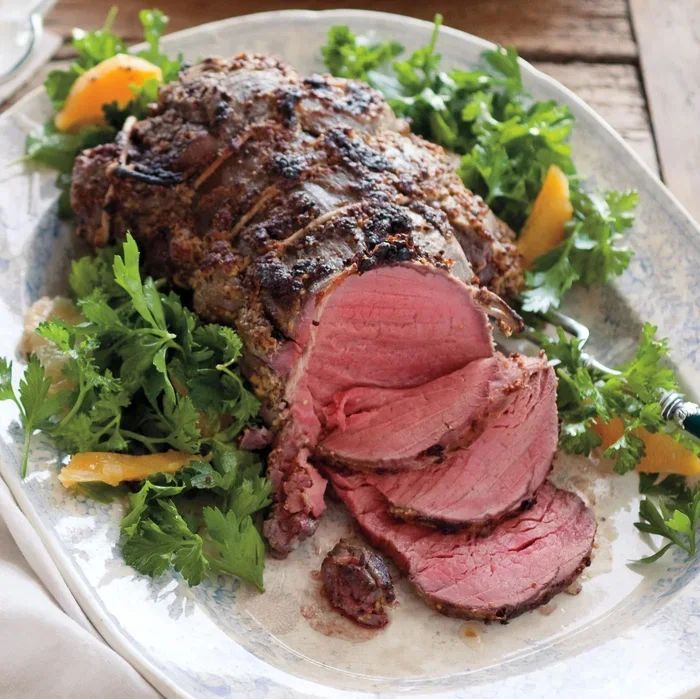
A beef tenderloin roast time chart helps you cook the perfect roast with precise timing and temperature guidance. Whether you are roasting a small 2-pound tenderloin or a large 8-pound cut, knowing the right time and internal temperature ensures juicy, tender results every time. This guide includes a detailed chart, step-by-step instructions, and expert tips to elevate your beef roasting game.
Roasting a beef tenderloin is one of the most rewarding things you can do in the kitchen. It is a cut that screams celebration, whether you are cooking for a holiday dinner or a simple Sunday roast. But here is the thing — timing is everything. A few extra minutes can mean the difference between a melt-in-your-mouth masterpiece and a dry, disappointing piece of meat. That is exactly why a beef tenderloin roast time chart is your best friend in the kitchen.
Think of a roast time chart as your personal cooking coach. It tells you exactly how long to cook your beef based on its weight, the oven temperature, and the level of doneness you want. No more guessing. No more cutting into the meat to check if it is done. With the right chart and a basic understanding of how roasting works, you can serve a juicy beef tenderloin that will impress everyone at the table.
In this guide, we walk you through everything you need to know about beef tenderloin roast times. We cover the chart itself, temperature guidelines, step-by-step cooking instructions, and the most common mistakes to avoid. By the end, you will feel confident enough to roast a tenderloin like a pro. Let us get into it.
Key Takeaways
- Precise Timing Matters: A beef tenderloin roast time chart takes the guesswork out of cooking, ensuring perfectly done meat every time.
- Internal Temperature Is Key: Using a meat thermometer and targeting the right doneness temperature (125°F for rare, 135°F for medium-rare) guarantees juicy results.
- Weight Determines Cook Time: Roast time varies significantly based on the weight of your beef tenderloin, so always reference a time chart for your specific cut.
- Resting Time Is Essential: Letting your roast rest for 15 to 20 minutes after cooking allows juices to redistribute for maximum flavor.
- Searing Adds Flavor: A hot sear before roasting creates a flavorful crust that locks in moisture and improves the overall taste.
- Avoid Common Mistakes: Overcooking, skipping the rest, and not using a thermometer are the top errors that ruin a tenderloin roast.
📑 Table of Contents
- Why a Beef Tenderloin Roast Time Chart Matters
- Beef Tenderloin Roast Time Chart by Weight
- Temperature Guide for Perfect Doneness
- Step-by-Step: How to Roast Beef Tenderloin
- Common Mistakes That Ruin a Beef Tenderloin Roast
- Expert Tips for the Juiciest Beef Tenderloin
- Final Thoughts on Beef Tenderloin Roast Time
Why a Beef Tenderloin Roast Time Chart Matters
A beef tenderloin roast time chart removes all the uncertainty from cooking. Beef tenderloin is a lean, tender cut that does not have much fat to protect it from overcooking. Unlike a chuck roast or brisket, which can forgive a few extra minutes, tenderloin is unforgiving. It goes from perfect to overcooked in a matter of minutes.
Here is why having a chart is so important:
- Consistency: A chart gives you reliable results every single time you roast beef tenderloin.
- Precision: It accounts for weight, oven temperature, and desired doneness, so you know exactly what to expect.
- Confidence: You will not second-guess yourself or nervously check the meat every five minutes.
- Planning: Knowing the exact time helps you plan your meal and serve everything hot and on time.
Whether you are a beginner or a seasoned home cook, a time chart simplifies the process. It is one of those tools that pays for itself the very first time you use it. And the best part is, once you understand how to read and use the chart, you can apply that knowledge to other cuts of beef too.
Beef Tenderloin Roast Time Chart by Weight
The most important factor in determining roast time is the weight of your beef tenderloin. A smaller roast cooks faster, while a larger one takes more time. Below is a general time chart based on common weights and oven temperatures. Always remember that these are starting points, and a meat thermometer is your ultimate guide.
Roast Time Chart at 425°F (220°C)
- 2 to 3 pounds: 25 to 35 minutes for medium-rare
- 3 to 5 pounds: 35 to 45 minutes for medium-rare
- 5 to 7 pounds: 45 to 55 minutes for medium-rare
- 7 to 8 pounds: 55 to 65 minutes for medium-rare
Roast Time Chart at 325°F (165°C)
- 2 to 3 pounds: 40 to 50 minutes for medium-rare
- 3 to 5 pounds: 50 to 65 minutes for medium-rare
- 5 to 7 pounds: 65 to 80 minutes for medium-rare
- 7 to 8 pounds: 80 to 95 minutes for medium-rare
These times assume you start with a room-temperature roast and do not include the resting time. Always add about 15 to 20 minutes of resting time after the roast comes out of the oven. During this rest, the internal temperature will continue to rise slightly, a phenomenon known as carryover cooking.
One thing to keep in mind is that these charts are guidelines, not strict rules. Your oven may run hot or cold, the shape of the roast matters, and whether you sear first can affect total time. Think of the chart as a helpful framework that you adjust based on your specific situation.
Temperature Guide for Perfect Doneness
Time alone is not enough to guarantee a perfect roast. Internal temperature is the real indicator of doneness. Using an instant-read meat thermometer is the single best thing you can do to improve your roasting results. Here is what each temperature means for your beef tenderloin:
Doneness Temperature Chart
- Rare: 120°F to 125°F (49°C to 52°C) — Very red center, soft texture
- Medium-Rare: 130°F to 135°F (54°C to 57°C) — Warm red center, juicy and tender
- Medium: 140°F to 145°F (60°C to 63°C) — Pink center, slightly firmer
- Medium-Well: 150°F to 155°F (66°C to 68°C) — Slight pink, firmer texture
- Well-Done: 160°F and above (71°C and above) — Little to no pink, drier texture
For most people, medium-rare is the sweet spot for beef tenderloin. It gives you a juicy, flavorful center with a beautiful pink color. Since the meat continues to cook after you remove it from the oven, pull it off about 5 degrees below your target temperature. This is called pulling early, and it is a game-changer.
If you are aiming for medium-rare at 135°F, pull your roast at 130°F and let it rest. The temperature will climb to the perfect 135°F during the resting period. This simple trick takes a lot of the stress out of roasting beef tenderloin.
Step-by-Step: How to Roast Beef Tenderloin
Now that you understand the time chart and temperature guide, let us put it all together with a step-by-step approach. Follow these steps for a flawless beef tenderloin every time.
Step 1: Prepare the Roast
Take your beef tenderloin out of the refrigerator at least 30 to 45 minutes before cooking. Letting it come to room temperature ensures more even cooking. Pat it dry with paper towels — dry meat sears better. Season generously with salt, pepper, and any herbs or spices you prefer. Garlic, rosemary, and thyme are classic choices that pair beautifully with tenderloin.
Step 2: Sear the Roast
Preheat your oven to 425°F. Heat a large oven-safe skillet or roasting pan over medium-high heat. Add a high smoke-point oil like avocado or grapeseed oil. Sear the tenderloin on all sides until you get a deep golden-brown crust. This should take about 2 to 3 minutes per side. The sear locks in juices and adds incredible flavor.
Step 3: Roast According to the Chart
Place the seared roast in the oven and cook according to your beef tenderloin roast time chart. Use a meat thermometer inserted into the thickest part of the roast. Check the temperature starting a few minutes before the estimated time is up. Remember, you want to pull the roast 5 degrees below your target doneness temperature.
Step 4: Rest the Roast
Once the roast reaches the right temperature, remove it from the oven and transfer it to a cutting board. Tent it loosely with aluminum foil and let it rest for 15 to 20 minutes. This resting period is critical. It allows the juices to redistribute throughout the meat, making every slice moist and flavorful. If you cut too early, all those beautiful juices will run out onto the cutting board instead of staying in the meat.
Step 5: Slice and Serve
Use a sharp knife to slice the tenderloin against the grain into 1/2-inch thick pieces. Serve immediately with your favorite sides. Roasted vegetables, mashed potatoes, and a simple pan sauce all make excellent companions for a tenderloin roast.
Common Mistakes That Ruin a Beef Tenderloin Roast
Even with the best intentions, it is easy to make mistakes when roasting beef tenderloin. Here are the most common errors and how to avoid them.
Skipping the Rest
This is the number one mistake people make. Cutting into a roast immediately after it comes out of the oven releases all the juices. The meat ends up dry and less flavorful. Always give your roast the full 15 to 20 minutes of resting time. Use this time to prepare your sides or make a quick pan sauce.
Not Using a Meat Thermometer
Relying on time alone is risky. Ovens vary, the shape of the roast differs, and starting temperature affects cook time. An instant-read thermometer takes the guesswork out completely. It is an inexpensive tool that makes a huge difference in your results.
Overcooking the Roast
Beef tenderloin is lean and has very little fat. This means it dries out quickly if you cook it too long. Always pull the roast early and let carryover cooking do the rest. It is much easier to add a few more minutes of cooking than to undo an overcooked roast.
Starting with a Cold Roast
Putting a cold roast straight into the oven leads to uneven cooking. The outside overcooks while the inside stays raw. Always let your tenderloin sit at room temperature for at least 30 minutes before roasting.
Skipping the Sear
Some people skip searing to save time, but this is a mistake. The sear creates a flavorful crust through the Maillard reaction, which adds depth and complexity to the final dish. It only takes a few extra minutes but makes a noticeable difference.
Expert Tips for the Juiciest Beef Tenderloin
Want to take your beef tenderloin to the next level? Here are some expert tips that make a real difference.
- Brine or Dry Brine: A simple dry brine of salt applied 24 hours in advance helps the meat retain moisture during cooking. Just season with kosher salt and let it sit uncovered in the fridge overnight.
- Use a Wire Rack: Roasting on a wire rack set inside a pan allows hot air to circulate around the meat evenly. This promotes uniform cooking and a better sear.
- Baste During Roasting: Basting the roast with pan juices every 10 to 15 minutes keeps the exterior moist and builds flavor.
- Let the Meat Speak: After resting, press gently on the roast. A medium-rare tenderloin should feel firm but with some give, like the base of your thumb when your hand is relaxed.
- Slice Against the Grain: Always cut perpendicular to the muscle fibers. This shortens the muscle fibers and makes each slice more tender and easier to chew.
Just as knowing what to do on a treadmill to pass time can make a workout more enjoyable, knowing these small techniques can make your roasting experience more rewarding and less stressful. The details matter, and they add up to a significantly better final product.
Another helpful mindset is to think about timing holistically. Just as people ask about when is the best time to buy a treadmill to get the most value, planning your roast timing carefully — from prep to resting to serving — ensures you get the most out of every step of the process.
And finally, remember that practice makes perfect. Every time you roast a beef tenderloin, you learn something new about your oven, your preferences, and your technique. Keep a beef tenderloin roast time chart handy, note your results, and refine your approach over time. Before long, roasting the perfect tenderloin will feel second nature.
Think of it this way — just as timing matters in fitness routines like how much time on the treadmill to lose weight, timing is equally critical in the kitchen. In both cases, precision and consistency lead to the best outcomes. Whether you are chasing fitness goals or culinary perfection, respecting the process and the timing is what gets you there.
Final Thoughts on Beef Tenderloin Roast Time
A beef tenderloin roast time chart is one of the simplest yet most powerful tools you can have in your kitchen. It takes the mystery out of roasting and gives you a clear roadmap to follow. Combine that with a good meat thermometer, proper resting time, and a solid sear, and you are well on your way to serving a truly exceptional roast.
The beauty of beef tenderloin is in its simplicity. It is a lean, elegant cut that shines when treated with care and respect for proper timing and temperature. You do not need complicated techniques or fancy equipment. You just need patience, attention to detail, and a reliable chart to guide you.
So the next time you plan to roast a beef tenderloin, pull out this guide. Follow the time chart, check your temperatures, and give your roast the rest it deserves. You will be amazed at the difference these simple steps make. Happy roasting!
Frequently Asked Questions
How long does it take to roast a beef tenderloin at 350°F?
At 350°F, a 3 to 5-pound beef tenderloin typically takes 50 to 65 minutes for medium-rare. Always use a meat thermometer to check the internal temperature, as oven variations can affect cooking time significantly.
What is the best temperature for beef tenderloin roast?
The best temperature depends on your preference. Most people prefer medium-rare at an internal temperature of 130°F to 135°F. For a juicier result, pull the roast at 130°F and let carryover cooking bring it up to 135°F during the rest.
Should I cover beef tenderloin with foil while roasting?
No, do not cover the tenderloin while roasting. Leaving it uncovered allows the heat to circulate evenly and creates a beautiful golden-brown crust. You can tent it with foil during the resting period to keep it warm.
How long should beef tenderloin rest after roasting?
Let your beef tenderloin rest for 15 to 20 minutes after removing it from the oven. This resting period allows the juices to redistribute throughout the meat, resulting in a more moist and flavorful slice when you cut into it.
Can I roast a beef tenderloin overnight for a slow cook?
Yes, you can roast at a lower temperature like 250°F for a longer time, which can take 2 to 3 hours depending on weight. This slow-roasting method can produce very tender results, but be careful not to overcook past medium-well.
What size beef tenderloin is best for a family dinner?
For a family dinner of 6 to 8 people, a 4 to 5-pound beef tenderloin is ideal. This size provides about 1/2 pound of raw meat per person, which yields a generous serving after cooking and trimming.