How to Clean a Grill
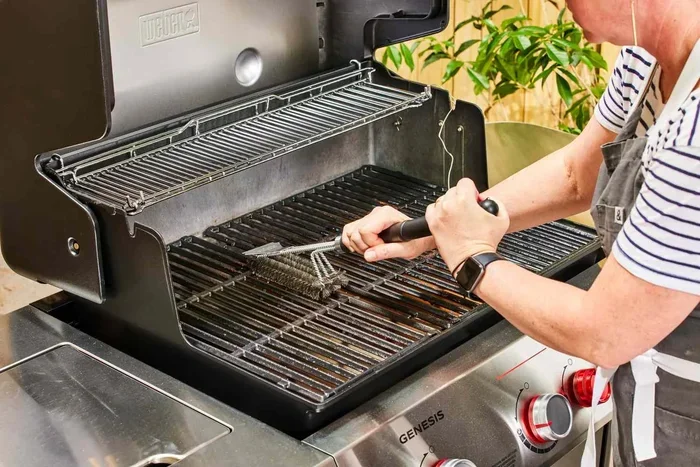
Keeping your grill clean ensures better-tasting food and longer equipment life. This guide walks you through every step of how to clean a grill, from basic daily upkeep to deep cleaning your grates and grease trays. You will learn simple methods that work for gas grills, charcoal grills, and every type in between.
Your grill takes a beating every time you fire it up. Grease builds up. Food sticks to the grates. Charcoal leaves behind ash that can block airflow. Over time, all of this buildup affects how your grill performs. How to clean a grill regularly is the secret to better-tasting food and safer outdoor cooking.
Many people skip grill cleaning until it becomes a real problem. By then, grease has hardened, rust may be setting in, and your grates are coated in old residue. A simple grill maintenance routine prevents all of this. It also extends the life of your equipment significantly.
Think of grill care like brushing your teeth. A little effort each time saves you from painful and expensive problems later. Whether you own a stainless steel grill or a cast iron grill, regular attention makes a big difference. Your barbecue grill deserves the same care as any other tool in your kitchen.
Key Takeaways
- Regular cleaning extends grill life: A consistent grill maintenance routine prevents rust, improves performance, and saves money on replacements.
- Use the right tools for your grate type: Wire brushes for cast iron, nylon brushes for porcelain, and soft cloths for stainless steel.
- Baking soda and vinegar are your best friends: These household items handle most grease removal and deep cleaning tasks effectively.
- Clean after every use: A quick brush while the grates are warm prevents buildup and makes deep cleaning much easier.
- Dry everything thoroughly: Moisture causes rust and corrosion, so always dry parts completely before reassembling or storing.
- Follow a cleaning schedule: Set reminders for weekly, monthly, and seasonal cleanings to stay on top of grill care.
- Never ignore the grease tray: Overflowing grease is a fire hazard and affects cooking quality.
📑 Table of Contents
Why Regular Grill Cleaning Matters
Clean cooking grates mean better food. When old residue builds up, it transfers flavors to your next meal. Grease buildup also creates dangerous flare-ups that can ruin your food or even cause burns. Regular grill cleaning prevents these issues and keeps your outdoor cooking experiences enjoyable.
Beyond safety and taste, grill maintenance saves you money. Replacing grates, burners, and other parts is expensive. A well-maintained grill can last for decades. Simple habits like brushing after each use and doing a monthly deep clean make a huge difference over time.
Many BBQ maintenance experts say that the grill should be cleaned as often as your kitchen stove. You would never cook on a dirty stovetop, so why do it on a grill? Treating your grill with the same respect as your indoor kitchen tools improves both results and longevity.
What You Need to Clean Your Grill
Before you start, gather your supplies. Having everything ready makes the process faster and more effective. You do not need fancy or expensive products. Most grill cleaning can be done with basic household items you probably already have.
Here is a simple checklist of what you need:
- A stiff wire grill brush
- Warm water and dish soap
- Baking soda for tough grime
- White vinegar for degreasing
- A soft sponge or clean cloth
- Gardening gloves for hand protection
- A putty knife for scraping
For charcoal grill cleaning, you will also need an ash shovel or vacuum. For gas grill cleaning, make sure you have access to the burner ports for clearing debris. The right tools turn a chore into a quick and manageable task.
Many people wonder about grill cleaning solutions. You can buy commercial sprays, but homemade mixtures work just as well. A blend of water, vinegar, and a few drops of dish soap handles most jobs. For stubborn grease, a paste of baking soda and water does wonders. These natural cleaners are safe for all grill surfaces and will not leave harmful residues on your food.
How to Clean a Grill: Step-by-Step Guide
Now that you have your supplies, let us walk through the actual process. This guide covers how to clean a grill from top to bottom. Follow these steps and your grill will look and work like new.
Step 1: Remove the Grates and Burner Covers
Start by turning off the gas supply if you have a gas grill. Let everything cool completely before you touch anything. Remove the cooking grates and any burner covers or heat tents. These parts collect the most grease and food debris, so they need the most attention.
Soaking the grates in warm soapy water loosens built-up grime fast. If you have ever tried how to clean a yoga mat with baking soda, you already know that baking soda is a powerful cleaner for greasy surfaces. The same principle applies here. Make a paste of baking soda and water, apply it to the grates, and let it sit for 15 to 20 minutes. This softens even the toughest baked-on residue and makes scrubbing much easier.
Step 2: Clean the Grease Tray and Burner Tubes
The grease tray sits beneath the grates and catches all the dripping fat. Pull it out and pour the grease into a disposable container. Wash the tray with warm soapy water and a soft sponge. For stubborn grease buildup, use a mix of vinegar and water. Rinse thoroughly and dry completely before replacing it.
Check the burner tubes next. Poke a wire or toothpick through each port to clear any blockages. Blocked burners create uneven heat, which ruins your cooking. This is a simple step that many people overlook in their grill upkeep routine. Taking a few minutes to clear the ports can dramatically improve your grill performance.
Step 3: Scrub the Interior and Exterior
Use a putty knife to scrape the inside walls of the grill. Pay special attention to areas with heavy char buildup. For the exterior, use a damp cloth with mild soap. Stainless steel grills respond well to a dedicated stainless steel cleaner. Always wipe in the direction of the grain to avoid creating scratches.
If your grill has a lot of caked-on residue, let the cleaning solution sit for a few minutes before scrubbing. Patience saves you effort and prevents scratching the surface. For cast iron grill interiors, avoid using too much water as it can promote rust. A dry scrape with a putty knife followed by a light oil wipe works best.
Step 4: Rinse and Dry Everything
Rinse all parts thoroughly with clean water. Make sure no soap residue remains, especially on the grates where food contacts the surface directly. Dry everything completely with a clean towel or let it air dry in the sun. Moisture is the enemy of metal and leads to rust and corrosion.
Leaving parts wet invites rust and shortens the life of your grill. This is why drying is just as important as the cleaning itself. Always make sure every piece is bone dry before you reassemble or store your grill.
Step 5: Reassemble and Light a Test Fire
Once everything is dry, put the grill back together. Replace the grates, burner covers, and grease tray. Turn on the gas and light the grill for 10 to 15 minutes. This burns off any remaining cleaning residue and ensures everything is working properly.
After the test fire, let the grill cool again and give the grates a quick brush. Your BBQ maintenance is now complete and you are ready for your next cookout. This final step ensures that no cleaning chemicals or residues affect your food taste.
Deep Cleaning Methods for Different Grill Types
Not all grills are the same. The type of grill you own determines the best deep clean grill approach. Here is how to handle the most common types found in backyards and patios.
Cleaning a Charcoal Grill
Charcoal grill cleaning starts with removing all the ash. Wait until the coals are completely cool before you begin. Use an ash shovel to scoop out the remains. Many people find that a shop vacuum works faster and is less messy than a shovel alone. Empty the ash pan or catch basin regularly to maintain proper airflow.
Remove the grates and soak them in soapy water for at least 15 minutes. Scrub with a grill brush to remove stuck-on food particles. The interior walls of a charcoal grill often develop a thick layer of grease and carbon buildup over time. Use a putty knife and a baking soda paste to break this down effectively. The carbon layer can actually add flavor, but too much of it blocks heat and airflow.
Cleaning a Gas Grill
Gas grill cleaning requires extra attention to the burner ports and igniter. These components directly affect how well your grill performs. Use a thin wire or needle to carefully clear each port. Do not use anything that could damage the gas line or delicate internal components.
The grates on a gas grill often have a porcelain or stainless steel coating. Use a soft brush and mild soap only. Avoid abrasive pads that can scratch and damage the surface. For the flavorizer bars, scrape off any drippings and rinse them thoroughly. These bars protect the burners from grease and help distribute heat evenly across the cooking surface.
Cleaning a Pellet Grill
Pellet grills have additional components like the hopper and auger system that need regular attention. Empty any remaining pellets from the hopper before cleaning. Use a vacuum to clean out the fire pot and remove ash buildup thoroughly. The cooking grates can be cleaned the same way as other grill types. Regular grill degreasing keeps pellet grills running smoothly and prevents flavor contamination between cooks.
| Grill Type | Best Cleaning Method | Recommended Frequency |
|---|---|---|
| Charcoal | Ash removal with baking soda paste for grates | After every 5 uses |
| Gas | Soapy water with wire brush for grates | After every 3 uses |
| Pellet | Vacuum for ash plus mild soap for grates | After every 4 uses |
| Electric | Dish soap with soft sponge | After every 3 uses |
Common Grill Cleaning Mistakes to Avoid
Even with the best intentions, people make mistakes when cleaning their grill. Here are the most common errors and how to avoid them. Learning from these mistakes saves time and protects your grill investment.
Using the wrong tools is the number one mistake people make. Steel wool on porcelain-coated grates will cause permanent damage that cannot be reversed. Always match your cleaning tool to your grate material. A nylon brush works well for delicate surfaces, while a wire brush is perfect for cast iron grates. Using the wrong brush can scratch, pit, or ruin your cooking surface permanently.
Skipping the grease tray leads to dangerous flare-ups. When grease overflows and hits the flame, it causes uncontrollable fires that can damage your grill and your yard. Check and empty your grease tray after every few uses. This simple habit keeps your outdoor cooking sessions safe and enjoyable for everyone.
Not drying parts after cleaning invites rust and corrosion. Moisture trapped between metal parts creates oxidation over time. Always dry everything thoroughly before reassembling. If you store your grill for the off-season, make sure it is completely dry inside and out. A little extra drying time now saves you from expensive replacements later.
Waiting too long between cleanings makes the job much harder. Hardened grease and carbon buildup require significantly more effort to remove. A little regular maintenance saves you hours of scrubbing later. Think of it as grill care rather than a punishment. Consistent effort is always easier than rare intensive cleaning marathons.
Expert grillers recommend a simple rule: if you spent more than 10 minutes scrubbing, you waited too long. Regular short cleaning sessions are far more effective than rare deep scrubbing marathons. This approach keeps your grill surface in great condition with minimal effort every time.
How Often Should You Clean Your Grill
The frequency of cleaning depends on how often you use your grill. A general rule is to do a quick brush after every session and a deep clean every few weeks. Consistent grill cleaning habits keep your equipment in top shape year after year.
Here is a simple schedule to follow:
- After every use: Brush the grates while they are warm. This removes loose food particles and prevents sticking before residue hardens.
- Every two weeks: Clean the grease tray and check the burner ports for any blockages or debris buildup.
- Every month: Do a full deep clean including the interior walls, exterior surfaces, and all removable components.
- Seasonally: Before storing your grill for winter or summer, perform a thorough inspection and complete deep clean.
Consistency is the key to easy grill cleaning. When you keep up with regular maintenance, each session takes less time and effort. Your grill performs better, lasts longer, and always looks great for your guests. Set a reminder on your phone to stay on track with your schedule.
If you have ever tried how to clean a yoga mat in the bathtub, you know that soaking tough items in warm soapy water works wonders. The same approach applies to your grill grates. A good soak before scrubbing cuts your cleaning time in half and delivers noticeably better results every time.
Remember that grill surface care also includes protecting your grill from the elements. Use a quality cover when the grill is not in use. This prevents rust, keeps debris out, and reduces how often you need to deep clean. A good cover is one of the best investments you can make for long-term grill maintenance.
Finally, if you grill frequently or host large gatherings, consider cleaning your grates after intense sessions. If you have ever tried how to clean a yoga mat after hot yoga, you know that cleaning after intense use requires immediate attention to prevent heavy buildup. A quick post-session brush prevents this from becoming a weekend-long project.
Conclusion
How to clean a grill does not have to be a daunting or time-consuming task. With the right tools, supplies, and routine, you can keep your barbecue grill in excellent condition all season long. Regular grill cleaning improves food taste, enhances safety, and protects your investment for years to come.
Start with the basics. Brush your grates after every cookout. Deep clean your grill every few weeks. Follow the steps in this guide and you will see a real difference in performance and appearance. Your outdoor cooking experiences will be better, safer, and more enjoyable every single time you fire up the grill.
Take pride in your equipment. A clean grill is a sign of a serious cook who cares about quality and presentation. Apply what you have learned here, share it with friends and family, and enjoy every meal off a sparkling clean grill. Your future self and your taste buds will thank you for the effort.
Frequently Asked Questions
Can I use a wire brush on all grill grates?
No, wire brushes work best on cast iron grates. For porcelain-coated or stainless steel grates, use a nylon brush or a soft sponge. Wire bristles can scratch and damage delicate surfaces, and they may even flake off into your food. Always check your grate material before choosing a cleaning tool.
What is the best homemade grill cleaning solution?
A mixture of water, white vinegar, and a few drops of dish soap works great for most grill cleaning tasks. For stubborn grease, make a paste with baking soda and water. Both solutions are effective, affordable, and safe for most grill surfaces. They also avoid the harsh chemicals found in many commercial cleaners.
How do I remove rust from my grill grates?
Soak the grates in a solution of vinegar and water for 30 minutes. Then scrub with a grill brush or fine steel wool. For heavy rust, apply a paste of baking soda and let it sit for 20 minutes before scrubbing. After removing rust, dry the grates completely and apply a light coat of oil to prevent future rust from forming.
Is it safe to clean a grill with bleach?
No, you should never use bleach on a grill. Bleach can react with metal and leave harmful residues that affect food safety. Stick to mild soap, vinegar, and baking soda for safe and effective grill cleaning. These natural cleaners protect both your grill and your food without any chemical risks.
How long does a grill deep clean take?
A thorough deep clean takes about 45 minutes to an hour, depending on how dirty the grill is. Regular maintenance after each use keeps the cleaning time short and manageable. When you stay consistent with your routine, your monthly deep clean sessions become quicker and much easier each time.
Should I clean my grill before or after storing it for the season?
Always clean your grill before storing it for any length of time. Remove all food residue, grease, and ash completely. Make sure every part is dry before covering it. Clean storage prevents mold, rust, and unpleasant odors when you take the grill out again for the next season of outdoor cooking.