How to Make a Weight Rack for Dumbbells
Building a weight rack for dumbbells is one of the smartest moves you can make for your home gym. This guide walks you through every step, from choosing materials to finishing your rack. You will learn simple designs that save space, keep your dumbbells organized, and protect your floor. Whether you are a beginner or a seasoned lifter, this project is easy, affordable, and incredibly rewarding.
If you lift weights at home, you know the struggle. Dumbbells end up scattered across the floor, taking up space and creating a tripping hazard. A how to make a weight rack for dumbbells project solves this problem fast. You do not need expensive gear or advanced skills. With a few materials and a weekend afternoon, you can build a sturdy rack that keeps your weights organized and your space safe. This guide covers everything you need to know, from picking the right design to finishing touches that make your rack last.
Having a dedicated dumbbell storage rack changes the way you work out. Instead of wasting time picking up scattered weights, you grab what you need and get moving. If you are following a program like how to workout with dumbbells at home for beginners, a clean setup makes a huge difference. Your focus stays on the work, not on clutter. Let us dive into how you can build one yourself.
Key Takeaways
- DIY racks save money: Building your own dumbbell storage rack costs a fraction of buying one pre-made.
- Simple tools are enough: You do not need a professional workshop to build a functional rack.
- Multiple designs work: Choose from floor racks, wall-mounted styles, or pipe frames based on your space.
- Safety comes first: Proper construction ensures your weights stay secure and your floor stays protected.
- Organization improves workouts: A tidy rack makes it faster to grab weights and stay focused during sessions.
- Custom sizing fits any need: Build the rack to hold exactly the dumbbells you own.
- Maintenance is minimal: A well-built rack lasts for years with basic care.
📑 Table of Contents
Why You Need a DIY Dumbbell Rack
A weight rack for dumbbells is more than just a storage solution. It is a game-changer for your home gym. When your weights have a proper place, everything flows better. You spend less time setting up and more time actually lifting. Here is why building one makes sense.
Save Space in Your Home Gym
Dumbbells take up a lot of room when left lying around. A rack stacks them neatly and keeps them off the floor. This is especially important if you have a small garage gym or apartment workout space. Vertical designs work wonders in tight areas. Even a basic floor rack can free up serious square footage.
Protect Your Floors and Equipment
Dropping dumbbells on hard floors causes damage. Rubber coatings crack, floors get scratched, and the noise drives everyone crazy. A rack holds your weights securely so they do not roll or crash to the ground. This also extends the life of your free weights and keeps your gym looking clean.
Stay Motivated and Organized
There is something about a tidy workout area that keeps you going. When everything has a place, you feel more in control. You can see all your weights at a glance and plan your sessions better. This small change in your setup can boost your consistency and help you stay committed to your fitness goals.
Materials and Tools You Will Need
Before you start building, gather everything you need. Having all materials ready saves time and keeps the project fun. You do not want to stop halfway because you are missing a bolt or a saw.
Essential Materials
- Plywood or MDF board — for the base and shelves. Choose at least 3/4-inch thickness for strength.
- 2×4 lumber — for the frame and support posts. These are affordable and widely available.
- Wood screws and bolts — 2.5-inch wood screws work great for most connections.
- Wood glue — adds extra strength to joints and prevents wobbling.
- Sandpaper — 120-grit and 220-grit for smoothing edges and surfaces.
- Paint or stain — optional, but it protects the wood and looks great.
- Rubber matting or foam — to cushion the floor and prevent dumbbells from rolling.
Basic Tools Required
- Circular saw or hand saw — for cutting wood to size.
- Drill with drill bits — for making pilot holes and driving screws.
- Measuring tape — accurate measurements make everything fit better.
- Square — ensures your corners are perfectly at 90 degrees.
- Level — keeps your rack stable and even on the floor.
- Clamps — hold pieces together while glue dries or screws go in.
You do not need fancy tools for this build. A basic home workshop setup is more than enough. If you are new to woodworking, start simple and build up your skills as you go.
Step-by-Step Build Guide
Now for the fun part. Follow these steps to build a solid dumbbell organizer that will serve you for years. This guide covers a simple floor rack design that works for most dumbbell sets.
Step 1: Plan Your Design and Measure
Start by laying out your dumbbells on the floor in the arrangement you want. Note the spacing between each weight. A standard rack holds dumbbells in a zigzag pattern, which saves space and looks clean. Measure the total length and width you need. Write these numbers down — they will guide every cut you make.
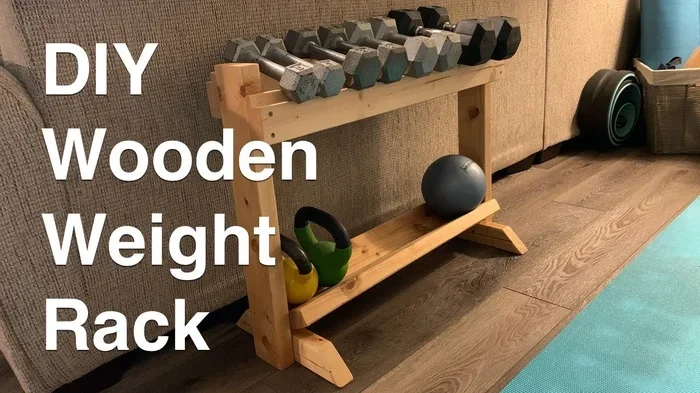
Think about how many tiers you want. A single-tier rack works well for lighter sets. If you have heavy dumbbells and a large collection, a two-tier design gives you more capacity. Sketch your plan on paper or use a free design app to visualize the final product.
Step 2: Cut the Wood Pieces
Using your measurements, cut the plywood for the base and any shelves. Cut the 2×4 lumber for the upright posts and side rails. Always measure twice and cut once. Smooth every cut edge with sandpaper to prevent splinters. This step sets the foundation for a clean, professional-looking rack.
Step 3: Assemble the Frame
Start with the base. Attach the side rails to the base using wood screws and glue. Use clamps to hold everything steady while you drill pilot holes. Next, attach the upright posts at each end. Make sure they are perfectly vertical using your level. A rack that leans is a safety hazard, so take your time with this step.
For a two-tier rack, add a middle shelf between the posts. Secure it with screws from the outside so the inside stays clean and smooth. This shelf is where your lighter dumbbells will sit, keeping the heavier ones on the base for stability.
Step 4: Add the Weight Slots
Mark evenly spaced slots on the base where each dumbbell will rest. The slots should be wide enough for the dumbbell handles to slide through comfortably. Use a jigsaw or drill to cut these openings. Test-fit a few dumbbells to make sure the spacing works. Adjust as needed before moving on.
A good rule of thumb is to space slots about 4 to 5 inches apart. This gives you room to grab each weight without knocking the others over. If you plan to pick up heavy dumbbells for chest press or other exercises, wider spacing makes the process smoother and faster.
Step 5: Sand, Paint, and Finish
Once the frame is assembled, sand all surfaces starting with 120-grit and finishing with 220-grit. This removes rough spots and gives the wood a smooth feel. Wipe away dust with a damp cloth.
Apply paint, stain, or a protective sealant. This step is not just about looks — it shields the wood from sweat, moisture, and daily wear. Let the finish dry completely before you place any dumbbells on the rack. A well-finished rack looks great and lasts much longer.
Step 6: Add Non-Slip Base and Final Touches
Attach rubber matting or foam padding to the bottom of the rack. This prevents it from sliding on the floor and protects your surface. You can also add small rubber feet or felt pads for extra stability. Finally, place your dumbbells on the rack and admire your work.
Design Variations to Consider
Not every home gym looks the same, and neither should your rack. Here are a few popular designs you can adapt to your space and needs.
Wall-Mounted Rack
A wall-mounted rack saves floor space and looks sleek. It works best for lighter dumbbell sets or when you have limited room. Mount sturdy brackets directly into wall studs for safety. This design is perfect if you want to keep your floor clear for other exercises like how to do a bent-over row with dumbbells or stretching.
Vertical Pipe Rack
A pipe rack uses metal pipes mounted on a wooden frame. The pipes act as holders for each dumbbell, giving a clean industrial look. This design is strong, durable, and easy to customize. You can adjust the pipe spacing to fit different dumbbell sizes. Many home gym enthusiasts love this style because it looks professional and costs very little.
Rolling Cart Rack
Attach your rack to a rolling cart or platform with wheels. This lets you move the entire setup wherever you need it. It is perfect for people who share workout spaces or want to store the rack away when not in use. Just add lockable casters for safety.
Safety Tips and Maintenance
A dumbbell storage rack is built to last, but safety should always come first. Follow these tips to keep your rack secure and your workouts worry-free.
- Anchor heavy racks to the wall. This prevents tipping, especially with tall or full racks. Use L-brackets or wall anchors for extra security.
- Check screws and bolts regularly. Over time, vibrations from workouts can loosen connections. Tighten them every few weeks.
- Do not exceed weight capacity. Every design has limits. Build your rack to handle the total weight of your dumbbell set, plus a safety margin.
- Keep the area around the rack clear. A cluttered space around your rack increases the risk of accidents. Give yourself room to move.
- Inspect the wood for cracks. Check for any splits or damage after heavy use. Replace worn parts immediately to maintain structural integrity.
Proper maintenance keeps your rack in great shape. A quick wipe-down after each workout session prevents sweat buildup. Every few months, apply a fresh coat of sealant to protect the wood. These small habits go a long way in extending the life of your DIY creation.
How to Organize Your Dumbbells on the Rack
Once your rack is built, organizing your weights properly makes every workout smoother. Place your heaviest dumbbells on the bottom tier for stability. Lighter weights go on top or upper shelves. Arrange them in order from lightest to heaviest, left to right. This way, you can find any weight in seconds.
Consider how you use your dumbbells during the week. If you do how long does it take for dumbbells to work and follow structured routines, group your weights by exercise category. Keep your bench press weights near the bench. Store your squat and row weights in an easy-to-reach spot. A thoughtful setup cuts down on setup time and keeps your workouts flowing.
Benefits of Building Your Own Rack
There are many reasons to build a DIY dumbbell rack instead of buying one. Here are the biggest advantages that make this project worthwhile.
- Cost savings. A pre-made rack can cost $100 or more. Building your own costs a fraction of that, often under $30 in materials.
- Full customization. You design the rack to fit your exact dumbbell sizes, your space, and your style.
- Satisfaction and pride. There is nothing quite like using something you built with your own hands. It adds a personal touch to your home gym.
- Skill building. This project teaches basic woodworking skills that you can apply to other DIY fitness equipment projects.
- Scalability. Start with a simple rack and expand it later as your collection grows. You can add tiers, shelves, or even a pull-up bar attachment.
Building a rack also connects you more deeply to your home gym. You become invested in the space and the equipment you use every day. That connection can fuel your motivation and help you stay consistent with your training.
Common Mistakes to Avoid
Even a simple build can go wrong if you skip important steps. Here are common mistakes and how to avoid them.
- Skipping pilot holes. This causes wood to split and weakens your joints. Always drill a pilot hole before driving in a screw.
- Using the wrong wood. Thin plywood or soft wood will warp under heavy dumbbells. Stick with quality materials that can handle the load.
- Ignoring the weight limit. Overloading your rack leads to bending, tipping, and potential injury. Know how much weight your design can hold.
- Rushing the build. Take your time with each step. Measuring, cutting, and assembling carefully pays off in the end.
- Forgetting to seal the wood. Unsealed wood absorbs sweat and moisture, leading to warping and damage over time.
Avoiding these mistakes ensures your rack is safe, sturdy, and built to last. A little extra care during the build process saves you from headaches later.
Final Thoughts
Building a weight rack for dumbbells is one of the best investments you can make for your home gym. It is affordable, practical, and deeply satisfying. You do not need to be a carpenter to build a functional rack. With the right materials, basic tools, and this guide, you can create a storage solution that keeps your gym organized and your workouts efficient.
Start with a simple design if you are new to woodworking. As your confidence grows, you can tackle more complex builds and custom features. The skills you gain from this project will serve you well in many other DIY fitness adventures. So grab your measuring tape, gather your materials, and start building today. Your organized gym and your future self will thank you.
Frequently Asked Questions
What is the easiest design for a beginner dumbbell rack?
A single-tier floor rack made from plywood and 2×4 lumber is the simplest option. It requires only basic cuts and a few screws. You can build it in an afternoon with minimal tools and no advanced woodworking experience. This design holds most standard dumbbell sets and is perfect for getting started.
How much does it cost to build a dumbbell rack?
A basic DIY rack costs between $20 and $50 in materials. Plywood, 2x4s, screws, glue, and sandpaper make up the bulk of the cost. Compare this to pre-made racks that sell for $100 or more. The savings alone make building your own rack a smart choice for any home gym.
Can I build a dumbbell rack in a small apartment?
Absolutely. A wall-mounted rack or a narrow vertical design works perfectly in small spaces. These designs take up minimal floor area while still holding your dumbbells securely. Just make sure to anchor the rack to the wall studs for safety in any living space.
What type of wood is best for a dumbbell rack?
Plywood and MDF are popular choices because they are affordable and strong. For heavier dumbbell sets, use at least 3/4-inch thick plywood. If you want a premium look, solid hardwood like oak works well but costs more. Avoid softwoods like pine for heavy-duty racks as they can dent and warp over time.
How do I make sure my rack is stable and safe?
Anchor the rack to the wall using L-brackets or heavy-duty anchors. Always use wood glue alongside screws for stronger joints. Check that all connections are tight before each use. Place rubber matting under the rack to prevent sliding and protect your floor from heavy weights.
Can I expand my dumbbell rack later as I buy more weights?
Yes, and that is one of the biggest advantages of building your own rack. Start with a basic design and add tiers, shelves, or longer side rails as your collection grows. The modular approach lets you customize the rack to your current needs and scale it up whenever you add new dumbbells to your setup.